Showing posts with label Windows. Show all posts

Tuesday, August 13, 2024

Trainsity World App


Navigate public train networks effortlessly with the Trainsity World app's high-resolution vector maps. Choose and download the maps you need, enjoying detailed zoom levels without sacrificing storage space. Access all features offline, without needing an internet connection.

Key Features:

High-Resolution Vector Maps: Crisp, clear maps with multiple zoom levels for detailed viewing.
 

Offline Functionality: Download maps and use them anytime, anywhere, without an internet connection.
 

Interactive Stations: Tap on a train station to open Google Maps, view the surrounding area, and get precise routing directions.


Optimized Travel Planning: Use the offline function to calculate the best routes between stations, complete with step-by-step directions and estimated timings. 

Train timetable: View static train line schedules, frequencies, and the first/last departures at individual stations. 

Note: Actual travel times may vary.

Discover a seamless way to explore train networks with our intuitive and efficient app. 

Available maps:

  1. Singapore
  2. Kuala Lumpur, Malaysia
  3. Sapporo, Japan
  4. Recife, Brazil
  5. Brasilia, Brazil
  6. Vancouver, Canada
  7. Hong Kong, China
  8. Bangkok, Thailand
  9. Manila, Philippines
  10. Osaka, Japan
  11. Amsterdam, Netherlands
  12. Hanoi, Vietnam  
  13. Utrecht, Netherlands
  14. Jakarta, Indonesia 
  15. Rio de Janeiro, Brazil
  16. Palembang, Indonesia
  17. Edmonton, Canada
  18. Calgary, Canada
  19. Sydney, Australia
  20. Fukuoka, Japan
  21. Paris, France
  22. Fortaleza, Brazil
  23. Montreal, Canada
  24. Rome, Italy
  25. Toronto, Canada
  26. Lyon, France
  27. Algiers, Algeria  
  28. São Paulo, Brazil
  29. Perth, Australia
  30. Ho Chi Minh City, Vietnam
  31. Milan, Italy
  32. Nuremberg, Germany 
  33. Copenhagen, Denmark
  34. Sobral, Brazil
  35. Natal, Brazil 

 Download and try out the Trainsity World app from the following stores:


Get it on Google Play 

Monday, April 12, 2021

Simple .NET5 C# example to show a Message box using AvaloniaUI

The cross platform AvaloniaUI (https://avaloniaui.net/) does not come with a message box class. In order to display message boxes like typical Windows applications, you have to use third party libraries. One such tool is the MessageBox.Avalonia NuGet package (https://github.com/AvaloniaUtils/MessageBox.Avalonia). 

This post shows how to create a simple Hello World project that calls the message box package to open up a modal message box from a main window. 

Create an AvaloniaUI MVVM project

  1. In a Terminal, type in the command to create a project:

    $ dotnet new avalonia.mvvm -o hellomsg

    The template "Avalonia .NET Core MVVM App" was created successfully.

  2. In the Terminal, change directory into the newly created project. Then install the MessageBox.Avalonia Nuget package.

    $ cd /path/to/hellomsg
    $ dotnet add package MessageBox.Avalonia


      Determining projects to restore...                                            
      Writing /tmp/tmpaumBpn.tmp                                                    
    info : Adding PackageReference for package 'MessageBox.Avalonia' into project '/path/to/hellomsg/hellomsg.csproj'
    .    
    ...etc..


Add a button to the newly created XAML file

  1. Using a text editor, open up the MainWindow.axaml file.

  2. Remove the TextBlock and add in a Button, as shown below.

    <Window xmlns="https://github.com/avaloniaui"
            xmlns:x="http://schemas.microsoft.com/winfx/2006/xaml"
            xmlns:vm="using:hellomsg.ViewModels"
            xmlns:d="http://schemas.microsoft.com/expression/blend/2008"
            xmlns:mc="http://schemas.openxmlformats.org/markup-compatibility/2006"
            mc:Ignorable="d" d:DesignWidth="800" d:DesignHeight="450"
            x:Class="hellomsg.Views.MainWindow"
            Icon="/Assets/avalonia-logo.ico"
            Title="hellomsg">
    
        <Design.DataContext>
            <vm:MainWindowViewModel/>
        </Design.DataContext>
    
        <!-- <TextBlock Text="{Binding Greeting}" HorizontalAlignment="Center" VerticalAlignment="Center"/> -->
        <Button
            Command="{Binding ShowMsgBoxCommand}"
            CommandParameter="{Binding $parent[Window]}"
            Content="Open MessageBox"
        />
    
    </Window>
    

    Note 1: The Button's Command will bind to a ShowMsgBoxCommand in the MainWindowViewModel.
    Note 2: The Button will pass in the Window object to the ShowMsgBoxCommand through the CommandParameter
    .

Create the ShowMsgBoxCommand in the View Model

  1. In a text editor, open up the file MainWindowViewModel.cs.

  2. Add in a new ReactiveCommand property and name it as ShowMsgBoxCommand.


    public ReactiveCommand<object, Unit> ShowMsgBoxCommand { get; }


    Note: this command will take in an object and return the default Unit.

  3. In the constructor, add in the code to create the ShowMsgBoxCommand command. Inside the command, create the message box, define the parameters and display it.

    ShowMsgBoxCommand = ReactiveCommand.CreateFromTask<object>( async (sender) => {
    var dialog = MessageBoxManager
                    .GetMessageBoxStandardWindow("My title", "My message");
    await dialog.ShowDialog(sender as Avalonia.Controls.Window);
    });


    Note: pass in the Window object as the owner of the message box to the ShowDialog method.

  4. The full listing of MainWindowViewModel.cs is shown below.


    using System;
    using System.Collections.Generic;
    using System.Text;
    using System.Reactive;
    using ReactiveUI;
    using MessageBox.Avalonia;
    
    namespace hellomsg.ViewModels
    {
        public class MainWindowViewModel : ViewModelBase
        {
            public ReactiveCommand<object, Unit> ShowMsgBoxCommand { get; }
            public string Greeting => "Welcome to Avalonia!";
            public MainWindowViewModel(){
                ShowMsgBoxCommand = ReactiveCommand.CreateFromTask<object>( async (sender) => {
                    var dialog = MessageBoxManager
                                    .GetMessageBoxStandardWindow("My title", "My message");
                    await dialog.ShowDialog(sender as Avalonia.Controls.Window);
                });
            }
        }
    }
    

Run the application

  1. In the Terminal, run the dotnet application.

    $ dotnet run

  2. If all is correct, the following should appear. When the button is clicked, a modal message box should pop up.


Monday, March 22, 2021

Find the location of a Docker volume on Windows

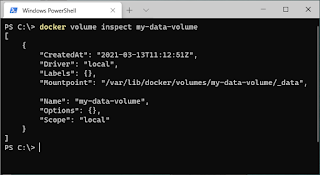
Like any Docker versions, Docker on Windows (with WSL2) can create and use Docker data volumes. The command to create a Docker volume (named as my-data-volume), as shown in the screenshot below is: 

$ docker volume create my-data-volume


The question then is where is the corresponding location of this data volume e.g. my-data-volume in the Windows file system.

Using the inspect command below to display the Docker volume details shows the following information.

$ docker volume inspect my-data-volume


The print out indicates the my-data-volume can be found at /var/lib/docker/volumes/ but the path cannot be located with the Windows Explorer.

Instead, to go to the actual location, you will have to use the WSL path e.g.

\\wsl$\docker-desktop-data\version-pack-data\community\docker\volumes\

Typing this path in Windows Explorer shows the my-data-volume location.


Monday, September 2, 2019

Resolving VeloView not displaying live sensor data from Velodyne Lidar sensors

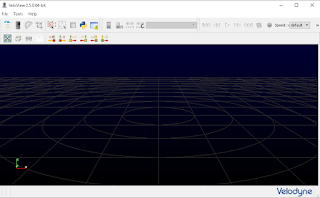
This is a fairly common problem when running VeloView with a real Velodyne Lidar sensor on Windows - even though the sensor e.g. VLP-16 or HDL-32 are powered on and connected to the host computer, no live point cloud data is displayed in VeloView. All you get is a blank screen as shown below.


The probable reason is that the Windows Defender firewall is set to block VeloView from accessing the ports used by the Velodyne sensors. Normally, Windows will prompt whether to allow the program to access the ports on the first startup of the program. If you click no to the prompt, then Windows will never ask again. To enable the ports for VeloView, you will have to manually open the ports. The steps are shown below.

  1. Click the Windows Start button. Start typing "firewall with advanced...".

    A list of matches appear.


  2. Click on Windows Defender Firewall with Advanced Security.

    The Windows Defender Firewall with Advanced Security dialog box appears.

  3. Click on Inbound Rules. Scroll the list and look for entries with the name Veloview.


  4. For each Veloview entry, double click on it.

    The Veloview Properties appear.

  5. Toggle on Enabled. Choose Allow the Connection. Click OK. Repeat for each Veloview entry.

    The entry in the list should be marked with a green tick icon.

  6. Close the dialog.

    VeloView should be able to display the live data from the Velodyne sensor.

Monday, July 15, 2019

Setup an Ubuntu VM instance on a Windows host for remote ssh access

An Ubuntu VM VirtualBox instance running as a guest OS on a Windows host can be remotely accessed via the secured ssh shell but the VirtualBox and the host OS must be configured to allow the networking traffic to pass through the ssh ports. The basic steps are: (a) to configure the Windows firewall, (b) to configure the port forwarding in Oracle VirtualBox, and (c) to install and setup the ssh server on the Ubuntu instance.

Open up the Windows firewall for Oracle VirtualBox
  1. In Windows, search for the Windows Defender Firewall with Advanced Security App and open it.


  2. Select Inbound rules. Check the VirtualBox Manager rules and if they are not enabled, double click and enable the rules.
Forward the TCP ssh ports to the Ubuntu VM
  1. Start Oracle VirtualBox.


  2. Select the Ubuntu VM, e.g. Ubuntu19. Click Settings. Then click Network.


  3. Click Port Forwarding.


  4. Click the Plus icon. Add in a new rule for Ssh with the Host Port set to 3022 and the Guest Port set to 22.

    Note: 3022 would be the port number to use to remotely access the Ubuntu VM.
  5. Click OK to all the dialog boxes.
Install openssh-server on the Ubuntu VM
  1. In Oracle VirtualBox, start the Ubuntu VM, e.g. Ubuntu19.
  2. Optional. If the openssh-server is not installed, then open up a Terminal and run the following command.

    $ sudo apt install openssh-server


  3. After the installation is completed, either reboot or restart the ssh service with the following command.

    $ service ssh restart

Remote access via ssh
  1. On a remote PC, open up a Terminal.
  2. Type in the following command to connect to the remote Ubuntu VM instance.

    $ ssh 192.168.8.157 -p 3022

    Note: where 3022 is the port number and 192.168.8.157 is the example IP address of the Windows PC hosting the Ubuntu VM instance.
    The ssh prompt appears.

Monday, July 8, 2019

Setup an Ubuntu VirtualBox instance on Windows 10 to connect to a Velodyne VLP-16 sensor

An Ubuntu 18.04 guest OS virtual machine running on a Windows 10 host can connect to a Velodyne VLP-16 LiDAR sensor and process the sensor's data and positioning packets. However, the VirtualBox Ubuntu guest OS must be configured properly to transfer the LiDAR data packets from the host OS to the guest OS. The following steps show how to perform the settings.
  1. On Windows, open the Internet and Network Settings.

     
  2.  Click the Change adapter options.

    The Network Connections window opens.
  3. Right click on the Local Area Connection icon. Choose Properties.

    The Local Area Connection Properties dialog box appears.
  4. Select Internet Protocol Version 4. Click Properties.

    The Internet Protocol Version 4 (TCP/IPV4) Properties appear.
  5. Toggle on Use the following IP address. In the IP address field, type in the following address:

    192.168.1.77
  6. Click OK to all the dialog boxes.

    The local Windows machine IP address is changed to 192.168.1.77


  7. Optional. If necessary, use the Windows Defender Firewall with Advanced Security App to open up the host Windows OS UDP ports for Oracle VirtualBox. In the Inbound Rules, make sure the VirtualBox Manager entries are enabled, as shown below.


  8. Now start Oracle VirtualBox.

    The Oracle VM VirtualBox Manager appears.
  9. Select the Ubuntu instance, e.g. Ubuntu18. Then click Settings.

    The Ubuntu18 Settings dialog box appears.
  10. Click Network. Then click the Port forwarding button.

    The Port forwarding rules dialog box appears.
  11. Click the Plus icon and add in two UDP protocol rules as shown below.


    Note: The rules will forward UDP packets from ports 2368 and 8308 on the Windows host to the same ports on the Ubuntu guest.
  12. Click OK.
  13. Now start the Ubuntu18 host.
  14. Login to Ubuntu and run Veloview. In Veloview, connect to the Velodyne VLP-16 sensor stream as per normal.

    The LiDAR point cloud is displayed.

Monday, July 1, 2019

How to setup a Ubuntu VirtualBox for remote telnet access

An Ubuntu 19.05 VirtualBox instance running on a Windows machine can be configured to be accessible remotely via telnet.

This can be simply by configuring the Ubuntu VirtualBox instance's network port forwarding in the VirtualBox graphical user interface. The following points illustrate the procedure.

Configure Oracle VirtualBox
  1. Start Oracle VirtualBox.

  2. Select the Ubuntu instance e.g. Ubuntu19. Click the Settings icon.
  3. In the Settings dialog box, select Network.

  4. Click the buton Port forwarding.

    The Port Forwarding Rules dialog box appears.
  5. Click the Add icon.

  6. Change the Host Port to an unused port e.g. 3023. Change the Guest Port to 23.

    Note: in this example, when accessing remotely, the port called should be 3023.
  7. Click OK to all the boxes.
Now run up the Ubuntu instance. If the telnet server is not installed, the open up a Terminal and run the following command.

$ sudo apt install telnetd

Then either restart the service or simply reboot.

On a remote computer, type in the following command to access the Ubuntu instance.

$ telnet 192.???.???.??? 3023

Note: replace 192.???.???.??? with the IP address of the Windows host

Note: If all the parameters are correct, the telnet response should be displayed as shown below.


Monday, September 24, 2018

Use CMake to build Visual Studio C++ projects with PDAL on Windows

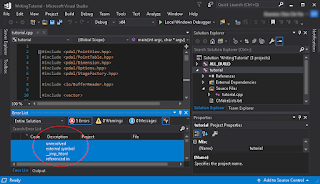
The tutorial on the PDAL website https://pdal.io/development/writing.html provides the details on developing and compiling a simple C++ program using the PDAL API on *nux. I followed the steps but encountered errors trying to compile the example on Windows 10. The following screenshot shows the compilation errors - the Microsoft Visual Studio linker could not find some external symbols such as __imp_htonl_ among others.


To fix the compilation errors, the Windows library ws2_32.lib needs to be linked to the final executable. This can be done in the following steps:
  1. Add the library ws2_32 to the CMakeLists.txt file, as shown below.

  2. Run CMake to build the Visual Studio project files.

    C:\> cmake -G"Visual Studio 15 2017 Win64" ..


    The project files are generated.

  3. Open up the solution project in Visual Studio. Then build the solution.

    The project is successfully built and the executable is generated.

Monday, September 19, 2016

Create a Windows Installer using CMake and CPack

CMake can be used to create a Windows installer with CPack and NSIS (Nullsoft Scriptable Install System). NSIS can be downloaded from http://nsis.sourceforge.net. This post follows and extends the tutorial from the CMake Wiki at https://cmake.org/Wiki/CMake:Component_Install_With_CPack.

I wanted to build a Windows installer for a 64 bit Visual Studio application that was build-managed using CMake. This post makes use of the example source code downloadable from https://cmake.org/Wiki/File:ComponentExampleStart.zip.

Add in CPACK macros to CMakeLists.txt
  1. Download and extract the example zip file into a folder e.g. D:\Temp\ComponentExampleStart\ as shown below. I then created a build sub-folder build underneath the D:\Temp\ComponentExampleStart\Source\ folder.
  2. Use a text editor and edit the CMakeLists.txt file to add in CPACK macros according to the Wiki. An edited example is shown below.
cmake_minimum_required(VERSION 2.6.0 FATAL_ERROR)
project(MyLib)

add_library(mylib mylib.cpp)

add_executable(mylibapp mylibapp.cpp)
target_link_libraries(mylibapp mylib)

install(
  TARGETS mylib 
  ARCHIVE
  DESTINATION lib
  COMPONENT libraries
  )
install(
  TARGETS mylibapp
  RUNTIME
  DESTINATION bin
  COMPONENT applications
  )
install(
  FILES mylib.h
  DESTINATION include
  COMPONENT headers
  )
#
# CPACK macros below here
#
set (CPACK_PACKAGE_NAME "MyLib")
set (CPACK_PACKAGE_VENDOR "CMake.org")
set (CPACK_PACKAGE_DESCRIPTION_SUMMARY "MyLib - CPack Component Installation Example")
set (CPACK_PACKAGE_VERSION "1.0.0")
set (CPACK_PACKAGE_VERSION_MAJOR "1")
set (CPACK_PACKAGE_VERSION_MINOR "0")
set (CPACK_PACKAGE_VERSION_PATCH "0")
set (CPACK_PACKAGE_INSTALL_DIRECTORY "CPack Component Example")

# Define components and their display names
set (CPACK_COMPONENTS_ALL applications libraries headers)
set (CPACK_COMPONENT_APPLICATIONS_DISPLAY_NAME "MyLib Applications")
set (CPACK_COMPONENT_LIBRARIES_DISPLAY_NAME "Libraries")
set (CPACK_COMPONENT_HEADERS_DISPLAY_NAME "C++ Headers")

# Human readable component descriptions
set (CPACK_COMPONENT_APPLICATIONS_DESCRIPTION
  "An extremely useful application that makes use of MyLib")
set (CPACK_COMPONENT_LIBRARIES_DESCRIPTION
  "Static libraries used to build programs with MyLib")
set (CPACK_COMPONENT_HEADERS_DESCRIPTION
  "C/C++ header files for use with MyLib")

# Define dependencies between components
set (CPACK_COMPONENT_HEADERS_DEPENDS libraries)

# Define groups
set(CPACK_COMPONENT_APPLICATIONS_GROUP "Runtime")
set(CPACK_COMPONENT_LIBRARIES_GROUP "Development")
set(CPACK_COMPONENT_HEADERS_GROUP "Development")

set(CPACK_COMPONENT_GROUP_DEVELOPMENT_DESCRIPTION
   "All of the tools you'll ever need to develop software")

# Define NSIS installation types
set(CPACK_ALL_INSTALL_TYPES Full Developer)
set(CPACK_COMPONENT_LIBRARIES_INSTALL_TYPES Developer Full)
set(CPACK_COMPONENT_HEADERS_INSTALL_TYPES Developer Full)
set(CPACK_COMPONENT_APPLICATIONS_INSTALL_TYPES Full)
 
# Must be after the last CPACK macros
include(CPack)

Generate the Visual Studio solution

  1. Open up a Command Prompt. Change to the build directory.

    D:> cd \temp\ComponentExampleStart\Source\build
  2. Use the cmake command to generate the build files.

    D:> cmake -G "Visual Studio 14 2015 Win64" ..

    The build files are generated.
Build the Visual Studio solution and generate the installer
  1. Using Visual Studio, open up the generated solution e.g. MyLib.sln.

  2. Since I wanted a release build, in Visual Studio I changed from Debug to Release, as shown below. Then I selected Build.

    The release binaries are generated.
  3. Next, in the Solution Explorer, select and mouse right click on the PACKAGE project.

    A pop down menu appears.
  4. Choose Build.


    CPack processing message appears.


    The NSIS installer is generated.


Monday, August 8, 2016

Use CMake to help build and use a Windows dll

I wanted to use Windows c++ classes and use them in another c++ applications through shared Windows DLLs, while using CMake to generate build files and Visual Studio to compile into final executables. I spent some time figuring out how to do it and the following steps illustrate a simple example.

Create a Windows DLL
The first step is to create a Windows DLL and export the functions that will be called by other methods.

Listing of Animal.h
1
 2
 3
 4
 5
 6
 7
 8
 9
10
11
#include <string>

using namespace std;

class Animal {
private:
    string name;
public:
    Animal(string);
    virtual void print_name();
};

Listing of Animal.cpp
1
 2
 3
 4
 5
 6
 7
 8
 9
10
#include <iostream>
#include "Animal.h"

using namespace std;

Animal::Animal(string name):name (name){}

void Animal::print_name(){
    cout << "Name is " << this->name << endl;
}

The Animal.h and Animal.cpp files are placed in the include and src folders under the [example root folder]\animallib_shared\ folder, as shown below.


The next thing to do is to create the CMakeLists.txt in the Windows DLL project e.g. [example root folder]\animallib_shared\ folder.
1
 2
 3
 4
 5
 6
 7
 8
 9
10
11
12
13
14
15
16
17
18
19
20
21
22
23
cmake_minimum_required(VERSION 2.8.6)
project (animallib)
set (CMAKE_BUILD_TYPE Debug)

#include *.h files under include folder and  
#the project's output folder e.g. Debug
include_directories (include ${PROJECT_BINARY_DIR})

#compile all *.cpp source files under src folder
file (GLOB SOURCES "src/*.cpp")

#output library as animallib.*

#output library export file *.lib and
#output macro definitions include file
include (GenerateExportHeader)
add_library(animallib SHARED ${SOURCES})
GENERATE_EXPORT_HEADER (animallib
    BASE_NAME animallib
    EXPORT_MACRO_NAME animallib_EXPORT
    EXPORT_FILE_NAME animallib_Export.h
    STATIC_DEFINE animallib_BUILT_AS_STATIC
)

Next, we have to modify the header (*.h) and source code (*.cpp) files to add in the Windows export macro animallib_EXPORT and cmake generated header file animallib_Export.h.
Listing of modified animal.h
1
 2
 3
 4
 5
 6
 7
 8
 9
10
11
12
13
#include <string>

#include "animallib_Export.h"

using namespace std;

class Animal {
private:
    string name;
public:
    animallib_EXPORT Animal(string);
    virtual animallib_EXPORT void print_name();
};
Listing of modified Animal.cpp

1
 2
 3
 4
 5
 6
 7
 8
 9
10
11
12
#include <iostream>
#include "Animal.h"

#include "animallib_Export.h"

using namespace std;

animallib_EXPORT Animal::Animal(string name):name (name){}

animallib_EXPORT void Animal::print_name(){
    cout << "Name is " << this->name << endl;
}

Open up a Windows Command prompt and change directory to the build folder of the Windows DLL project e.g. [example root folder]\animallib_shared\build\ folder.

Type in the cmake command (assuming cmake is in the PATH environment variable):
C:> cd \path\to\example\animallib_shared\build
C:> cmake ..
Build files are generated
The generated build files
Open up the generated Visual Studio solution file [example root folder]\animallib_shared\build\animallib.sln in Visual Studio. Then select Build | Build Solution to compile the Windows DLL.
Compilation messages
The generated *.dll and export library *.lib files under [example root folder]\animallib_shared\build\Debug\
Using the Windows DLL in a separate C++ application
Now that the Windows DLL has been generated and the functions exported, the next thing is to use the DLL's classes and functions in an application e.g. UseAnimalLib project under [example root folder]\useanimallib\]

Listing of uselib.cpp

1
 2
 3
 4
 5
 6
 7
 8
 9
10
11
12
#include "Animal.h"

#include "animallib_Export.h"

int main(int argc, char *argv[]){
    //Create a new animal instance with name Dog
    Animal animal("Dog");

    //try to call the class's print_name method
    animal.print_name();
    return (0);
}

Then create a CMakeLists.txt file under the [example root folder]\useanimallib\ folder.


1
 2
 3
 4
 5
 6
 7
 8
 9
10
11
12
13
14
15
cmake_minimum_required(VERSION 2.8.6)
project (UseAnimalLib)

set (EXAMPLE_DIR d:/path/to/example/root/folder)

set (PROJECT_LINK_LIBS animallib.dll)
link_directories (${EXAMPLE_DIR}/animallib_shared/build/Debug)

include_directories (${EXAMPLE_DIR}/animallib_shared/include ${EXAMPLE_DIR}/animallib_shared/build)

#compile all *.cpp source files under src folder
file (GLOB SOURCES "src/*.cpp")

add_executable(uselib ${SOURCES})
target_link_libraries (uselib ${PROJECT_LINK_LIBS})

Open up a Windows Command Prompt. Change directory to the [example root folder]\useanimallib\build folder.
C:> cd \path\to\example\useanimallib\build
C:> cmake ..

The build files are generated


The generated build files


Open up the generated solution file e.g. [example root folder]\useanimallib\build\Debug\uselib.sln using Visual Studio and build the solution.
Building the solution
The executable that uses the Windows DLL can now be run in a Command Prompt, assuming the DLL is in the PATH environment variable, as shown below.