Showing posts with label Proj4. Show all posts

Monday, May 16, 2022

Convert Geoids from BYN to GTX format with this WebApp

This WebApp came about because I wanted to use some Geoid files for some vertical datum corrections with Proj (which uses .gtx format) but could only find Geoid files in Natural Resources Canada's .byn format.

  1. To convert Geoid BYN files to GTX, open up a browser to the following url: https://dominoc925-pages.appspot.com/webapp/byn2gtx/index.html.


    The WebApp is loaded.


  2. Click the Add File button.

    The File Upload dialog appears.


  3. Browse and select a .byn file e.g. EGM96.byn. Click Open.


    The Geoid file is displayed in a list and the Convert button is enabled.
    Note: the Geoid .byn is loaded locally to the browser and not transferred to some server on the Internet.


  4. Click the Convert button.

    The Geoid file is converted into .gtx format and the Process log and Save As icons are enabled.


  5. Optional. To view the process log, click the Show Process Log icon.

    The process log messages are displayed.


  6. To save the converted .gtx Geoid locally, click the Save Converted File icon.

    The Geoid file is saved.


  7. Optional. If necessary, you can use a GIS software like QGIS to display the converted .gtx file, as shown below.


Monday, February 1, 2021

Koordinat2 WebApp for geo-coordinates conversion and display

Koordinat2 WebApp (https://dominoc925-pages.appspot.com/webapp/koordinat2/default.html) was developed using ReactJS and WebAssembly for converting geo-coordinates and showing them on a map. The WebApp uses Proj4 in the backend for performing the projection conversion and datum conversion; hence it supports over a thousand coordinate reference systems. 

Using the Koordinat2 WebApp is easy. The following shows what can be done with the WebApp.

Opening the WebApp

  1. Using a modern browser, open up the the Koordinat2 WebApp at this url https://dominoc925-pages.appspot.com/webapp/koordinat2/default.html

    The WebApp page is displayed.


Choosing Coordinate Systems

  1. To define the primary input coordinate system, click the gear icon in the Input Coordinates panel.

    The Select Source Coordinate System dialog appears.


  2. In the Search field, type in a EPSG code e.g. 3414 for SVY21. Or type in part of a coordinate system name, e.g. Borneo.

    One or more entries are listed.


  3. Click on a listed entry, e.g. Timbalai 1948 / RSO Borneo (m).

    The selected coordinate system is chosen.


  4. To define the secondary or output coordinate system, click the gear icon in the Output Coordinates panel.


  5. Choose the Output coordinate system e.g. EPSG 4326 using similar procedure as the previous steps 3 to 4.

Converting Coordinates

  1. To convert coordinates in the Input Coordinate system, type in the Easting and Northing (or Latitude and Longitude) values in the corresponding entry fields.

    The converted coordinates are displayed immediately in the Output Coordinates Longitude and Latitude fields (or Easting and Northing fields).

    A corresponding marker is also created on the Map pointing to the location of the coordinate.


  2. Optional. Clicking on the marker will pop up a moveable Information box.


Displaying Coordinates of Map Locations

  1. To display coordinates of locations on the map, simply click the map location with the mouse.

    A marker is placed at the clicked location.

    The clicked location coordinates are displayed in the Input Coordinates and Output Coordinates panels.
     

  Displaying a Grid

  1. On the toolbar on the top right, click the Grid icon.

    The Select Grid Settings dialog box appears.


  2. Optional. Click the Line color field to choose a grid color.

  3. In the Grid type field, choose the grid type to display e.g. UTM or Geographic.

  4. Click Okay.

    The selected grid is displayed on the map.

Selecting a Base Layer

  1. On the tool bar on the top right, click the Layer icon.

    The Select Base Layer dialog box appears.

     
  2.  Choose a layer to display, e.g. Open Street Map Landscape.

    The base layer changes to the selected layer.

Monday, March 25, 2013

Build the basic liblas for 64 bit Windows (no GDAL and GeoTIFF support)

In order to build 64 bit Windows binaries of liblas, the header files and 64 bit binaries for Boost must be accessible by Microsoft Visual Studio. The CMake utility from http://www.cmake.org needs to be used to configure and generate the Microsoft Visual Studio project files for liblas. The following illustrates how I build the basic liblas 64 bit binaries (no GDAL or GeoTIFF support). Note that the 64-bit executables may not run successfully even though the compilation is successful depending on how the source code was written.
  1. Download the latest liblas source code from http://www.liblas.org/download.html. Extract the files to a folder e.g. E:\Work\src\liblas-1.7.0\.
  2. On the Windows Desktop, select Start | All Programs | CMake 2.8 | CMake (cmake-gui).

    The CMake application appears.
  3. In the Where is the source code field, click Browse Source.

    The Browse for Folder dialog box appears.
  4. Select the folder where the liblas archive was extracted, e.g. E:\Work\src\libLAS-1.7.0\. Click OK.
  5. In the Where to build the binaries field, click Browse Build.

    The Browse for Folder dialog box appears.
  6. Select or create the folder where the Microsoft Visual Studio solution project files will be created e.g. E:\Work\src\libLAS-1.7.0\bin\. Click OK.

  7. Click Configure.

    A prompt appears.
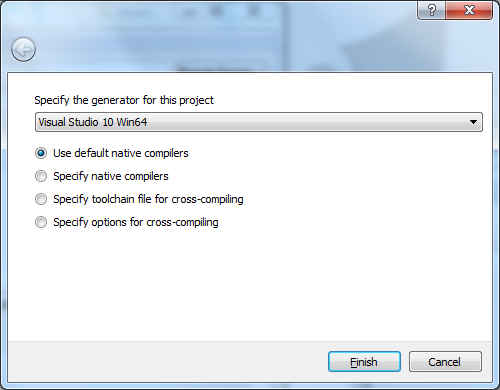
  8. In the combo box, choose a generator for this project e.g. Visual Studio 10 Win64. Click Finish.

    A Error message appears.
  9. Close the message.

  10. In the list box, select Boost_INCLUDE_DIR. Then click the browse [...] button.

    The Browse For Folder dialog box appears.
  11. Choose the root folder containing Boost e.g. E:\Work\src\boost_1_52_0\. Click OK.

    Note: the boost folder containing the header include files should be underneath the root folder.
  12. Click Configure again.

    The configuration files are created.
  13. Click Generate.

    The Microsoft Visual Studio project files are generated the specified destination build folder.
  14. Close CMake.
  15. Run Microsoft Visual Studio 2010. Open up the libLAS.sln file.
  16. Press F7 to build all the projects.

    The 64 bit liblas binaries are generated.

Monday, March 4, 2013

How to build 64-bit versions of libgeotiff for Windows

I could not find 64-bit binaries of the open-source libGeotiff library so I decided to download the most recent source code from http://trac.osgeo.org/geotiff/ so that I could use Microsoft Visual Studio 2010 to compile make my own. Other libraries are also required so I downloaded the latest source code for libTiff from http://download.osgeo.org/libtiff/ and Proj4 from http://trac.osgeo.org/proj/. I have no problems compiling libTiff and Proj4 as is but I had to modify the libGeotiff's makefile.vc file to make it compile successfully. Note that successful compilation does not necessarily mean the 64 bit executables will run successfully.


Compile 64 bit version of Proj4
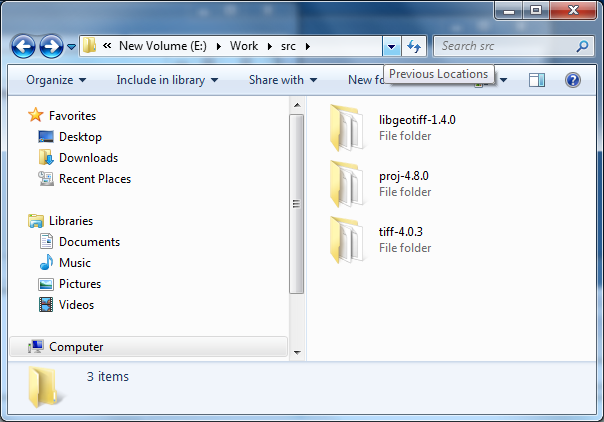
  1. Extract the Proj4 source code into a folder e.g. C:\Work\src\proj-4.8.0\
  2. Select Start | All Programs | Microsoft Visual Studio 2010 | Visual Studio Tools | Visual Studio x64 Win64 Command Prompt.

    The Win64 Command Prompt appears.
  3. In the Command Prompt, type in and enter the following:

    C:\> cd \Work\src\proj-4.8.0
  4. Run the nmake build command in the Command Prompt:

    C:\> nmake /f makefile.vc

    The 64 bit version of Proj4 is created.
Compile 64 bit version of libTiff
  1. Extract the libTiff source code into a folder e.g. C:\Work\src\tiff-4.0.3\.
  2. Open up the Win64 Command Prompt if it is not  already on the screen.
  3. In the Command Prompt, type in the following command.

    C:\> cd \Work\src\tiff-4.0.3\
  4. Run the nmake build command in the Command Prompt.

    C:\> nmake /f makefile.vc

    The 64 bit version of libTiff is created.
Compile 64-bit version of libGeotiff
  1. Extract the libGeotiff source code into a folder e.g. C:\Work\src\libgeotiff-1.4.0\.
  2. Use a text editor to open up the header file geo_config.h. Add in the line #define BUILD_AS_DLL 1 as shown in red below.

    /* geo_config.h.  Generated from geo_config.h.in by configure.  */
    #ifndef GEO_CONFIG_H
    #define GEO_CONFIG_H
    
    #define BUILD_AS_DLL 1
    
    /* Define if you have the ANSI C header files.  */
    #define STDC_HEADERS 1
    
    /* Define if you have the <stdlib.h> header file.  */
    #define HAVE_STDLIB_H 1
    
    /* Define if you have the <string.h> header file.  */
    #define HAVE_STRING_H 1
    
    /* Define if you have the <strings.h> header file.  */
    #define HAVE_STRINGS_H 1
    
    #define HAVE_LIBPROJ 1
    /* #undef HAVE_PROJECTS_H */
    
    #endif /* ndef GEO_CONFIG_H */
    

  3. Use a text editor to open up the libGeotiff's makefile.vc file.
  4. Replace the contents of makefile.vc with the contents below.

    Note: the parts that were modified are colored in red.
    #
    # Typically the only thing that needs to be changed are the paths to the
    # TIFF tree.  Note that we expect an existing build tree, in part because we
    # need private include files from libtiff, but also we need access to getopt.h.
    # in the ports directory.
    #
    # You may want to add optimization options to the CFLAGS macro as well. 
    #
    
    TIFF = C:\Work\src\tiff-4.0.3
    PROJ4 = C:\Work\proj-4.8.0
    
    TIFF_INC = -I$(TIFF)\libtiff
    TIFF_LIB = $(TIFF)\libtiff\libtiff.lib
    TIFF_LIB_DLL = $(TIFF)\libtiff\libtiff_i.lib
    PROJ4_INC = -I$(PROJ4)\src
    PROJ_LIB = $(PROJ4)\src\proj.lib
    PROJ4_LIB_DLL = $(PROJ4)\src\proj_i.lib
    
    # Installation locations (with install, or devinstall targets)
    PREFIX =    release    
    BINDIR =    $(PREFIX)\bin
    LIBDIR =    $(PREFIX)\lib
    INCDIR =    $(PREFIX)\include
    DATADIR =    $(PREFIX)\share\epsg_csv
    
    #
    CC      = cl
    INCL    = -I. -Ilibxtiff $(TIFF_INC) $(PROJ4_INC)
    
    
    # Pick the first LIBS definition for a static libtiff.lib or the second
    # to link against the libtiff DLL.
    
    #LIBS    = geotiff.lib $(TIFF_LIB) $(PROJ4_LIB)
    LIBS    = geotiff_i.lib $(TIFF_LIB_DLL) $(PROJ4_LIB_DLL)
    
    DLLNAME = geotiff.dll
    
    # Set optimization or debug flags here.
    CFLAGS  = $(INCL) /MD /Ox /nologo
    #CFLAGS  = $(INCL) /MD /Zi /nologo
    
    #
    OBJS    = \
        xtiff.obj \
        geo_free.obj \
        geo_get.obj \
        geo_names.obj \
        geo_new.obj \
        geo_print.obj \
        geo_set.obj \
        geo_tiffp.obj \
        geo_write.obj \
        geo_extra.obj \
        geo_trans.obj \
        geo_normalize.obj \
        geotiff_proj4.obj \
        geo_simpletags.obj \
        cpl_csv.obj \
        cpl_serv.obj
    
    all:    geo_config.h geotiff.lib $(DLLNAME) listgeo.exe geotifcp.exe
    
    listgeo.exe:    bin\listgeo.c geotiff.lib
        $(CC) $(CFLAGS) bin\listgeo.c $(LIBS)
        
    geotifcp.exe:    bin\geotifcp.c geotiff.lib
        $(CC) $(CFLAGS) bin\geotifcp.c bin\getopt.c $(LIBS)
        
    gt_update.exe:    bin\gt_update.c geotiff.lib
        $(CC) $(CFLAGS) bin\gt_update.c bin\getopt.c geotiff.lib $(LIBS)
        
    geotiff.lib:    $(OBJS)
        lib /out:geotiff.lib $(OBJS)
    
    #
    $(DLLNAME):    $(OBJS)
        link /dll /out:$(DLLNAME) /implib:geotiff_i.lib $(OBJS) $(TIFF_LIB_DLL) $(PROJ4_LIB_DLL)
        if exist $(DLLNAME).manifest mt -manifest $(DLLNAME).manifest -outputresource:$(DLLNAME);2
    
    geo_config.h:    geo_config.h.vc
        copy geo_config.h.vc geo_config.h
    
    xtiff.obj: libxtiff\xtiff.c
        $(CC) -c $(CFLAGS) libxtiff\xtiff.c
    
    geo_free.obj: geo_free.c
        $(CC) -c $(CFLAGS) geo_free.c
    
    geo_get.obj: geo_get.c
        $(CC) -c $(CFLAGS) geo_get.c
    
    geo_names.obj: geo_names.c
        $(CC) -c $(CFLAGS) geo_names.c
    
    geo_new.obj: geo_new.c
        $(CC) -c $(CFLAGS) geo_new.c
    
    geo_print.obj: geo_print.c
        $(CC) -c $(CFLAGS) geo_print.c
    
    geo_set.obj: geo_set.c
        $(CC) -c $(CFLAGS) geo_set.c
    
    geo_tiffp.obj: geo_tiffp.c
        $(CC) -c $(CFLAGS) geo_tiffp.c
    
    geo_write.obj: geo_write.c
        $(CC) -c $(CFLAGS) geo_write.c
    
    geo_trans.obj: geo_trans.c
        $(CC) -c $(CFLAGS) geo_trans.c
    
    geo_extra.obj: geo_extra.c
        $(CC) -c $(CFLAGS) geo_extra.c
    
    geo_normalize.obj: geo_normalize.c
        $(CC) -c $(CFLAGS) geo_normalize.c
    
    geotiff_proj4.obj: geotiff_proj4.c
        $(CC) -c $(CFLAGS) geotiff_proj4.c
    
    cpl_csv.obj: cpl_csv.c
        $(CC) -c $(CFLAGS) cpl_csv.c
    
    cpl_serv.obj: cpl_serv.c
        $(CC) -c $(CFLAGS) cpl_serv.c
    
    clean:
        -del *.obj
        -del *.exe
        -del *.lib
        -del *.dll
        -del *.manifest
    
    install:    all
        -mkdir $(PREFIX)
        -mkdir $(BINDIR)
        -mkdir $(DATADIR)
        copy *.dll $(BINDIR)
        copy *.exe $(BINDIR)
        -copy csv\*.csv $(DATADIR)    
    
    devinstall:    install
        -mkdir $(INCDIR)
        -mkdir $(LIBDIR)
        copy *.lib $(LIBDIR)
        copy *.h $(INCDIR)
        copy libxtiff\*.h $(INCDIR)
        copy *.inc $(INCDIR)


  5. Save and close the text editor.

  6. Open up the Win64 Command Prompt if it is not on the screen.
  7. In the Command Prompt, type in the following.

    C:\> cd \Work\src\libgeotiff-1.4.0\
  8. Run the nmake build command in the Command Prompt.

    C:\> nmake /f makefile.vc
    The 64 bit libgeotiff files are created.