Showing posts with label Gimp. Show all posts

Monday, December 5, 2022

Using GIMP to copy an image layer into a channel

In GIMP, it is possible to copy a colored image layer into a single grayscale channel. Here's how to do the job.

Create an empty channel

  1. In GIMP, open up the image file.


  2. Click the Channels tab on the bottom right.


  3. Then click the Create a new channel icon.

    The New Channel dialog box appears.


  4. Optional. In the Channel name field, type in a name, e.g. flats. In the Fill opacity field, slide to 50.0.
     
  5. Click OK.

    A new channel is created.

Copy and paste the colored image into the channel

  1. Click the Layers tab. Click the image layer, e.g. bored-tiger.jpg to make sure it is active.


  2. In the menu, choose Select | All. Then choose Edit | Copy.

    The layer is copied to the clipboard.

  3. Click the Channels tab. Click the previously created channel, e.g. flats.


  4. In the menu, select Edit | Paste in Place


  5. Then click the Layers tab.

    A Floating Selection (Pasted Layer) is visible in the Layers list.


  6. Click the green Anchor the floating layer icon.

    The pasted layer is added to the active channel.

  7. Optional. Click the Channels tab.

    Note the channel thumbnail has been updated with a grayscale image of the pasted layer.

Monday, November 28, 2022

Using GIMP's color channels to remove blue guide lines from inked line art

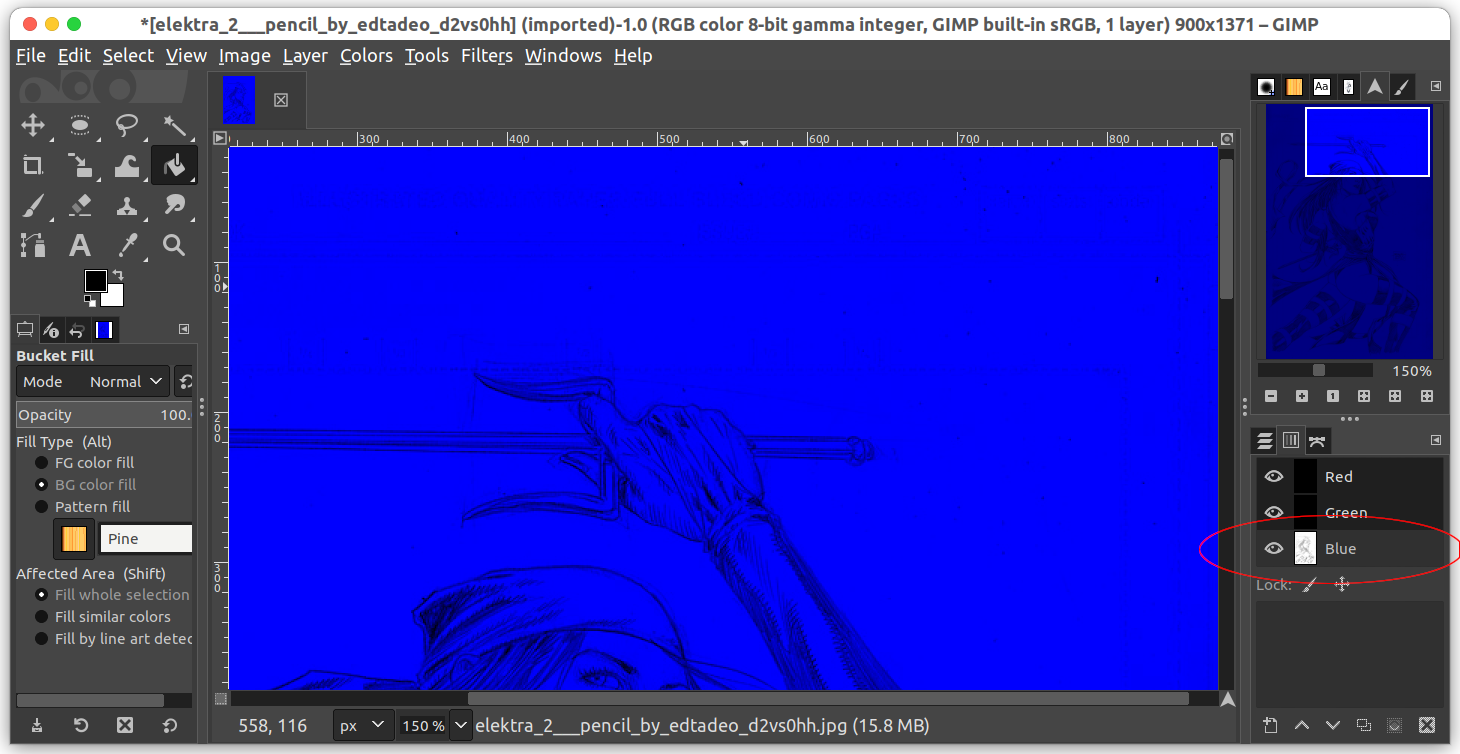
Penciled comic book art typically have blue guide lines (and text) as shown in the screen shot below. 

The sketch can be downloaded from this site https://www.deviantart.com/edtadeo/art/Elektra-2-Pencil-174307445 if you want to practice with it. There are a number of ways to remove the blue lines from the image. I will be using the Color channels panel to remove the guide lines.

The steps:

Remove pixels from the Red and Green channels

  1. In GIMP, open up the image. Click the Channels tab on the bottom right.


  2. Click the Blue channel to deselect it.


  3. In the Tool palette, click the Fill icon.


  4. Toggle on the FG color fill. Make sure the foreground color is black since we want to remove the Red and Green channels data.


  5. Then, click anywhere on the canvas.

    The background becomes blue.


Create the line art in the Red and Green channels

  1.  In the Channels tab, press the mouse right click button on the Blue channel.

    A popup menu appears.


  2. Choose Channel to Selection.

    The blue channel's non-zero pixels are selected.


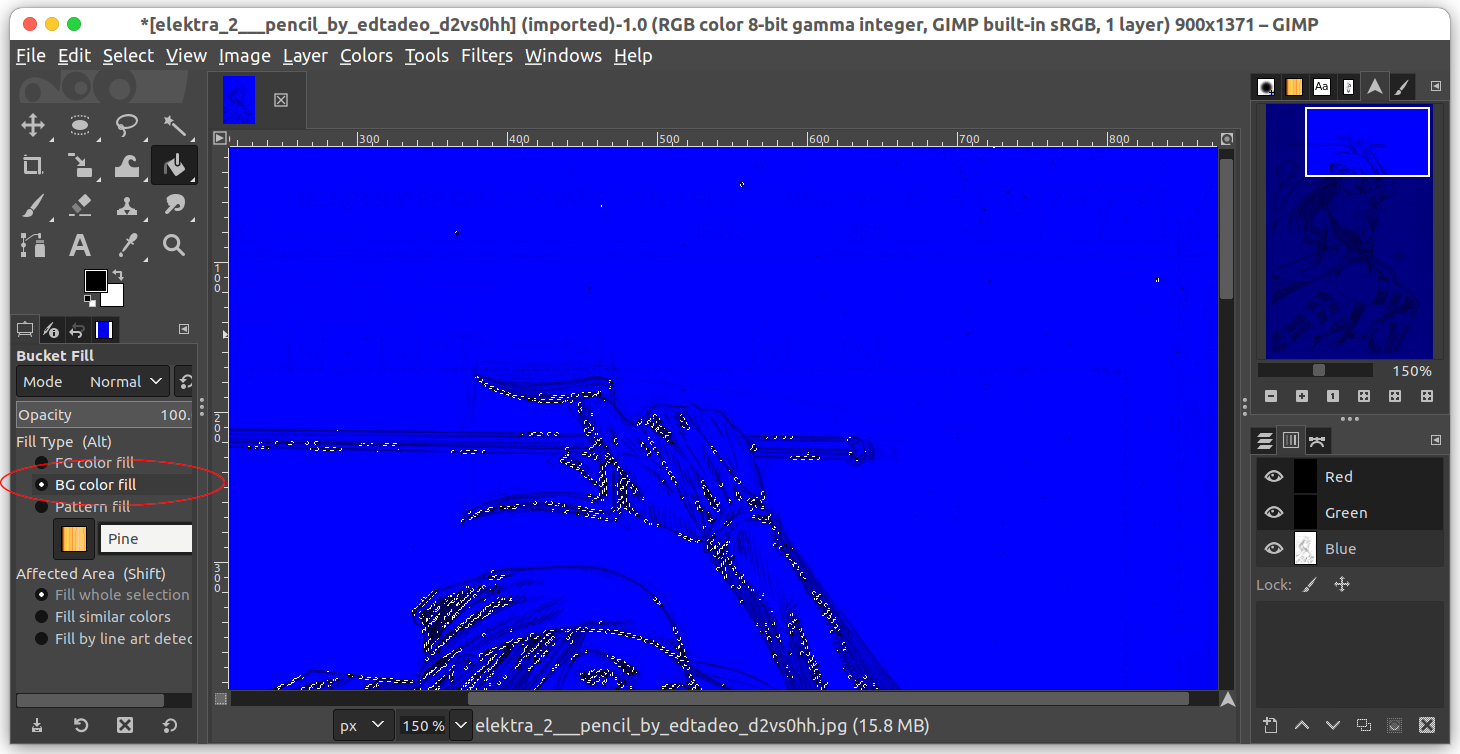
  3. In the Tool box, click the Fill icon. Toggle on the BG color fill option. (Note: the background color should be white). Then click anywhere in the selection on the canvas.

    The background becomes white.


  4. In the Channels tab, click the Blue channel to select it again.  Then in the menu, choose Select | None to clear the selection.


Use Threshold to clean up the line work

  1. In the menu, select Colors | Threshold.

    The Threshold dialog box appears.

     
  2.  Drag the black triangle until you are satisfied with the contrast between the line work and the background.


  3. Save your work.

Monday, December 8, 2014

Correcting color cast problems in aerial photographs using curves in Gimp

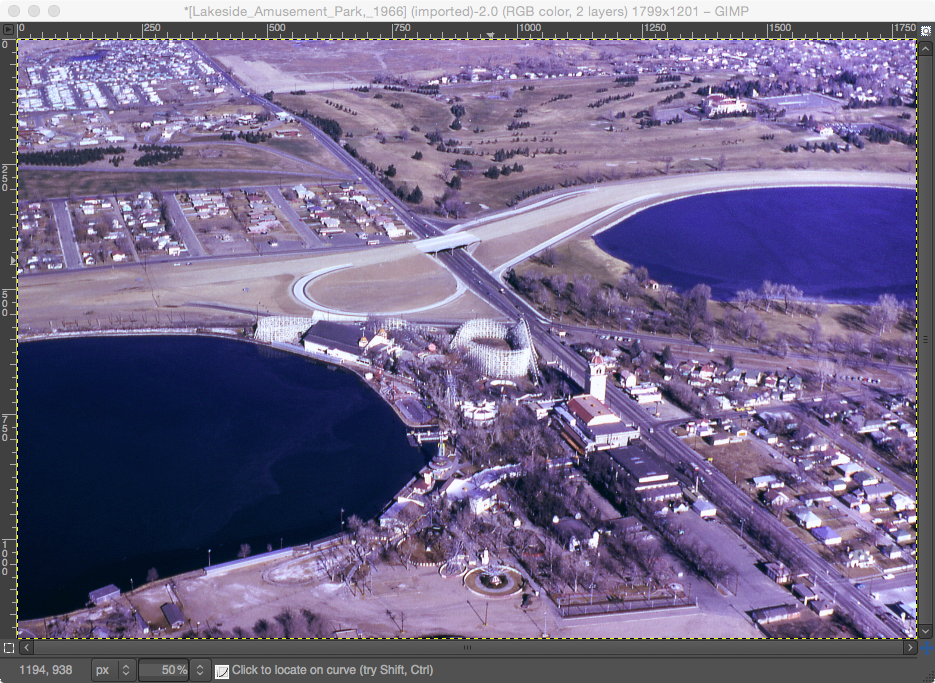
In some cases, it may be necessary to correct color cast problems from aerial photographs due to atmospheric haze or sensor problems. An example of an image with a color cast problem is shown below. You can download the file from http://commons.wikimedia.org/wiki/File:Lakeside_Amusement_Park,_1966.jpg.


Note: aerial photograph courtesy of http://www.airlinesafety.com/editorials/AboutTheEditor.htm.

The Curves correction function in just about any image processing software can be used to easily correct the color cast problem. The open source application Gimp is used in this example.

The key to solving the problem is to use the fact that the color gray has the same RGB values. If a gray colored feature in the image e.g. an asphalt road has unequal RGB values, than the image has a color cast problem. To correct the problem, all you have to do is to get the RGB values for that gray point in the image to be the same using the Curves function.  It may be necessary to do the correction in the middle, dark and light tones. The following example illustrates how to correct the color cast problem.

  1. Start Gimp and open the aerial photograph. Optional. Make a duplicate layer of the image.

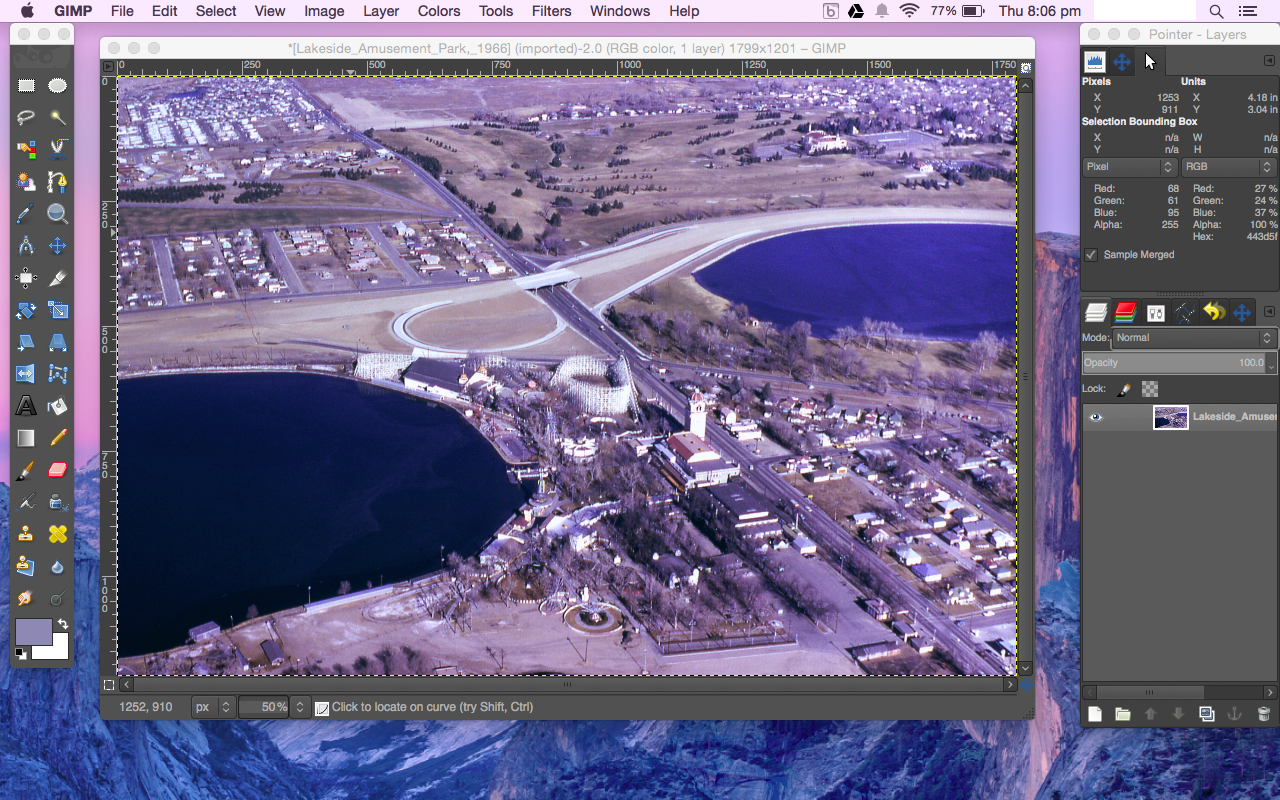
  2. If the Pointer window is not displayed, then select Windows | Dockable Dialogs | Pointer.

    Note: the circled area displays the RGB in pixel or percentage values.
  3. Move the pointer around the mid tone gray colored feature e.g. paved road, as shown in the screenshot below. Observe the RGB values in the Pointer window.

    Note: in this example, the RGB values are 142, 140, 189 or 55%, 55%, 74%. The numbers say that there is a blue cast in the mid tone values i.e. the blue values are too high and will have to be lowered. The red and green values are okay. 
  4. Select Colors | Curves.

    The Adjust Color Curves dialog box appears.
  5. Since blue is the problem color, select Blue in the Channel field. Then drag down the blue curve at around 189 pixel value as shown in the screenshot below. You can also move the cursor to the mid tone gray feature and check the new RGB values in the Pointer window. The correction is complete when the RGB values are about equal.

    Note: if the preview is toggled on, the effect of the changes will be displayed in the image window.
  6. In this example, the light tones do not seem to show much color cast. However, the dark tones don't seem to have enough red values as shown in the screenshot below. The dark area under the bridge show the RGB values of 1, 18, 17 or 0%, 7%, 7%.


  7. In the Adjust Color Curves dialog box, change the Channel to Red. Click a point in the middle of the curve to anchor the mid and light tone red values since the problem is only in the dark tones. Then drag the 0 pixel curve point up to 17 pixel value.

    Note: after every change, always move the cursor to the dark area and check the RGB values in the Pointer window.
  8. When the numbers and preview look pleasing, click OK to confirm the changes.

    The image shows the corrected colors.


    Contrast this to the original color casted version.

Monday, August 25, 2014

Using Android L Material Design color palette swatches in Inkscape

In the previous post, I showed how to import the upcoming Android "L" Material Design color palettes for styling Android apps into Gimp. The palette swatches can be downloaded from http://www.google.com/design/spec/style/color.html and used in Adobe Illustrator and Adobe Photoshop. If you want to import and use the swatches in the free and open source vector drawing software Inkscape, the following must be done:

  • Import the swatches into Gimp palette files, as described in the previous post. 
  • Then copy the imported Gimp palette files into Inkscape's palettes folder. 
 More details are below on how to copy the palette files into Inkscape, assuming they have been imported into Gimp.

  1. Using the Windows Explorer, browse and locate the imported Gimp palette files, e.g. C:\users\xxx\.gimp-2.8\palettes\.

    Note: xxx is the log in user name.
  2. In Windows Explorer, select the two *.gpl files. Press CTRL-C.
  3. In Windows Explore, browse to the Inkscape palette folder, e.g. C:\Program Files (x86)\Inkscape\share\palettes\.

  4. Press CTRL-V.

    The two files are copied into the palette folder.
  5. Start Inkscape.

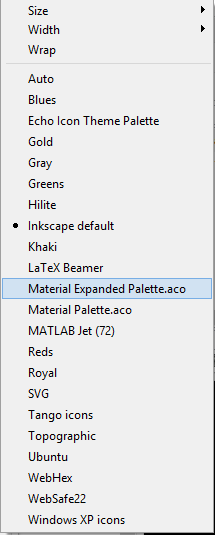
  6. In the bottom right, next to the horizontal color palette boxes, click the black arrow icon.

    A pop up menu appears.
  7. Choose one of the Material Design palette, e.g. Material Expanded Palette.aco.

    The selected color palette preview is updated.
  8. Now you can use any of the Material Design colors. Click on one of the colors to use for styling vector drawing elements.

Monday, August 18, 2014

Using Android L Material Design color swatches in Gimp

The upcoming Android "L" Material Design introduces new color palettes for styling Android apps. The palette swatches can be downloaded from http://www.google.com/design/spec/style/color.html and used in Adobe Illustrator and Adobe Photoshop. It is a little more inconvenient if your are using Gimp, the free and open source photo editing software. Fortunately, it is possible to import the Material Design swatches into Gimp so that they can be used. The following steps illustrate how.

  1. Download the Material Design color palette swatches from http://quantum-paper.storage.googleapis.com/downloads/color_swatches.zip. Extract the zip file into a folder e.g. D:\Temp\.

    The files Material Expanded Palette.aco and Material Palette.aco are extracted.

  2. Start Gimp.


  3. Select Windows | Dockable Dialogs | Palettes.

    The Palettes dialog appears.

  4. Click Configure this tab (left pointing icon in a rectangle somewhere on the top right). In the pop up menu, choose Palettes Menu | Import a New Palette.


    The Import a New Palette dialog appears.

  5. Toggle Palette file on. In the Palette file field, click the folder icon.


    The Select Palette file dialog appears.

  6.  Browse and select one of the extracted Material Design palette swatch file e.g. D:\Temp\color_swatches\photoshop\Material Expanded Palette.aco. Click Open.

    A preview of the palette is displayed.

  7. Click Import.

    The selected palette is displayed at the top of the list.

  8. Repeat the previous steps 4 to 7 to import the second Material Design palette swatch.


  9. In the Palettes dialog, double click one of the imported swatches e.g. Material Expanded Palette.aco.

    The Palette Editor appears.

  10. In the Palette Editor, just click on the color you want to use in the image editing process.

Monday, August 26, 2013

Retaining GeoTiff metadata for an image after editing in Photoshop

Sometimes for whatever reason, we have to edit a GeoTiff image in a photo manipulation software application like Photoshop. These image editing applications usually do not retain the geo-referencing information of the GeoTiff file after editing. The following screenshots show a GeoTiff image being edited in GIMP to remove some text from the image.

When the edited file is opened in a mapping software application e.g. Global Mapper, the software will be unable to detect any geo-referencing information, as shown below.


There is a way to apply back the geo-referencing information from the original GeoTiff file. As long as the edited image pixel sizes (width and height) remain the same as the original GeoTiff image, we can copy the GeoTiff metadata from the original file to the edited file using the listgeo and geotifcp executables. These programs can be downloaded as part of FWTools.

The following shows how to use the listgeo and geotifcp executables.

  1. Open up a command prompt. Type in the following:

    C:\> listgeo -no_norm original.tif > metadata.geo

    The GeoTiff file's geo-referencing metadata is copied out from the input original.tif and written to the output file metadata.geo.
  2. Next, type in the following:

    C:\> geotifcp -g metadata.geo edited.tif output.tif

    The geo-referencing info in the metadata.geo file is applied to the edited.tif file and written out to output.tif.  When the output.tif file is loaded in a mapping application, the image is placed in the correct geographic location.


Monday, August 13, 2012

Use Gimp to create icon shadows for Google Maps

If you make your own custom Google Maps icons, then it is sometimes necessary to create suitable shadow icons for them. There are a few free online tools to do the job but I thought I would try to use Gimp to do the task. I figured out the basic steps:


  1. Duplicate the custom icon, 
  2. De-saturate and darken the duplicate, 
  3. Scale the duplicate in half vertically and skewed it horizontally, 
  4. Reduce the shadow opacity and make another duplicate shadow layer, 
  5. Refine the shadow layers.
  6. Save the shadow icon


Make a duplicate layer of the custom icon

  1. Start Gimp. Load the custom icon e.g. fair.png.

    Note the dimensions of the custom icon in the title bar at the top; 32 by 32 pixels in this example.
  2. If the Layers pane is not displayed, then press CTRL+L. Select the original icon layer, which is usually labelled as Background.


  3. Click the Duplicate layer icon as shown above.

    A duplicate named Background copy is created.
  4. Click the eye icon for the Background copy layer to turn off the display for that layer.
De-saturate and darken a duplicate layer
  1. In  the Layers pane, select the Background layer.
  2. In the menu bar, select Colors | Hue-saturation.

    The Hue-Saturation dialog box appears.


  3. In the Lightness scroll field, drag the handle to the left. Similarly, drag the Saturation handle all the way to the left. Click OK.

    The layer is grayed and darkened.


Scale vertically by half and skew horizontally by half the shadow layer
  1. Select Layer | Scale Layer.

    The Scale Layer dialog box appears.
  2. Toggle the chain off as shown below. This turns off the constant aspect ratio.


  3. In the Height field, type in half the current height e.g. 16. Click Scale.

    The layer is scaled vertically in half.
  4. Press SHIFT+T.

    The Shear dialog box appears.


  5. In the Shear magnitude X field, type in negative half of the current height e.g. -16. Click Shear.

    The layer is sheared horizontally by half.
Adjust the shadow opacity, location and make duplicate the shadow layer
  1. Select the Move Tool in the tool box or press M. Drag the layer until the layer border is aligned as shown below.

  2. Select Image | Fit Canvas to Layers.

    The canvas is expanded to fit the skewed layer.
  3. In the Layers pane, drag the Opacity scroll handle to reduce the opacity e.g. 25%.

  4. Click the Duplicate icon.

    The shadow layer is duplicated as Background copy#1 layer.
Refine the shadow layers by scaling and blurring
  1. In the Layers pane, select the upper shadow layer e.g. Background copy#1.
  2. Select Layer | Scale Layer.

    The Scale Layer dialog box appears.
  3. Make sure the chain icon is connected. In the Width field, reduce the size by a few pixels e.g. from 48 to 43. Click Scale.

    The upper shadow layer is scaled down while maintaining the aspect ratio.
  4. In the Layers pane, select the lower shadow layer e.g. Background.
  5. Select Filters | Blur | Gaussian Blur.

    The Gaussian Blur dialog box appears.


  6. In the Horizontal and Vertical fields, type in a radius e.g. 5.0. Click OK.

    The lower layer is blurred.


Save the shadow icon
  1. Select File | Save As.

    The Save Image dialog box appears.
  2. In the Name field, type in a name e.g. fair-shadow.png. Click Save.

    The Export File prompt pops up.
  3. Toggle Flatten Image on. Click Export.

    The Save as PNG dialog box appears.


  4. Click Save.

    The shadow icon is saved.