Showing posts with label Visual Studio. Show all posts

Monday, March 8, 2021

CUDA11.2.props not found in Visual Studio Community 2019

While trying out the NVIDIA CUDA development sample solutions in Visual Studio Community 2019, I encountered error messages about some CUDA11.2.props files not found. An example is shown in the screen shot below.

The solution to this is simple: simply do the following:

  1. Using the Windows Explorer, browse to the location of the NVIDIA CUDA Toolkit e.g. C:\Program Files\NVIDIA GPU Computing Toolkit\CUDA\v11.2\extras\visual_studio_integration\MSBuildExtensions\.


  2. Select and copy all the files inside the folder: CUDA 11.2.props, CUDA 11.2.targets, CUDA 11.2.xml, and Nvda.Build.CudaTasks.v11.2.dll.

  3. Browse to the folder C:\Program Files(x86)\Microsoft Visual Studio\2019\Community\MSBuild\Microsoft\VC\v160\BuildCustomizations\.


  4. Paste the copied CUDA files inside.


Now, when compiling the CUDA sample solutions, the error messages no longer appear, as shown below.


Monday, September 24, 2018

Use CMake to build Visual Studio C++ projects with PDAL on Windows

The tutorial on the PDAL website https://pdal.io/development/writing.html provides the details on developing and compiling a simple C++ program using the PDAL API on *nux. I followed the steps but encountered errors trying to compile the example on Windows 10. The following screenshot shows the compilation errors - the Microsoft Visual Studio linker could not find some external symbols such as __imp_htonl_ among others.


To fix the compilation errors, the Windows library ws2_32.lib needs to be linked to the final executable. This can be done in the following steps:
  1. Add the library ws2_32 to the CMakeLists.txt file, as shown below.

  2. Run CMake to build the Visual Studio project files.

    C:\> cmake -G"Visual Studio 15 2017 Win64" ..


    The project files are generated.

  3. Open up the solution project in Visual Studio. Then build the solution.

    The project is successfully built and the executable is generated.

Monday, August 15, 2016

Use CMake to develop an SQLite Visual Studio C++ application

I wanted to write a Windows 64 bit C++ executable that makes use of a SQLite database using CMake to generate a Visual Studio solution.

Prepare SQLite

  1. The simplest way to use SQLite in my code is to download and use the amalgamated source files and binaries from the SQLite website https://www.sqlite.org/download.html.
  2. Extract the amalgamated SQLite source files into a folder e.g. c:\path\to\sqlite\include\.


  3. Extract the compiled SQLite binaries into a folder e.g. c:\path\to\sqlite\lib\.

  4. In order to link the SQLite dll into a C++ executable, the dll needs to have a exported library. This can be done by opening a Visual Studio Command Prompt. Select Start | Visual Studio 2015 | VS2015 x64 Native Tools Command Prompt.
  5. In the Command Prompt, change directory to the location of the SQLite binaries e.g. C:\path\to\sqlite\lib\. Type in the LIB command:

    C:\> LIB /def:sqlite3.def


    The files sqlite3.lib and sqlite3.exp are generated.

Create your application's CMakeLists.txt
  1. In your C++ application's root folder e.g. C:\path\to\sqliteexample\, use a text editor to create a CMakeLists.txt file.

  2. In the CMakeLists.txt, define the SQLite library name and locations of the headers and library, as shown below.
An example CMakeLists.txt

cmake_minimum_required(VERSION 2.8.6)
project(sqliteexample)

# compile all *.cpp files
file (GLOB SOURCES "src/*.cpp")

# define libraries to link to final executable
set (PROJECT_LINK_LIBS sqlite3.dll)

# define the sqlite header include file directory
set (SQLITE_INCLUDE ../sqlite/include)

# define the sqlite link library directory
set (SQLITE_LINK_DIR ../sqlite/lib)

# define the directories to search for libraries
link_directories ( ${SQLITE_LINK_DIR})

# define the directories to search for headers
include_directories (include ${SQLITE_INCLUDE})

# define the final executable
add_executable(sqliteexample ${SOURCES})

# define the libraries to link to the final executable
target_link_libraries (sqliteexample ${PROJECT_LINK_LIBS})


Generate the Visual Studio solution files

  1. Write the C++ source code e.g. main.cpp in the C++ application source folder e.g. C:\path\to\sqliteexample\src\.
  2. Create a build folder underneath the C++ application root folder e.g. C:\path\to\sqliteexample\.
  3. Open up the Visual Studio x64 Command Prompt. Change directory to the build folder, e.g. C:\path\to\sqliteexample\build\.
  4. In the Command Prompt, type in the cmake command:

    C:\> cmake -G "Visual Studio 14 2015 Win64" ..


    The Visual Studio solution files are generated.

  5. Next, open up the generated Visual Studio solution e.g. sqliteexample.sln in Visual Studio.
  6. Select Build | Build Solution to compile your SQLite C++ application.

Monday, August 8, 2016

Use CMake to help build and use a Windows dll

I wanted to use Windows c++ classes and use them in another c++ applications through shared Windows DLLs, while using CMake to generate build files and Visual Studio to compile into final executables. I spent some time figuring out how to do it and the following steps illustrate a simple example.

Create a Windows DLL
The first step is to create a Windows DLL and export the functions that will be called by other methods.

Listing of Animal.h
1
 2
 3
 4
 5
 6
 7
 8
 9
10
11
#include <string>

using namespace std;

class Animal {
private:
    string name;
public:
    Animal(string);
    virtual void print_name();
};

Listing of Animal.cpp
1
 2
 3
 4
 5
 6
 7
 8
 9
10
#include <iostream>
#include "Animal.h"

using namespace std;

Animal::Animal(string name):name (name){}

void Animal::print_name(){
    cout << "Name is " << this->name << endl;
}

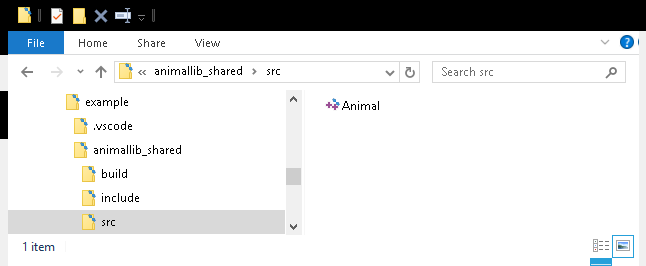
The Animal.h and Animal.cpp files are placed in the include and src folders under the [example root folder]\animallib_shared\ folder, as shown below.


The next thing to do is to create the CMakeLists.txt in the Windows DLL project e.g. [example root folder]\animallib_shared\ folder.
1
 2
 3
 4
 5
 6
 7
 8
 9
10
11
12
13
14
15
16
17
18
19
20
21
22
23
cmake_minimum_required(VERSION 2.8.6)
project (animallib)
set (CMAKE_BUILD_TYPE Debug)

#include *.h files under include folder and  
#the project's output folder e.g. Debug
include_directories (include ${PROJECT_BINARY_DIR})

#compile all *.cpp source files under src folder
file (GLOB SOURCES "src/*.cpp")

#output library as animallib.*

#output library export file *.lib and
#output macro definitions include file
include (GenerateExportHeader)
add_library(animallib SHARED ${SOURCES})
GENERATE_EXPORT_HEADER (animallib
    BASE_NAME animallib
    EXPORT_MACRO_NAME animallib_EXPORT
    EXPORT_FILE_NAME animallib_Export.h
    STATIC_DEFINE animallib_BUILT_AS_STATIC
)

Next, we have to modify the header (*.h) and source code (*.cpp) files to add in the Windows export macro animallib_EXPORT and cmake generated header file animallib_Export.h.
Listing of modified animal.h
1
 2
 3
 4
 5
 6
 7
 8
 9
10
11
12
13
#include <string>

#include "animallib_Export.h"

using namespace std;

class Animal {
private:
    string name;
public:
    animallib_EXPORT Animal(string);
    virtual animallib_EXPORT void print_name();
};
Listing of modified Animal.cpp

1
 2
 3
 4
 5
 6
 7
 8
 9
10
11
12
#include <iostream>
#include "Animal.h"

#include "animallib_Export.h"

using namespace std;

animallib_EXPORT Animal::Animal(string name):name (name){}

animallib_EXPORT void Animal::print_name(){
    cout << "Name is " << this->name << endl;
}

Open up a Windows Command prompt and change directory to the build folder of the Windows DLL project e.g. [example root folder]\animallib_shared\build\ folder.

Type in the cmake command (assuming cmake is in the PATH environment variable):
C:> cd \path\to\example\animallib_shared\build
C:> cmake ..
Build files are generated
The generated build files
Open up the generated Visual Studio solution file [example root folder]\animallib_shared\build\animallib.sln in Visual Studio. Then select Build | Build Solution to compile the Windows DLL.
Compilation messages
The generated *.dll and export library *.lib files under [example root folder]\animallib_shared\build\Debug\
Using the Windows DLL in a separate C++ application
Now that the Windows DLL has been generated and the functions exported, the next thing is to use the DLL's classes and functions in an application e.g. UseAnimalLib project under [example root folder]\useanimallib\]

Listing of uselib.cpp

1
 2
 3
 4
 5
 6
 7
 8
 9
10
11
12
#include "Animal.h"

#include "animallib_Export.h"

int main(int argc, char *argv[]){
    //Create a new animal instance with name Dog
    Animal animal("Dog");

    //try to call the class's print_name method
    animal.print_name();
    return (0);
}

Then create a CMakeLists.txt file under the [example root folder]\useanimallib\ folder.


1
 2
 3
 4
 5
 6
 7
 8
 9
10
11
12
13
14
15
cmake_minimum_required(VERSION 2.8.6)
project (UseAnimalLib)

set (EXAMPLE_DIR d:/path/to/example/root/folder)

set (PROJECT_LINK_LIBS animallib.dll)
link_directories (${EXAMPLE_DIR}/animallib_shared/build/Debug)

include_directories (${EXAMPLE_DIR}/animallib_shared/include ${EXAMPLE_DIR}/animallib_shared/build)

#compile all *.cpp source files under src folder
file (GLOB SOURCES "src/*.cpp")

add_executable(uselib ${SOURCES})
target_link_libraries (uselib ${PROJECT_LINK_LIBS})

Open up a Windows Command Prompt. Change directory to the [example root folder]\useanimallib\build folder.
C:> cd \path\to\example\useanimallib\build
C:> cmake ..

The build files are generated


The generated build files


Open up the generated solution file e.g. [example root folder]\useanimallib\build\Debug\uselib.sln using Visual Studio and build the solution.
Building the solution
The executable that uses the Windows DLL can now be run in a Command Prompt, assuming the DLL is in the PATH environment variable, as shown below.

Monday, July 4, 2016

Set up Visual Studio to use the All-in-one Point Cloud Library PCL

Point Cloud Library (PCL) from http://pointclouds.org is a powerful library for working with point clouds. But the downloadable binaries are outdated and compiling the latest source code can be a bit of a pain. Fortunately, you can get more recent all-in-one PCL binaries from this blog site http://unanancyowen.com/?p=1255&lang=en for use in your projects.

Installing PCL All-in-one

  1. Just follow the instructions on the site to download and install a version of PCL e.g. PCL 1.7.2 All-in-one Installer MSVC2015 X64, for your development environment.
  2. Also download a suitable Visual Studio property sheet e.g. PCL Property Sheet, and save the file on your machine as e.g. pclPropertySheet.props.
  3. After installing, add the bin folder locations of PCL and VTK to the Windows PATH environment variable, as shown below.

Setting up Visual Studio
  1. Run Visual Studio. Select File | New | Project.
    The New Project dialog appears.

  2. Select Templates | Visual C++ | General. Choose Empty Project. Type in a project Name e.g. HelloPCL. Browse to a Location. Click OK.

    The project is created.

  3. In the top right pane, click the Property Manager tab.

    The Property Manager tab is activated.

  4. Click the Add Existing Property Sheet icon, as shown above.
    The Add Existing Property Sheet dialog box appears.

  5. Browse and select the previously downloaded property sheet e.g. pclPropertySheet.props. Click Open.

    The property sheet is loaded.
  6. Now create a new C++ source file, e.g. main.cpp.


  7. In the C++ file, type in PCL include header file(s) and classes, as shown below.


  8. Optional: the PCL headers and classes may display wavy red under lines. If so make sure you are working in the correct configuration. In this example, the environment is for x64. Change the configuration to x64 from x86.

    Visual Studio now recognizes the PCL headers and classes
    .

Monday, April 18, 2016

Publish and deploy a C# Web Service API to IIS

After developing a Web Service API application in Visual Studio, the next step may be to publish and deploy the application to an Internet Information Server (IIS). Applications can be published as a package zip file, written straight to the file system, or uploaded to the Cloud provider Azure. In this example, I will publish to a package zip file, then deploy the package to IIS.

  1. In Visual Studio's Solution Explorer pane, right click on the Web Service API project e.g. ProductsAPP.

  2. In the pop up menu, choose Publish.

    The Publish Web dialog box appears.

    Note: if a profile has been created, the following screen will appear.
  3. In the Target list, choose Custom. Click Next.

    The New Custom Profile prompt appears.

  4. Type in a profile name, e.g. ProductsAppProfile. Click OK.


  5. In the Publish method field, choose Web Deploy Package. In the Package location, type in or browse to select a destination folder, e.g. D:\Temp\.
  6. Optional: Type in a Site name e.g. ProductsApp. Click Next.

  7. Click Publish.

    The package zip file is created
    .
Once the package zip file is created, it can then be deployed onto a supported IIS platform.

  1. On the web server, start the Internet Information Services (IIS) Manager by clicking Start | Control Panel | Administrative Tools | Internet Information Services (IIS) Manager.


  2. In the Connection pane, expand the node.
  3. Optional. Select Application Pools to check the pools whether they are running on .NET Framework 4+.


    If the pool is running on Framework 2+, Framework 4+ must be installed. Then for each pool, select Basic Settings on the right and change to Framework 4+, as shown below.

  4. In the Connection pane, select a web site node e.g. Default web site.


  5.  In the Deploy section on the right, click Import Application.

    Note: if there is no Import Application, then the Web Deployment Tool has to be installed. On my IIS 7+ system, I had to use version 2.1 to get the deploy commands. Versions 3.5 and Version 3.6 did not come with the Deploy commands.

    The Import Application Package dialog box appears.

  6. Optional. If your application uses a SQL Server Database connection string, then the string can be edited here to change the server name, username, password.
  7. Click Next.

    The package is deployed.


Monday, April 11, 2016

Create a simple C# Web Service API to insert a record into a SQL Server database

Creating a Web Service API in C# that talks to a SQL Server database in Visual Studio is relatively straightforward. It comes with a number of wizards that guide through the process. First, create a project by

  1. Start Visual Studio. Select New Project. Choose Templates | Visual C# | Windows | Web. Choose ASP.NET Web Application.

    The New Project dialog box appears.

  2. Type in a new Name, Solution Name and/or Browse to a new Location. Click OK

    The project is created.
  3. In the Solution Explorer pane on the right, double click on the file Web.config.

    The editor shows the contents of Web.config.
  4. Add in a new section for connectionString, as shown in the screenshot below.

    Note: obviously, the connection string values will vary depending on the server name, database, and user name, so they need to be changed accordingly
    .


  5. In the Solution Explorer pane, right click on the Controllers folder node and choose Add Controller.

    The Add Scaffold dialog box appears.

  6. Select an appropriate controller e.g. Web API 2 Controller with read/write action. Click Add. Type in the new Controller name, e.g. LogController. Click Add.


    A skeleton controller is created.
  7. Open the newly created file e.g. LogController.cs in the editor. Type in a method e.g. Get. An example is shown below. 
Note: in this example, when a user calls the address in a browser with the Route pattern http://some.server.com/api/log/[some latitude number]/[some longitude number], the second Get method is called. If the call is successful, the latitude and longitude values would have been inserted into the SQL Server database.
using System;
using System.Collections.Generic;
using System.Configuration;
using System.Data.SqlClient;
using System.Linq;
using System.Net;
using System.Net.Http;
using System.Web.Http;

namespace ProductsAPP.Controllers
{
    public class LogController : ApiController
    {
        // GET: api/Log
        public IEnumerable<string> Get()
        {
            return new string[] { "value1", "value2" };
        }

        [Route("api/Log/{lat}/{lon}")]
        public string Get(double lat, double lon)
        {
            //Get the SQL Server database connection string from
            //the Web.config file
            ConnectionStringSettings settings;
            settings = System.Configuration.ConfigurationManager.ConnectionStrings["Database1Connection"];
            string connectionString = settings.ConnectionString;

            //Create a new SQL Server database connection
            SqlConnection conn;
            conn = new SqlConnection(connectionString);
            try
            {
                //Open a connection
                conn.Open();

                //Create a parameterized SQL command to insert
                string query =
                    "INSERT INTO point_datatable (latitude, longitude) ";
                query += " VALUES (@latitude, @longitude)";
                SqlCommand cmd = new SqlCommand(query, conn);
                cmd.Parameters.AddWithValue("@latitude", lat);
                cmd.Parameters.AddWithValue("@longitude", lon);

                //Run the insert statement
                cmd.ExecuteNonQuery();

                conn.Close();
            }
            catch (Exception ex)
            {
                Console.WriteLine("Exception:" + ex.Message);
            }
            return "ok";
        }
    }
}