Showing posts with label C#. Show all posts

Monday, April 12, 2021

Simple .NET5 C# example to show a Message box using AvaloniaUI

The cross platform AvaloniaUI (https://avaloniaui.net/) does not come with a message box class. In order to display message boxes like typical Windows applications, you have to use third party libraries. One such tool is the MessageBox.Avalonia NuGet package (https://github.com/AvaloniaUtils/MessageBox.Avalonia). 

This post shows how to create a simple Hello World project that calls the message box package to open up a modal message box from a main window. 

Create an AvaloniaUI MVVM project

  1. In a Terminal, type in the command to create a project:

    $ dotnet new avalonia.mvvm -o hellomsg

    The template "Avalonia .NET Core MVVM App" was created successfully.

  2. In the Terminal, change directory into the newly created project. Then install the MessageBox.Avalonia Nuget package.

    $ cd /path/to/hellomsg
    $ dotnet add package MessageBox.Avalonia


      Determining projects to restore...                                            
      Writing /tmp/tmpaumBpn.tmp                                                    
    info : Adding PackageReference for package 'MessageBox.Avalonia' into project '/path/to/hellomsg/hellomsg.csproj'
    .    
    ...etc..


Add a button to the newly created XAML file

  1. Using a text editor, open up the MainWindow.axaml file.

  2. Remove the TextBlock and add in a Button, as shown below.

    <Window xmlns="https://github.com/avaloniaui"
            xmlns:x="http://schemas.microsoft.com/winfx/2006/xaml"
            xmlns:vm="using:hellomsg.ViewModels"
            xmlns:d="http://schemas.microsoft.com/expression/blend/2008"
            xmlns:mc="http://schemas.openxmlformats.org/markup-compatibility/2006"
            mc:Ignorable="d" d:DesignWidth="800" d:DesignHeight="450"
            x:Class="hellomsg.Views.MainWindow"
            Icon="/Assets/avalonia-logo.ico"
            Title="hellomsg">
    
        <Design.DataContext>
            <vm:MainWindowViewModel/>
        </Design.DataContext>
    
        <!-- <TextBlock Text="{Binding Greeting}" HorizontalAlignment="Center" VerticalAlignment="Center"/> -->
        <Button
            Command="{Binding ShowMsgBoxCommand}"
            CommandParameter="{Binding $parent[Window]}"
            Content="Open MessageBox"
        />
    
    </Window>
    

    Note 1: The Button's Command will bind to a ShowMsgBoxCommand in the MainWindowViewModel.
    Note 2: The Button will pass in the Window object to the ShowMsgBoxCommand through the CommandParameter
    .

Create the ShowMsgBoxCommand in the View Model

  1. In a text editor, open up the file MainWindowViewModel.cs.

  2. Add in a new ReactiveCommand property and name it as ShowMsgBoxCommand.


    public ReactiveCommand<object, Unit> ShowMsgBoxCommand { get; }


    Note: this command will take in an object and return the default Unit.

  3. In the constructor, add in the code to create the ShowMsgBoxCommand command. Inside the command, create the message box, define the parameters and display it.

    ShowMsgBoxCommand = ReactiveCommand.CreateFromTask<object>( async (sender) => {
    var dialog = MessageBoxManager
                    .GetMessageBoxStandardWindow("My title", "My message");
    await dialog.ShowDialog(sender as Avalonia.Controls.Window);
    });


    Note: pass in the Window object as the owner of the message box to the ShowDialog method.

  4. The full listing of MainWindowViewModel.cs is shown below.


    using System;
    using System.Collections.Generic;
    using System.Text;
    using System.Reactive;
    using ReactiveUI;
    using MessageBox.Avalonia;
    
    namespace hellomsg.ViewModels
    {
        public class MainWindowViewModel : ViewModelBase
        {
            public ReactiveCommand<object, Unit> ShowMsgBoxCommand { get; }
            public string Greeting => "Welcome to Avalonia!";
            public MainWindowViewModel(){
                ShowMsgBoxCommand = ReactiveCommand.CreateFromTask<object>( async (sender) => {
                    var dialog = MessageBoxManager
                                    .GetMessageBoxStandardWindow("My title", "My message");
                    await dialog.ShowDialog(sender as Avalonia.Controls.Window);
                });
            }
        }
    }
    

Run the application

  1. In the Terminal, run the dotnet application.

    $ dotnet run

  2. If all is correct, the following should appear. When the button is clicked, a modal message box should pop up.


Monday, October 10, 2016

Simple C# example for creating and using a Spatialite database

A Spatialite database is just a SQLite database loaded with Spatialite module extensions including tables, triggers, functions etc. It is therefore possible to access a Spatialite database using the SQLite .Net Wrapper from https://system.data.sqlite.org and with the Spatialite module extension library mod_spatialite-x.x.x from http://www.gaia-gis.it/gaia-sins/, otherwise the spatial functions will not be available to your C# code.

While the Spatialite database can be created using the SQLite wrapper and the Spatialite module extension, the newly created database lacks all the Spatialite tables, triggers etc. necessary for proper functioning of the Spatialite database. I would need to run some initialization SQL to create all the required Spatialite tables, triggers, etc. So instead, I found it more convenient to create a template Spatialite database with the Spatialite executable beforehand. Then in the C# program, just simple copy the template to create a new Spatialite database.

 The following is an example C# code snippet illustrating creating a new Spatialite database from a pre-prepared template and making a SQL query reading some Spatialite geometry fields from the database.

1
 2
 3
 4
 5
 6
 7
 8
 9
10
11
12
13
14
15
16
17
18
19
20
21
22
23
24
25
26
27
28
29
30
31
32
33
34
35
36
37
38
39
40
41
42
using System.Data.SQLite;

//...etc...

string pathTemplate = @"\path\to\spatiaLiteTemplate.db";
string destDbFilename = @"\path\to\dest.db";

// Copy the template Spatialite file to the destination Spatialite file
File.Copy(pathTemplate, destDbFilename);

// Create Spatialite SQL Connection
string connectString = "Data Source=" + destDbFilename + ";Version=3;";
SQLiteConnection connection = new SQLiteConnection(connectString);

// Open the database and load in the Spatialite extension
connection.Open();
connection.LoadExtension("mod_spatialite");

// ...etc ...

// Make some Spatialite function calls
string sql = "SELECT ST_MINX(geometry), ST_MINY(geometry), ST_MAXX(geometry), ST_MAXY(geometry) FROM somefeature ";

using (SQLiteCommand command = new SQLiteCommand(sql, connection))
{
 using (SQLiteDataReader reader = command.ExecuteReader())
 {
  while (reader.Read())
  {
   double minX = reader.GetDouble(0);
   double minY = reader.GetDouble(1);
   double maxX = reader.GetDouble(2);
   double maxY = reader.GetDouble(3);
  }
 }
}

// Close and clean up the database connection
connection.Close();
connection.Dispose();
 
//...etc... 


Monday, April 18, 2016

Publish and deploy a C# Web Service API to IIS

After developing a Web Service API application in Visual Studio, the next step may be to publish and deploy the application to an Internet Information Server (IIS). Applications can be published as a package zip file, written straight to the file system, or uploaded to the Cloud provider Azure. In this example, I will publish to a package zip file, then deploy the package to IIS.

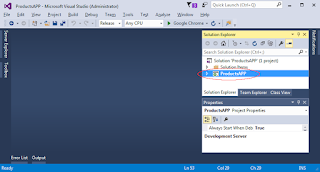
  1. In Visual Studio's Solution Explorer pane, right click on the Web Service API project e.g. ProductsAPP.

  2. In the pop up menu, choose Publish.

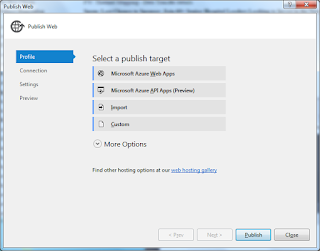
    The Publish Web dialog box appears.

    Note: if a profile has been created, the following screen will appear.
  3. In the Target list, choose Custom. Click Next.

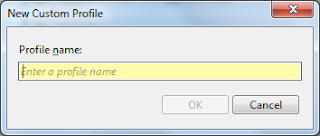
    The New Custom Profile prompt appears.

  4. Type in a profile name, e.g. ProductsAppProfile. Click OK.


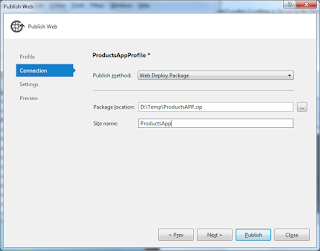
  5. In the Publish method field, choose Web Deploy Package. In the Package location, type in or browse to select a destination folder, e.g. D:\Temp\.
  6. Optional: Type in a Site name e.g. ProductsApp. Click Next.

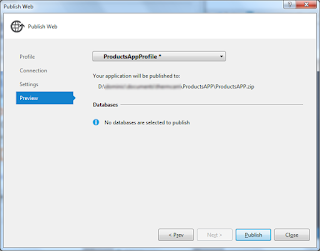
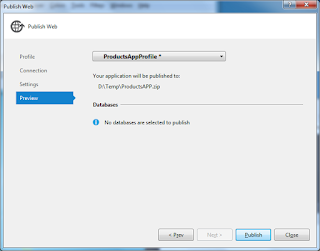
  7. Click Publish.

    The package zip file is created
    .
Once the package zip file is created, it can then be deployed onto a supported IIS platform.

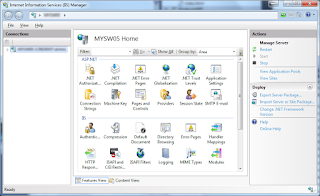
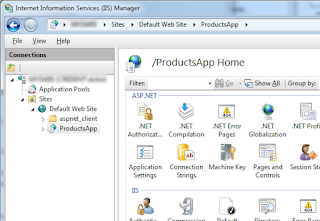
  1. On the web server, start the Internet Information Services (IIS) Manager by clicking Start | Control Panel | Administrative Tools | Internet Information Services (IIS) Manager.


  2. In the Connection pane, expand the node.
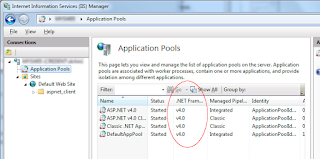
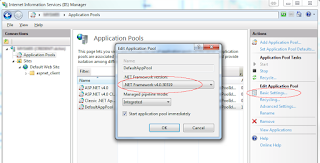
  3. Optional. Select Application Pools to check the pools whether they are running on .NET Framework 4+.


    If the pool is running on Framework 2+, Framework 4+ must be installed. Then for each pool, select Basic Settings on the right and change to Framework 4+, as shown below.

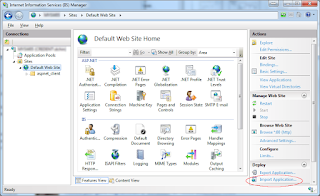
  4. In the Connection pane, select a web site node e.g. Default web site.


  5.  In the Deploy section on the right, click Import Application.

    Note: if there is no Import Application, then the Web Deployment Tool has to be installed. On my IIS 7+ system, I had to use version 2.1 to get the deploy commands. Versions 3.5 and Version 3.6 did not come with the Deploy commands.

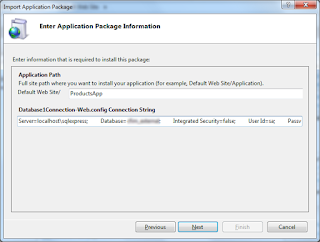
    The Import Application Package dialog box appears.

  6. Optional. If your application uses a SQL Server Database connection string, then the string can be edited here to change the server name, username, password.
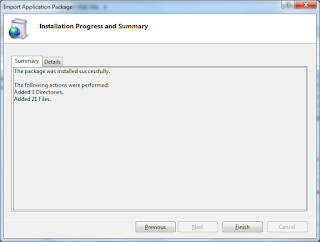
  7. Click Next.

    The package is deployed.


Monday, April 11, 2016

Create a simple C# Web Service API to insert a record into a SQL Server database

Creating a Web Service API in C# that talks to a SQL Server database in Visual Studio is relatively straightforward. It comes with a number of wizards that guide through the process. First, create a project by

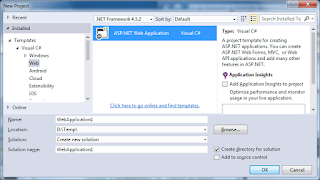
  1. Start Visual Studio. Select New Project. Choose Templates | Visual C# | Windows | Web. Choose ASP.NET Web Application.

    The New Project dialog box appears.

  2. Type in a new Name, Solution Name and/or Browse to a new Location. Click OK

    The project is created.
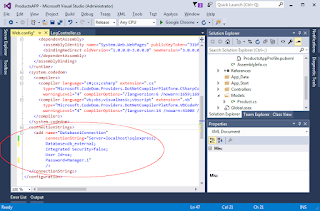
  3. In the Solution Explorer pane on the right, double click on the file Web.config.

    The editor shows the contents of Web.config.
  4. Add in a new section for connectionString, as shown in the screenshot below.

    Note: obviously, the connection string values will vary depending on the server name, database, and user name, so they need to be changed accordingly
    .


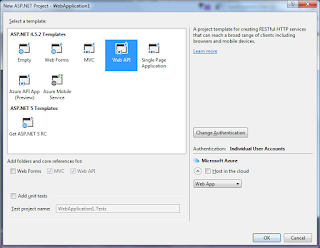
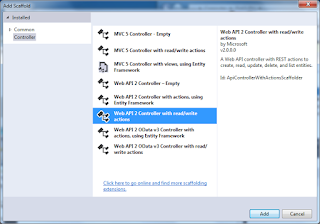
  5. In the Solution Explorer pane, right click on the Controllers folder node and choose Add Controller.

    The Add Scaffold dialog box appears.

  6. Select an appropriate controller e.g. Web API 2 Controller with read/write action. Click Add. Type in the new Controller name, e.g. LogController. Click Add.


    A skeleton controller is created.
  7. Open the newly created file e.g. LogController.cs in the editor. Type in a method e.g. Get. An example is shown below. 
Note: in this example, when a user calls the address in a browser with the Route pattern http://some.server.com/api/log/[some latitude number]/[some longitude number], the second Get method is called. If the call is successful, the latitude and longitude values would have been inserted into the SQL Server database.
using System;
using System.Collections.Generic;
using System.Configuration;
using System.Data.SqlClient;
using System.Linq;
using System.Net;
using System.Net.Http;
using System.Web.Http;

namespace ProductsAPP.Controllers
{
    public class LogController : ApiController
    {
        // GET: api/Log
        public IEnumerable<string> Get()
        {
            return new string[] { "value1", "value2" };
        }

        [Route("api/Log/{lat}/{lon}")]
        public string Get(double lat, double lon)
        {
            //Get the SQL Server database connection string from
            //the Web.config file
            ConnectionStringSettings settings;
            settings = System.Configuration.ConfigurationManager.ConnectionStrings["Database1Connection"];
            string connectionString = settings.ConnectionString;

            //Create a new SQL Server database connection
            SqlConnection conn;
            conn = new SqlConnection(connectionString);
            try
            {
                //Open a connection
                conn.Open();

                //Create a parameterized SQL command to insert
                string query =
                    "INSERT INTO point_datatable (latitude, longitude) ";
                query += " VALUES (@latitude, @longitude)";
                SqlCommand cmd = new SqlCommand(query, conn);
                cmd.Parameters.AddWithValue("@latitude", lat);
                cmd.Parameters.AddWithValue("@longitude", lon);

                //Run the insert statement
                cmd.ExecuteNonQuery();

                conn.Close();
            }
            catch (Exception ex)
            {
                Console.WriteLine("Exception:" + ex.Message);
            }
            return "ok";
        }
    }
}

Monday, April 4, 2016

Using EmguCV/OpenCV to correct optical distortions from photos

After calibrating a camera and obtaining the camera matrix and optical distortion coefficient matrix of the camera, the calculated matrices can be used to perform correction of photo images captured using the same camera. The open source libraries EmguCV and OpenCV have the methods and functions to undistort images given the parameters determined previously. The following snippets show how to perform the correction.

The following code C# snippet extends the EmguCV Mat class to enable us to get and set values in the matrix by row and column indices.
// Source: http://stackoverflow.com/questions/32255440/how-can-i-get-and-set-pixel-values-of-an-emgucv-mat-image
// Extends the EmguCV Mat class with Get and Set matrix values
    // by row and column indices
    public static class MatExtension
    {
        public static dynamic GetValue(this Mat mat, int row, int col)
        {
            var value = CreateElement(mat.Depth);
            Marshal.Copy(mat.DataPointer + (row * mat.Cols + col) * mat.ElementSize, value, 0, 1);
            return value[0];
        }

        public static void SetValue(this Mat mat, int row, int col, dynamic value)
        {
            var target = CreateElement(mat.Depth, value);
            Marshal.Copy(target, 0, mat.DataPointer + (row * mat.Cols + col) * mat.ElementSize, 1);
        }
        private static dynamic CreateElement(DepthType depthType, dynamic value)
        {
            var element = CreateElement(depthType);
            element[0] = value;
            return element;
        }

        private static dynamic CreateElement(DepthType depthType)
        {
            if (depthType == DepthType.Cv8S)
            {
                return new sbyte[1];
            }
            if (depthType == DepthType.Cv8U)
            {
                return new byte[1];
            }
            if (depthType == DepthType.Cv16S)
            {
                return new short[1];
            }
            if (depthType == DepthType.Cv16U)
            {
                return new ushort[1];
            }
            if (depthType == DepthType.Cv32S)
            {
                return new int[1];
            }
            if (depthType == DepthType.Cv32F)
            {
                return new float[1];
            }
            if (depthType == DepthType.Cv64F)
            {
                return new double[1];
            }
            return new float[1];
        }

The following code snippet is an example function that performs the correction to a list of JPEG images in a folder D:\Temp\.

public static void Undistort()
        {
            Mat cameraMatrix = new Mat(3, 3, DepthType.Cv64F, 1);
            Mat distCoeffs = new Mat(5, 1, DepthType.Cv64F, 1);
            Mat image = null;

            //Camera matrix values
            double fx = 3388.49;
            double fy = 3390.57;
            double cx = 2096.43;
            double cy = 1566.23;
            double skew = 1.11273;
            
            //Optical distortion coefficient values
            double k1 = 0.17352;
            double k2 = -0.484226;
            double k3 = 0.344761;
            double p1 = 0.00075256;
            double p2 = -0.000269617;

            //Set the camera matrix
            cameraMatrix.SetValue(0, 0, fx);
            cameraMatrix.SetValue(1, 1, fy);
            cameraMatrix.SetValue(0, 1, skew);
            cameraMatrix.SetValue(0, 2, cx);
            cameraMatrix.SetValue(1, 2, cy);
            cameraMatrix.SetValue(2, 2, 1);

            //Set the distortion matrix
            distCoeffs.SetValue(0, 0, k1);
            distCoeffs.SetValue(1, 0, k2);
            distCoeffs.SetValue(2, 0, p1);
            distCoeffs.SetValue(3, 0, p2);
            distCoeffs.SetValue(4, 0, k3);

            // get paths to image files
            string[] imageFiles = Directory.GetFiles(@"d:\temp\", "IMG_*.jpg");

            // for every image
            foreach (string imageFile in imageFiles)
            {
                // create new image object from file path.
                // append Und.jpg to the input filename for the output 
                string outFile = Path.Combine(Path.GetDirectoryName(imageFile), 
                    Path.GetFileNameWithoutExtension(imageFile) + "Und.jpg");

                Console.WriteLine("Processing {0}->{1}...", imageFile, outFile);
                
                //Read the input image
                image = CvInvoke.Imread(imageFile, LoadImageType.AnyColor);

                //Correct the input image
                Mat outFrame = image.Clone();
                CvInvoke.Undistort(image, outFrame, cameraMatrix, distCoeffs);
                
                //save the corrected image
                image = outFrame.Clone();
                image.Save(outFile);
                image.Dispose();
                outFrame.Dispose();
            }
        }

Monday, November 23, 2015

Display sample data in Visual Studio's Designer using simple data binding

In Visual Studio, when designing the graphical user interface using XAML, it would be nice to see the screen filled with sample data rather than a blank spot as shown in the example screenshot below.

In order to get the Designer to show some sample data, you have to create a few view model item and collection classes, as well as a sample data XAML. Then link up the sample data with the graphical page XAML using bindings. In this example, only a simple one way binding will be shown to illustrate the steps in getting the Designer to display some sample data.

Create a view model item class
In Visual Studio, create a new class that represents an object with properties that you want to display in the Designer, e.g. a PersonItemViewModel class with ID and FirstName properties in the project's ViewModels folder.

namespace Solarizr.ViewModels
{
    public class PersonItemViewModel
    {
        public string Id { get; set; }
        public string FirstName { get; set; }
    }
}


Create a view model collection class
To contain one or more Person items in a list, create a collection class e.g. PeopleViewModel in the project's ViewModels folder. Note that the name PeopleCollection used here will be used later in the Page XAML binding source definition.

using Solarizr.Models;
using System;
using System.Collections.Generic;
using System.Collections.ObjectModel;
using System.ComponentModel;
using System.Linq;
using System.Text;
using System.Threading.Tasks;

namespace Solarizr.ViewModels
{
    public class PeopleViewModel
    {
        public PeopleViewModel()
        {
            this.PeopleCollection 
                = new ObservableCollection<PersonItemViewModel>();
        }

        public ObservableCollection<PersonItemViewModel> PeopleCollection { get; set; }
    }
}

Create a XAML with sample data
With the PersonItemViewModel and PeopleViewModel collection class definitions created, the next thing to do is to create a XAML file populated with some sample data you want to display in the Visual Studio Designer. In the XAML file, it is important to add in a namespace xmlns declaration to the PersonItemViewModel and PeopleViewModel view model classes. In the code listing below, it is vm pointing to "using:Solarizr.ViewModels". The sample data XAML can be created in the project's SampleData folder. In this sample, 3 records are defined - David, John and Mary.


<vm:PeopleViewModel
    xmlns="http://schemas.microsoft.com/winfx/2006/xaml/presentation"
    xmlns:x="http://schemas.microsoft.com/winfx/2006/xaml"
    xmlns:vm="using:Solarizr.ViewModels"
    >

    <vm:PeopleViewModel.PeopleCollection>
        <vm:PersonItemViewModel Id="1" FirstName="David" />
        <vm:PersonItemViewModel Id="2" FirstName="John" />
        <vm:PersonItemViewModel Id="3" FirstName="Mary" />       
    </vm:PeopleViewModel.PeopleCollection>
    
</vm:PeopleViewModel>

Add in the view models to the Page XAML
Now with the sample data XAML created, the next step is to edit the Page XAML using the Visual Studio Designer and editor and add in the namespaces and bindings.

  1. In the Page XAML file, add in the view models namespace.

    xmlns:vm="using:Solarizr.ViewModels"
  2. Add in the sample data namespace.

    xmlns:sampleData="using:Solarizr.SampleData"
  3. Add in a design time data context and point it to the sample data.

    d:DataContext="{d:DesignData ../SampleData/PeopleViewModelSampleData.xaml }"
  4. Add in the data source to a list control's items e.g. ListView.

    ItemsSource="{Binding Path=PeopleCollection, Mode=OneTime}"
>

  • Add in the individual item control's binding field.

    Text="{Binding Path=FirstName}"
  • Width="80" Margin="10" />

    The Designer should now display the sample data from the binding as shown in the screenshot below.


    Monday, February 23, 2015

    Disabling the Windows Phone frame rate numbers display while debugging

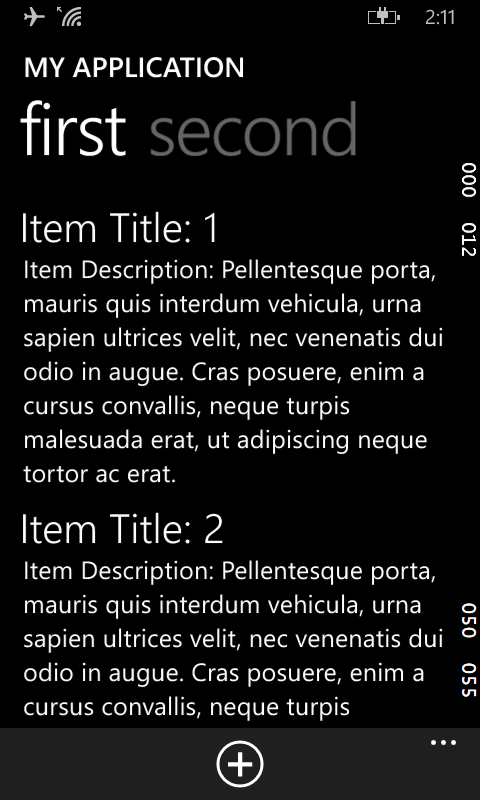
    While debugging Windows Phone Apps, there will be some (weird looking) running numbers on the right side of the app's screen, as shown in the screen shot below.

    These are actually frame rate counter numbers to aid in debugging. They can be easily switched off if you do not want them on the screen, especially if you want to capture the screen. To turn it off, just do the following:

    1. In Visual Studio, open up the project's App.xaml.cs file in the editor.


    2. Look for the following lines:

      if (System.Diagnostics.Debugger.IsAttached)
      {
      this.DebugSettings.EnableFrameRateCounter = true;
      }

    3. Change them to the following:

      if (System.Diagnostics.Debugger.IsAttached)
      {
      this.DebugSettings.EnableFrameRateCounter = false;
      }

    4. Run and debug the app again.

      The frame rate numbers are no longer displayed.


    Monday, September 22, 2014

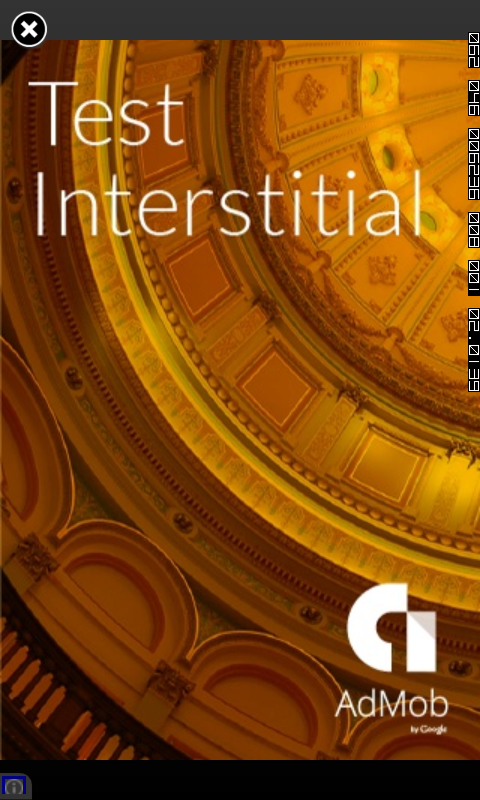
    Example Windows Phone 8 C# code to show AdMob interstitial ad on start up

    I did not find examples on the net illustrating how to show an AdMob interstitial advertisement when a Windows Phone 8 app is started. So here is an example I wrote using C#, basing it on an Android example. In a nutshell, the following need to be done:

    1. Create a splash screen XAML file
    2. Edit the splash screen code behind file
    3. Set the splash screen XAML as the start up object
    4. Override the Windows Phone 8 app main page XAML's OnNavigatedTo method to prevent the back key from bringing up the splash screen
    Create a splash screen XAML
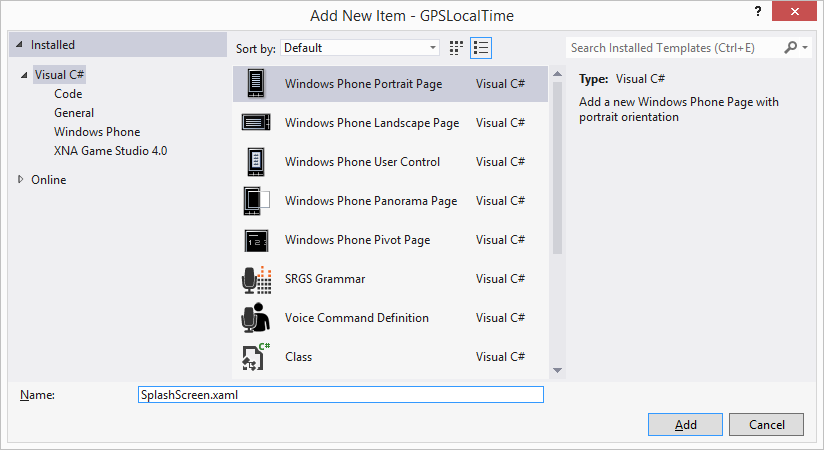
    1. In Visual Studio, add a New Item to the Windows Phone 8 project. Give it a name e.g. SplashScreen.xaml.


    2. Edit the newly created splash screen XAML file to your liking. In this example, we want to display only a progress bar without any text, as shown in the code below.

    <phone:PhoneApplicationPage
    x:Class="dominoc925.GPSLocalTime.SplashScreen"
    xmlns="http://schemas.microsoft.com/winfx/2006/xaml/presentation"
    xmlns:x="http://schemas.microsoft.com/winfx/2006/xaml"
    xmlns:phone="clr-namespace:Microsoft.Phone.Controls;assembly=Microsoft.Phone"
    xmlns:shell="clr-namespace:Microsoft.Phone.Shell;assembly=Microsoft.Phone"
    xmlns:d="http://schemas.microsoft.com/expression/blend/2008"
    xmlns:mc="http://schemas.openxmlformats.org/markup-compatibility/2006"
    FontFamily="{StaticResource PhoneFontFamilyNormal}"
    FontSize="{StaticResource PhoneFontSizeNormal}"
    Foreground="{StaticResource PhoneForegroundBrush}"
    SupportedOrientations="PortraitOrLandscape" Orientation="Portrait"
    mc:Ignorable="d"
    shell:SystemTray.IsVisible="True">
     
    <!--LayoutRoot is the root grid where all page content is placed-->
    <Grid x:Name="LayoutRoot" Background="Transparent">
    <Grid.RowDefinitions>
    <RowDefinition Height="Auto"/>
    <RowDefinition Height="*"/>
    </Grid.RowDefinitions>
     
    <!--TitlePanel contains the name of the application and page title-->
    <StackPanel Grid.Row="0" Margin="12,17,0,28">
    </StackPanel>
     
    <!--ContentPanel - place additional content here-->
    <Grid x:Name="ContentPanel" Grid.Row="1" Margin="12,0,12,0">
    <ProgressBar Margin="10" IsIndeterminate="True" />
    </Grid>
    </Grid>
     
    </phone:PhoneApplicationPage>

    Edit the splash screen code behind file

    1. In Visual Studio, open the splash screen code behind file e.g. splashscreen.xaml.cs.
    2. Code in the following:


    using System;
    using System.Collections.Generic;
    using System.Linq;
    using System.Net;
    using System.Windows;
    using System.Windows.Controls;
    using System.Windows.Navigation;
    using Microsoft.Phone.Controls;
    using Microsoft.Phone.Shell;
    using GoogleAds;
    using System.Threading;
     
    namespace dominoc925.GPSLocalTime
    {
    public partial class SplashScreen : PhoneApplicationPage
    {
    //The time to wait for the ad to load in milliseconds
    private static int WAIT_TIME = 5000;
    private static string INTERSTITIAL_AD_UNIT_ID = "ca-app-pub-xxxxxxxxxxxxxxxxxx";
    #if DEBUG
    private static bool ADMOB_FORCE_TESTING = true;
    #else
    private static bool ADMOB_FORCE_TESTING = false;
    #endif
    private static Timer _waitTimer;
    private static bool _interstitialCanceled = false;
     
    private InterstitialAd _interstitialAd;
     
    public SplashScreen()
    {
    InitializeComponent();
    
    
    _interstitialAd = new InterstitialAd(INTERSTITIAL_AD_UNIT_ID);
    
    
    //Set up the Ad event listeners
    _interstitialAd.ReceivedAd += OnAdReceived;
    _interstitialAd.FailedToReceiveAd += OnAdFailedToLoad;
    _interstitialAd.DismissingOverlay += OnAdDismissed;
     
    AdRequest adRequest = new AdRequest();
    adRequest.ForceTesting = ADMOB_FORCE_TESTING;
    _interstitialAd.LoadAd(adRequest);
     
    TimerCallback callback = new TimerCallback(ProcessTimerEvent);
    _waitTimer = new Timer(callback, this, WAIT_TIME, Timeout.Infinite);
    }
    //Cancel the timer when the waiting time has been reached and show the App's main page.
    private void ProcessTimerEvent(object obj)
    {
    _interstitialCanceled = true;
    _waitTimer.Dispose();
     
    Dispatcher.BeginInvoke(() =>
    {
    NavigationService.Navigate(new Uri("/MainPage.xaml", UriKind.Relative));
    });
    }
    //Display the App's main page when the user dismisses the ad 
    private void OnAdDismissed(object sender, AdEventArgs e)
    {
    NavigationService.Navigate(new Uri("/MainPage.xaml", UriKind.Relative));
    }
    //Display the App's main page when the ad fails to load
    private void OnAdFailedToLoad(object sender, AdErrorEventArgs e)
    {
    _waitTimer.Dispose();
    NavigationService.Navigate(new Uri("/MainPage.xaml", UriKind.Relative));
    }
    //Show the ad only when the ad has been received and within the waiting time 
    private void OnAdReceived(object sender, AdEventArgs e)
    {
    if (!_interstitialCanceled)
    {
    _waitTimer.Dispose();
    _interstitialAd.ShowAd();
    }
    }
    }
    }
    Set the splash screen XAML file as the start up object

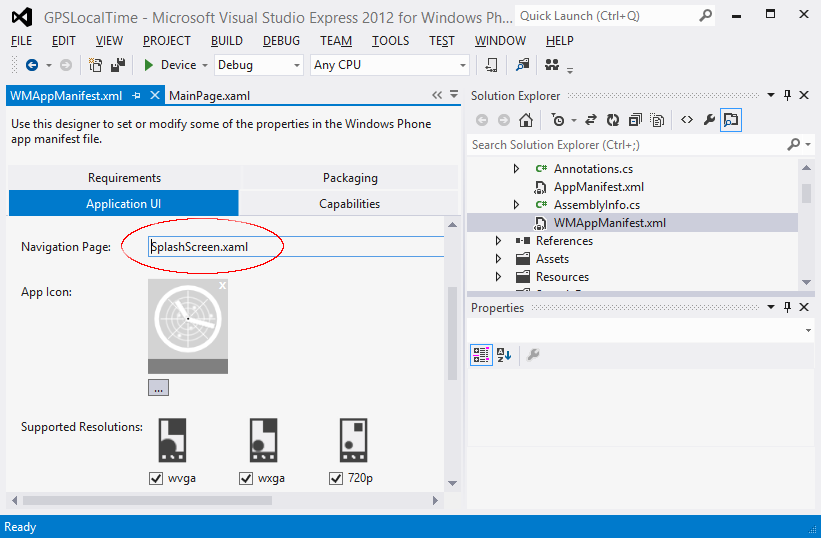
    1. In Visual Studio, open up the file WMAppManifest.xml file in the designer.

    2. In the Navigation Page field, type in the name of the splash screen XAML file e.g. SplashScreen.xaml.

    Override the main page's OnNavigatedTo method
    1. In Visual Studio, open up the main page's code behind file e.g. MainPage.xaml.cs.

    2. In the code editor, change the OnNavigatedTo method to the following:
    protected override void OnNavigatedTo(NavigationEventArgs e)
    {
    base.OnNavigatedTo(e);
    if (NavigationService.BackStack.Count() == 1)
    {
    NavigationService.RemoveBackEntry();
    }
    }

    Note: This will remove the splash screen XAML from the back stack i.e. when the user press the back button, the splash screen will not be loaded again.

    Now when the Windows app is run, the splash screen will load and may display an interstitial ad as shown below.

    Monday, September 8, 2014

    C# code snippet to write a Stanford Polygon binary file

    The Stanford Polygon file format (PLY) is a standard three-dimensional file format typically used in 3-D software such as Blender, 3D Studio Max and many others. I looked for some C# source code to write 3-D data into a file in binary PLY format but could only find C++ examples. So I came up with my own code snippet which just writes out simple 3-D vertices without additional properties, as shown below.

    using System;
    using System.Collections.Generic;
    using System.Linq;
    using System.Text;
    using System.IO;
     
    SomeFunction()
    {
    BinaryWriter writer = new BinaryWriter(new FileStream("myBinaryFile.ply", FileMode.Create), Encoding.ASCII);
    //Write the headers for 3 vertices
    writer.Write(str2byteArray("ply\n"));
    writer.Write(str2byteArray("format binary_little_endian 1.0\n"));
    writer.Write(str2byteArray("element vertex 3\n"));
    writer.Write(str2byteArray("property float x\n"));
    writer.Write(str2byteArray("property float y\n"));
    writer.Write(str2byteArray("property float z\n"));
    writer.Write(str2byteArray("end_header\n"));
    
    
    //Write the 1st vertex
    writer.Write(float2byteArray((float)1000.0));
    writer.Write(float2byteArray((float)1230.3));
    writer.Write(float2byteArray((float)2390.1));
    
    
    //... write the remaining 2 vertices here
    
    
    //Close the binary writer
    writer.Close();
    }
    private byte[] float2byteArray(float value)
    {
    return BitConverter.GetBytes(value);
    }
    private byte[] str2byteArray(string theString)
    {
    return System.Text.Encoding.ASCII.GetBytes(theString);
    }
    This example is meant only for little endian machines.

    Monday, August 11, 2014

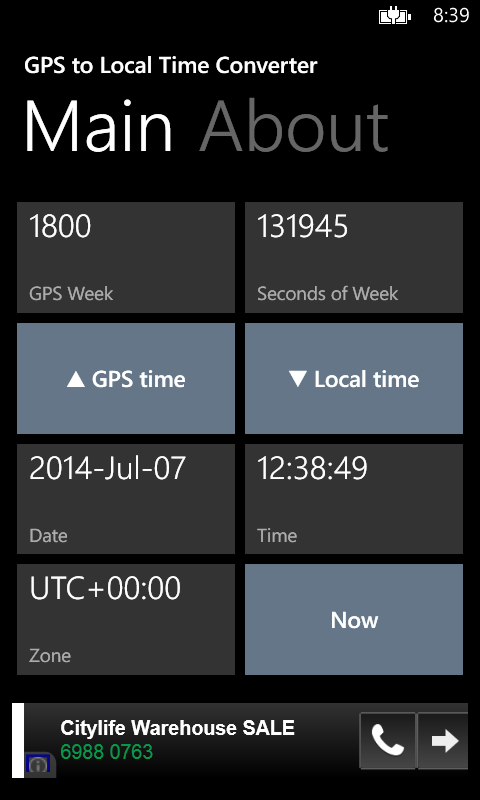
    Windows Phone 8 App for converting GPS Week time and local time

    The date time used by the Global Positioning System (GPS) date time is normally expressed as a week number and a seconds-of-week number. This format is not as easy to work with as a normal calendar date time. This app can help to convert the GPS week-seconds format into the equivalent local date time and vice-versa. It has the option to choose which local UTC time zone to use for conversion. The app will automatically adjust the local time for GPS leap seconds.

    This Windows Phone app is based on a similar app written for Android earlier. The app was written as an exercise to learn the ins and outs of developing for the Windows Phone 8 platform. It turned out that the app has to be rewritten from scratch as the two platforms are not the same, especially the look and the behavior has to be specially tailored to the platform.

    Using the Windows Phone app is simple. Just click on the GPS Local Time tile to launch the app.


    Convert from GPS week and seconds of week to the local time

    1. Tap the GPS week button to set the source GPS week number in the picker screen.


    2. Tap the GPS seconds of week button to set the source GPS seconds of week number in the picker screen.
    3. Optional. Tap the Zone button to set the destination UTC zone in the picker list.


    4. Tap the To Local time button to do the conversion.

      The GPS time is converted to the equivalent local date time.
    Convert from the local date time to GPS week time
    1. Optional. Tap the Zone button and choose a source UTC zone in the picker.
    2. Tap the Date button and choose the source date in the picker.


    3. Tap the Time button and choose the source time in the picker.


    4. Tap the To GPS Time button.

      The local date time is converted to the equivalent GPS week, seconds time.
    Display the current GPS and Local time
    1. Optional. Tap the Zone button and choose the destination UTC zone in the picker.
    2. Tap the Now button.

      The current GPS week, seconds and local date, time are displayed.

    The app can be downloaded from the Windows Phone store.


    Monday, August 4, 2014

    Extend and style a Button to display two labels in Windows Phone 8 with a Tilt animation effect

    While developing a Windows Phone 8 app, I wanted to create a button that can display two lines of  text and has a tilt animation effect when pressed, similar to the standard Windows Phone UTC time zone list screen, as shown below. 
    After some research, I found out how to do it by doing the following:
    • Extending the Button class to add in an additional property for the second text label
    • Create and use a new Button style resource for the extended Button class
    • Download and include the Control Tilt Effect example TiltEffect.cs file
    Extend the Button class
    In the Windows Phone solution, create a new class that extends the Button class, and expose a new property; I named the property as 'Content2'. 

    namespace Example
    {
    public class TwoLabelButton : Button
    {
    public static readonly DependencyProperty Content2Property =
    DependencyProperty.Register("Content2", typeof(string), typeof(TwoLabelButton), new PropertyMetadata(default(string)));
     
    public string Content2
    {
    get { return (string)GetValue(Content2Property); }
    set { SetValue(Content2Property, value); }
    }
    }
    }
    Define a new Button style resource
    In the XAML file that I want to use the new two label extended button, create a new style resource. I name this as the TimeZoneButtonStyle. In the code snippet below, the style resource is placed in a Grid.Resources block, as I wanted to use the style in a grid layout. In the style I wanted the two labels (to be bounded to the Content and Content2 properties) to be in two TextBlocks, oriented vertically in a StackPanel. The upper TextBlock will be styled with the standard PhoneTextTitle2Style while the lower TextBlock will be styled with the standard PhoneTextSubtleStyle.


    <Grid.Resources>
    <Style x:Key="TimeZoneButtonStyle" TargetType="local:TwoLabelButton">
    <Setter Property="Template">
    <Setter.Value>
    <ControlTemplate TargetType="local:TwoLabelButton">
    <StackPanel Orientation="Vertical">
    <TextBlock
    Style="{StaticResource PhoneTextTitle2Style}"
    TextWrapping="Wrap"
    Text="{TemplateBinding Content}"></TextBlock>
    <TextBlock
    Style="{StaticResource PhoneTextSubtleStyle}"
    Text="{TemplateBinding Content2}"></TextBlock>                                
    </StackPanel>
    </ControlTemplate>
    </Setter.Value>
    </Setter>
    </Style>
    </Grid.Resources>
    Download and include the example TiltEffect.cs file
    Follow the instructions on the MSDN web site http://msdn.microsoft.com/en-us/library/ff941094 to download and include the TiltEffect.cs file in your solution.
    In my case, I edited the TiltEffect.cs file and changed the namespace to be consistent with my solution. Then in the XAML file where I wanted to use the effect, I added in the page level property to enable the tilt effect for the whole page as shown in the snippet below.

    <phone:PhoneApplicationPage
        x:Class="Example"
        xmlns="http://schemas.microsoft.com/winfx/2006/xaml/presentation"
        xmlns:x="http://schemas.microsoft.com/winfx/2006/xaml"
        xmlns:phone="clr-namespace:Microsoft.Phone.Controls;assembly=Microsoft.Phone"
        xmlns:shell="clr-namespace:Microsoft.Phone.Shell;assembly=Microsoft.Phone"
        xmlns:d="http://schemas.microsoft.com/expression/blend/2008"
        xmlns:mc="http://schemas.openxmlformats.org/markup-compatibility/2006"
        xmlns:local="clr-namespace:Example"
        local:TiltEffect.IsTiltEnabled="True"
        FontFamily="{StaticResource PhoneFontFamilyNormal}"
        FontSize="{StaticResource PhoneFontSizeNormal}"
        Foreground="{StaticResource PhoneForegroundBrush}"
        SupportedOrientations="PortraitOrLandscape" Orientation="Portrait"
        mc:Ignorable="d"
        Loaded="PhoneApplicationPage_Loaded"
        shell:SystemTray.IsVisible="True">

    The complete example XAML file is shown below. To display the list of time zones, I bounded a DataTemplate to a collection of my custom TimeZone class.

    <phone:PhoneApplicationPage
    x:Class="Example"
    xmlns="http://schemas.microsoft.com/winfx/2006/xaml/presentation"
    xmlns:x="http://schemas.microsoft.com/winfx/2006/xaml"
    xmlns:phone="clr-namespace:Microsoft.Phone.Controls;assembly=Microsoft.Phone"
    xmlns:shell="clr-namespace:Microsoft.Phone.Shell;assembly=Microsoft.Phone"
    xmlns:d="http://schemas.microsoft.com/expression/blend/2008"
    xmlns:mc="http://schemas.openxmlformats.org/markup-compatibility/2006"
    xmlns:local="clr-namespace:Example"
    local:TiltEffect.IsTiltEnabled="True"
    FontFamily="{StaticResource PhoneFontFamilyNormal}"
    FontSize="{StaticResource PhoneFontSizeNormal}"
    Foreground="{StaticResource PhoneForegroundBrush}"
    SupportedOrientations="PortraitOrLandscape" Orientation="Portrait"
    mc:Ignorable="d"
    Loaded="PhoneApplicationPage_Loaded"
    shell:SystemTray.IsVisible="True">
     
    <phone:PhoneApplicationPage.Resources>
    <local:TimeZones x:Key="TimeZones" />
    </phone:PhoneApplicationPage.Resources>
    <!--LayoutRoot is the root grid where all page content is placed-->
    <Grid x:Name="LayoutRoot" Background="{StaticResource PhoneChromeBrush}">
    <Grid.RowDefinitions>
    <RowDefinition Height="Auto"/>
    <RowDefinition Height="*"/>
    </Grid.RowDefinitions>
     
    <Grid.Resources>
    <Style x:Key="TimeZoneButtonStyle" TargetType="local:TwoLabelButton">
    <Setter Property="Template">
    <Setter.Value>
    <ControlTemplate TargetType="local:TwoLabelButton">
    <StackPanel Orientation="Vertical">
    <TextBlock
    Style="{StaticResource PhoneTextTitle2Style}"
    TextWrapping="Wrap"
    Text="{TemplateBinding Content}"></TextBlock>
    <TextBlock
    Style="{StaticResource PhoneTextSubtleStyle}"
    Text="{TemplateBinding Content2}"></TextBlock>                                
    </StackPanel>
    </ControlTemplate>
    </Setter.Value>
    </Setter>
    </Style>
    </Grid.Resources>
     
    <!--TitlePanel contains the name of the application and page title-->
    <StackPanel Grid.Row="0" Margin="12,17,0,28">
    <TextBlock Text="SELECT A TIME ZONE" Style="{StaticResource PhoneTextNormalStyle}"/>
    </StackPanel>
     
    <!--ContentPanel - place additional content here-->
    <Grid x:Name="ContentPanel" Grid.Row="1" Margin="12,0,12,0">
    <phone:LongListSelector
    ItemsSource="{StaticResource TimeZones}"
    HorizontalAlignment="Stretch"
    VerticalAlignment="Stretch"
    >
    <phone:LongListSelector.ItemTemplate>
    <DataTemplate>
    <!--<TextBlock Text="{Binding Path=DisplayName}" />-->
    <local:TwoLabelButton
    Tap="TimeZoneButton_Tap"
    Style="{StaticResource TimeZoneButtonStyle}"
    Content="{Binding Path=DisplayName}"
    Content2="{Binding Path=ZoneOffset}"
    HorizontalContentAlignment="Left" BorderThickness="0" RenderTransformOrigin="0.5,0.5">                                
    </local:TwoLabelButton>
    <!--<TextBlock Text="{Binding Path=ZoneOffset}" />-->
    </DataTemplate>
    </phone:LongListSelector.ItemTemplate>
    </phone:LongListSelector>
    </Grid>
    </Grid>
     
    </phone:PhoneApplicationPage>

    The code listing for the TimeZone class is shown below.

    namespace Example
    {
    public class TimeZone
    {
    private string _displayName = string.Empty;
    private string _zoneOffset = string.Empty;
    public string DisplayName
    {
    get { return _displayName; }
    set { _displayName = value; }
    }
    public string ZoneOffset
    {
    get { return _zoneOffset; }
    set { _zoneOffset = value; }
    }
    public TimeZone(string zoneOffset, string displayName)
    {
    _displayName = displayName;
    _zoneOffset = zoneOffset;
    }
    }
    public class TimeZones : List<TimeZone>
    {
    public TimeZones()
    {
    Add(new TimeZone("UTC-12:00", "International Date Line West"));
    Add(new TimeZone("UTC-11:00", "Samoa"));
    Add(new TimeZone("UTC-10:00", "Hawaii"));
    Add(new TimeZone("UTC-09:00", "Alaska"));
    Add(new TimeZone("UTC-08:00", "Pacific Time (US & Canada)"));
    //...etc...
    }
    }
    }
    The following screenshot shows how the example XAML file looks rendered on a Windows Phone.