Showing posts with label PostGIS. Show all posts

Monday, December 19, 2011

Accessing PostGIS database features from gvSIG

The PostGIS spatial database can be accessed by a variety of client software including gvSIG, FME, and even Intergraph's GeoMedia. It is possible to import features from GeoMedia into the PostGIS database and manipulated through an open source software like gvSIG. For instance, the example States feature in the screenshots below was imported to PostGIS via GeoMedia's Export Feature command.

In order for gvSIG to access and manipulate features in PostGIS, a GeoDB connection must be made first as shown below.
  1. Start gvSIG OADE 2010. Create a new View with the desired coordinate system, e.g. Albers Equal Area. Open the view.


  2. Select View | Add Layer.

    The Add Layer dialog box appears.

  3. Click the GeoDB tab.
  4. In the Connection field, click the New Connection button on the right.|

    The Connection Settings dialog box appears.

  5. In the Connection name field, type in a name e.g. PostGISConn1.
  6. In the Driver field, choose PostGIS JDBC Driver.
  7. In the Server URL or IP field, type in the address name or the IP address e.g. 192.168.1.99.
  8. In the Database name field, type in the PostGIS database name e.g. gdotest.
  9. In the User field, type in the database user name e.g. gdouser.
  10. In the Password field, type in the password of the database user e.g. gdouser.
  11. Click OK.

    If the values are correctly filled, the database would be connected to gvSIG. A list of tables appear

  12. In the table list field, toggle on one or more spatial tables e.g. public.states.
  13. Click Ok.

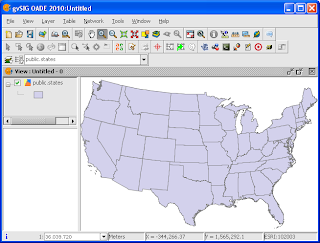
    The selected table(s) are displayed in the View.

Monday, July 11, 2011

Connecting GeoMedia Professional to a read/write PostGIS database warehouse

Intergraph has released an open source GeoMedia PostGIS data server under the Apache 2.0 license on this site http://geomediapostgis.codeplex.com/. I downloaded and tried out creating and connecting to a read/write PostGIS warehouse on a Windows server from a remote client using the sample GeoMedia workspace USSampleData.gws. The instructions on the binaries talked about using Debian Linux as the host for the PostGIS database while I used Windows XP as the host instead.

Installing PostGIS 1.5 onto PostgreSQL 9.0 on Windows
After installing PostgreSQL 9.0 on Windows using the packaged installer on my server, I did the following:
  1. Download the PostGIS 1.5 Windows binaries from http://postgis.refractions.net/download/windows/pg90/postgis-pg90-binaries-1.5.3.zip
  2. Extract the files into a folder e.g. C:\Program Files\postgis-pg90-binaries-1.5.3.

  3. Use a text editor and open up the makepostgisdb.bat file.

  4. If necessary, change the PGPORT, PGHOST, PGUSER, and PGPASSWORD settings to match the Windows PostgreSQL installation.
  5. Uncomment the last line to create the database defined by the THEDB setting as a template PostGIS database e.g template_postgis15. Close and save the file.

  6. Run the batch file makepostgisdb.bat.

    PostGIS is installed and a template database is created.
Configure PostgreSQL for network access
By default, PostgreSQL is configured not to accept any network database requests. I had to do edit the configuration parameters to allow network access.
  1. On the server, select Start | All Programs | PostgreSQL 9.0 | pgAdmin III.

    The pgAdmin III application appears.
  2. In the Object browser pane, double click on the PostgreSQL 9.0 (localhost:5432) node. Enter the password if prompted.

    Connection to the server is established.
  3. Select Tools | Server Configuration | pg_hba.conf.

    The Backend Access Configuration Editor appears.
  4. Double click the empty last row.

    The Client Access Configuration dialog appears.
  5. Toggle Enabled on. Choose host for Type, all for Database, all for User and md5 for Method. Type in an appropriate IP Address for your network e.g. 192.168.8.0/24.

    Note: In this example, I am allowing access for any clients with the IP address pattern 192.168.8.*.
  6. Click OK.
  7. Select File | Save. Press Yes if prompted.
  8. Select File | Reload Server. Press Yes if prompted.
  9. Close the Client Access Configuration and Backend Access Configuration dialogs. 
Create and configure the Postgis database
  1. In the Object browser, expand and select Login Roles node.
  2. Select Edit | New Object | New Login Role.

    The New Login Role dialog box appears.
  3. In the Role Name field, type in gdouser. In the Password and Password(again) fields, type in gdouser.

  4. Click OK.

    The login is created.
  5. In the Object browser, select the Database(s) node.
  6. Select Edit | New Object | New Database.

    The New Database dialog box appears.
  7. In the Name field, type in gdotest. Choose gdouser as the Owner. Choose template_postgis15 as the Template.

  8. Click OK.

    The database is created.
Configuring the PostGIS GDO server on the client
  1. On the client machine, I downloaded the PostGISGDObin.zip package from http://geomediapostgis.codeplex.com and extracted to a folder e.g. C:\Program Files\PostGISGDO\.

  2. Run Register.bat.

    The data server is registered with GeoMedia.
  3. Double click the file PsgDBUtils.exe.

    The PostGIS GDO Database Utilities appear.
  4. Click New Connection.

    The New Connection dialog box appears.

  5. In the Server field, type in the address or name. In the Database field, type in gdotest. In the User field, type in gdouser. In the Password field, type in gdouser. Click OK.

    The utility is connected to the PostGIS database.
  6. Click Create INGR Metadata Tables.

    The metadata tables are created.
  7. Click Run script.

    The Open dialog box appears.
  8. Browse and choose the file USSampleProjCS.sql. Click Open. Click OK when prompted.

    Note: this script will add the Albers Equal Area coordinate system to the PostGIS database for working with the sample USSampleData.gws workspace.
  9. Click Close.
Connect to the PostGIS database from GeoMedia
  1. Start GeoMedia and open up the sample workspace USSampleData.gws.
  2. Select Warehouses | New Connection.

    The New Connection dialog box appears.
  3. Choose PostGIS Connection Type.
  4. In the Server field, type in the IP address or node name of the PostGIS server.
  5. In the Database field, type in gdotest.

  6. In the User and Password fields, type in gdouser. Click OK.

    GeoMedia is connected to the PostGIS database.

    Note: You should now have full read/write access to the PostGIS database.

Monday, December 6, 2010

Export a GeoMedia Access Warehouse to Postgis with GM2PGSQL

If you have been using Postgis for a while, you would be familiar with the shp2pgsql executable. This executable converts a shapefile into a Postgis SQL file for bulk loading into a Postgis database. There is a similar executable for converting a GeoMedia Access warehouse into Postgis. It is gm2pgsql, a free executable which is downloadable from this web site http://gm2pgsql.projects.postgresql.org/.

To use this executable,
  1. Type in the gm2pgsql command at the Windows Command Prompt.

    For example, input.mdb is the source GeoMedia Access warehouse, output.sql is the destination Postgis SQL file, pgdatabase is the destination Postgis database schema name, and -1 is the SRID number.

    C:\> gm2pgsql input.mdb output.sql pgdatabase -1
  2. Press RETURN.

    All the supported features in the Access warehouse are exported out.
If you open up the resultant SQL file with Notepad, the SQL statements to create the corresponding Postgis tables and corresponding feature attributes and geometries can be seen, as shown below. 
It seems that there is no way to limit the export to a single feature table; it will export all features that it recognizes. For more details, please visit the gm2pgsql project page at http://gm2pgsql.projects.postgresql.org/.

Wednesday, April 22, 2009

Using PostGIS to convert SVY21 easting/northing to latitude/longitude coordinates

Besides commercial software like GeoMedia, Global Mapper, FME, ArcGis, etc. there are also free open source tools that can be used to convert SVY21 easting/northing coordinates to geographical latitudes/longitude coordinates. A great open source software is PostGIS and in this posting I will show how to use it without any programming or customization to convert SVY21 coordinates in CSV (comma separated values) files to geographical coordinates.

Note: Prior to doing the conversion, the SVY21 projection parameters must be added to the PostGIS spatial reference system table as shown in the previous posting here

The source CSV file is shown in the screen shot below. The file has only three columns - a running number, the easting coordinate and the northing coordinate. 

  1. Open up the pgAdmin GUI by selecting Start | All Programs | PostgreSQL 8.3 | pgAdmin III.

    The pgAdmin III application appears.

  2. Connect to your PostgreSQL server and select your database e.g. svy21.

  3. Select Tools | Query Tool.

    The Query dialog box appears.

  4. Enter the following SQL command to create a database table to store the records from the CSV file.

    CREATE TABLE svy21coords   ( id SERIAL NOT NULL,   easting DOUBLE PRECISION,   northing DOUBLE PRECISION,
    CONSTRAINT id_pkey PRIMARY KEY (id)  ); 
  5. On the keyboard, press F5 to execute the command.

    The table svy21coords is created.

  6. Select Edit | Clear Window. Enter the following SQL command to load in the SVY21 records from the CSV file. Note: replace C:/temp/svy21coords.csv with the name of your file.

    COPY svy21coords (id, easting, northing)  FROM 'c:/temp/svy21coords.csv'   WITH CSV HEADER ; 
  7. Press F5 to execute the command.

    The records are loaded to the table.

  8. Select Edit | Clear Window. Enter the following SQL command to create a geometry field that is associated with the SVY21 coordinate system.

    SELECT AddGeometryColumn 
    ( 'public', 'svy21coords', 'the_geom', 93414, 'POINT', 2 ); 
    Note: 93414 is the SRID of the SVY21 coordinate system in the spatial_ref_sys table.

  9. Press F5 to execute the command.

    The geometry field is appended to the table.

  10. Select Edit | Clear Window. Enter the following SQL command.

    SELECT 'UPDATE svy21coords SET the_geom=GeomFromText(''POINT('||easting||' '||northing||')'',93414) WHERE id='||id||';'  FROM svy21coords; 
  11. Press F5 to execute the query.

    The query results are displayed in the bottom pane of the Query window.


  12. Select all the query results by clicking the first row and shift-clicking the last row. Press CTRL-C to copy the selected results to the Windows Clipboard.

  13. Click the top pane. Select Edit | Clear Window. Select Edit | Paste.

    The results are pasted into the top pane of the query window. Note the double quotation marks on every line. 
    "UPDATE svy21coords SET the_geom=GeomFromText('POINT(39815 35200)',93414) WHERE id=1;"
    "UPDATE svy21coords SET the_geom=GeomFromText('POINT(39800 35200)',93414) WHERE id=2;"
    "UPDATE svy21coords SET the_geom=GeomFromText('POINT(43200 35900)',93414) WHERE id=3;"


  14. Select Edit | Find and Replace.

    The Find and Replace dialog box appears.


  15. In the Find what field, enter ". Click Replace All. Close the Find and Replace dialog box.

    All the double quote marks are removed.
    UPDATE svy21coords1 SET the_geom=GeomFromText('POINT(39815 35200)',93414) WHERE id=1;
    UPDATE svy21coords1 SET the_geom=GeomFromText('POINT(39800 35200)',93414) WHERE id=2;
    UPDATE svy21coords1 SET the_geom=GeomFromText('POINT(43200 35900)',93414) WHERE id=3;


  16. Press F5 to execute the SQL command.

    The geometry field the_geom is updated with the SVY21 point coordinates.

  17. Select Edit | Clear Window. Enter the following SQL command to transform the SVY21 geometries to geographical latitude/longitude and write the records to a temporary table CSVOUTPUT.

    CREATE TABLE CSVOUTPUT  AS SELECT id,easting,northing, x(ST_Transform(the_geom,4326)),y(ST_Transform(the_geom,4326))  from svy21coords  Note: 4326 is the SRID of the geographical lat/lng coordinate system. 
  18. Press F5.

    The SVY21 points are transformed into latitude/longitude and written to the output table.

  19. Select Edit | Clear Window. Enter the following SQL command to save the converted coordinates to an output CSV file. Note: replace C:/temp/out/svy21coords.csv with your output file name.

    COPY CSVOUTPUT TO 'C:/TEMP/OUT/svy21coords.csv' WITH CSV HEADER
  20. Press F5.

    The output file is created as shown in the Excel screen shot below.

Tuesday, April 21, 2009

How to add SVY21 coordinate system to PostGIS

SVY21 projection does not come with the default installation of my PostGIS 1.3.5 running on PostgreSQL 8.3. If you have geometries with SVY21 easting and northing coordinates and you need to do coordinate transformation e.g. between SVY21 and latitude/longitude in PostGIS, then you have to insert the SVY21 projection parameters into the spatial_ref_sys table in your database. The parameters are a pain to type in. Fortunately, there is a website http://spatialreference.org where you can simply copy the SQL INSERT statement and execute it in the PgAdmin GUI or the PSQL command prompt. 

The exact link to the SVY21 SQL INSERT statement is here below:

Below is the actual statement:
INSERT into spatial_ref_sys  ( srid,  auth_name,  auth_srid,  proj4text,  srtext )  values  (  93414,  'epsg',  3414,  '+proj=tmerc +lat_0=1.366666666666667 +lon_0=103.8333333333333 +k=1 +x_0=28001.642 +y_0=38744.572 +ellps=WGS84 +units=m +no_defs ',  'PROJCS["SVY21 / Singapore TM",GEOGCS["SVY21",DATUM["SVY21",SPHEROID["WGS 84",6378137,298.257223563,AUTHORITY["EPSG","7030"]],AUTHORITY["EPSG","6757"]],PRIMEM["Greenwich",0,AUTHORITY["EPSG","8901"]],UNIT["degree",0.01745329251994328,AUTHORITY["EPSG","9122"]],AUTHORITY["EPSG","4757"]],UNIT["metre",1,AUTHORITY["EPSG","9001"]], PROJECTION["Transverse_Mercator"], PARAMETER["latitude_of_origin",1.366666666666667], PARAMETER["central_meridian",103.8333333333333], PARAMETER["scale_factor",1], PARAMETER["false_easting",28001.642], PARAMETER["false_northing",38744.572], AUTHORITY["EPSG","3414"], AXIS["Easting",EAST],AXIS["Northing",NORTH]]' );
Simply execute the statement to add in the SVY21 projection to your PostGIS database. The SRID for SVY21 is 93414 here. 

Monday, January 19, 2009

Include Directories and Library for Developing PostGIS C Programs

To start developing PostgreSQL and PostGIS C/C++ programs in Microsoft Visual Studio 6.0, there are a couple of Include file directories which you should set as part of the configuration of the development environment. The directories are the following:
(a) c:\PROGRAM FILES\POSTGRESQL\8.x\INCLUDE\
(b) c:\PROGRAM FILES\POSTGRESQL\8.x\INCLUDE\LIBPQ\

These can be set in the Options dialog box which can be opened by selecting Tools > Options in Microsoft Visual Studio 6.0, as shown below.


Besides the include files setting, another useful directory to define is the Library files directories. Only one library directory - C:\PROGRAM FILES\POSTGRESQL\8.x\LIB\ need to be set in the Options dialog box, as shown in the figure below.


The PostgreSQL/PostGIS executable you are developing can be statically linked with the PostgreSQL library libpq.lib. Or if you prefer, you can link the executable to the dynamic link library libpq.dll. Select Project > Settings to open the Project Settings dialog box and type in the library to link to under the Link tab, as shown in the figure below.

Tuesday, June 24, 2008

GeoMedia and PostGIS

PostGIS is an open source software that spatially enables the PostgreSQL database. I have been using PostGIS for several years and it has served me well personally as well as in a couple of GIS implementation projects. It is easy to use and I really like being able to create spatial tables and perform spatial queries and analysis all from the SQL prompt. I could string a number of the statements into a script for automated batch processing. An example PostGIS spatial query is shown below:

create table demand as
select
a.postcode, a.telno, a.acctclass, a.premisenumber, a.premiseaddress, a.avgbill, a.acctclass, a.x, a.y, a.demandtype, b.polygonid
from custdata a, demandpolygon b
where (a.the_geom && b.the_geom) and
intersects(a.the_geom,b.the_geom)
order by b.polygonid

The field the_geom is the geometry field of the tables; the operator ' &&' is similar to Oracle's first pass rough filter while intersects is a spatial operator.

One of the problems that I face is the lack of a good graphical user interface for viewing and manipulating spatial data in PostGIS. I have to export data in Shape file format using the PostGIS utility pgsql2shp for viewing in GeoMedia.

However, I have just seen the Intergraph 2008 GeoMedia Product Updates presentation and I am pleased to see that a PostGIS Data Server will be developed as part of a minor release of GeoMedia 6.1. It is not known whether it will be a Read only or Read/Write data server. Let's hope it is R/W. Here is a crop of a slide below: