Showing posts with label Windows Phone. Show all posts

Monday, June 20, 2016

Trainsity Hong Kong Windows Phone App

Find your way around Hong Kong city's subway using the high resolution vector maps of the train network. The following metro rail lines are available: East Rail, Kwun Tong, Tsuen Wan, Island, Tung Chung, Airport Express, Tseung Kwan O, West Rail, Ma On Shan, and Disneyland Resort lines.

The maps have small file size footprints but with many levels of zoom and can work offline without connecting to the Internet. Users can click the train station box labels to open Bing Maps, where they can use all the functions of the external app to visualise the surrounding area and/or perform routing for directions.

There is also an offline function to calculate the best way to travel from a station to another station with a direction breakdown and timings (which may vary from the actual travelling time).

On a Windows Mobile 8+ handset, the app will display tiles of train lines, which when tapped will open up a detail view of the metro transit map, as shown below.
 
Tapping the station labels will bring up an option menu where users can choose to display the station location in Bing Maps.


If you want to find out how long it takes to travel from one station to another, and the best route to take, simply swipe to the Route page. Then type in the From station and To station. As you enter the values, a drop down list will appear and a station can be selected from the list. Finally, tap the Execute icon.

Tapping the more details link will display the recommended route to take.

Click the button below to download the app from the Windows Store.
Get it from Microsoft

Monday, February 1, 2016

Visual Studio Windows Phone project has no Run Device or Mobile Emulators options

After upgrading my computer to Microsoft Visual Studio 2015, I opened up my old Windows Phone 8 projects to work on them. I found the Run Device or Mobile Emulators function missing, previously available in VS2013 and all the Visual Studio 2015 showed was a Start button, as shown below.

My first thought was that the installation probably had some problems and I spent a lot of time with repairing, and reinstalling Visual Studio 2015. After some time, I did a mouse right click in the Solution Explorer on the project and found the Retarget to Windows Phone 8.1 option, as shown in the screenshot below.

Right after the option was selected, the Start button changed to the Run Device/Mobile Emulators button.


That was what was needed to reinstate the function back to Visual Studio and I found it by accident after unsuccessfully doing a Google search or reading the documentation.
Hopefully this post will help some people.

Wednesday, September 9, 2015

Cannot start the Windows Phone emulator with the message "The emulator is unable to create the internal network switch"

On a Windows 10 Pro notebook, I encountered this error while trying to run the Windows phone emulator from Visual Studio 2015.

A few quick Internet search results came up with the following suggestions:

  1. Use the Hyper-V Manager to manually create the "Windows Phone Emulator Internal Switch" but I found this did not fully resolve the problem, as running the emulator will create additional network switches.

  2. Uninstall Oracle Virtual Box. However, I required Virtual Box for other purposes. 
The solution that work for me was to do the following:
  1. In Windows, search for "View network connections" to bring up the Network Connections panel.


  2. Look for all VirtualBox Host-Only Ethernet Adapter connections e.g. Ethernet 3. Mouse right click on each connection.
  3. In the pop up menu, choose Disable
It may be necessary to restart Windows. Now the Windows Phone emulator should be able to start up.

Monday, February 23, 2015

Disabling the Windows Phone frame rate numbers display while debugging

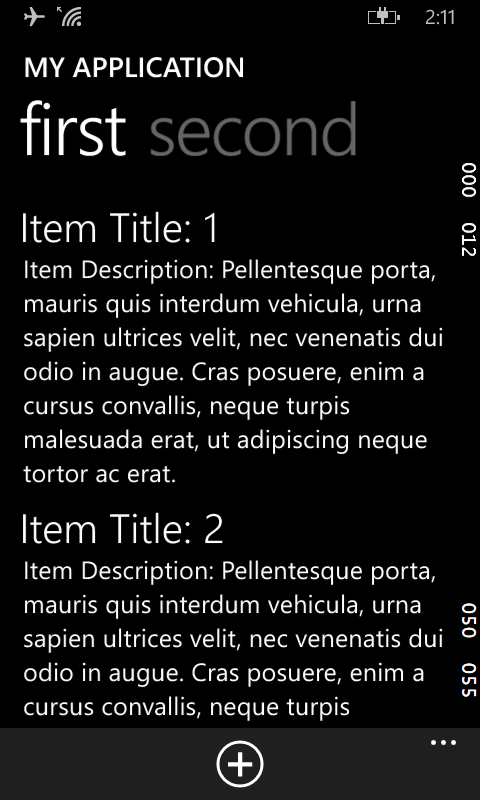
While debugging Windows Phone Apps, there will be some (weird looking) running numbers on the right side of the app's screen, as shown in the screen shot below.

These are actually frame rate counter numbers to aid in debugging. They can be easily switched off if you do not want them on the screen, especially if you want to capture the screen. To turn it off, just do the following:

  1. In Visual Studio, open up the project's App.xaml.cs file in the editor.


  2. Look for the following lines:

    if (System.Diagnostics.Debugger.IsAttached)
    {
    this.DebugSettings.EnableFrameRateCounter = true;
    }

  3. Change them to the following:

    if (System.Diagnostics.Debugger.IsAttached)
    {
    this.DebugSettings.EnableFrameRateCounter = false;
    }

  4. Run and debug the app again.

    The frame rate numbers are no longer displayed.


Monday, February 16, 2015

How to fix AdDuplex ad unit configuration error for Microsoft AdMediator

The following error message "Ad unit configuration error Please check the configuration" kept popping up in the Microsoft AdMediator control in an Windows Phone 8 app when it tried to display an ad from AdDuplex.

After troubleshooting the issue, I found that the AdDuplex configuration was indeed incorrect. To resolve the issue the following must be done.

  1. In the Visual Studio project, right click on the project with the AdMediator control. Choose Add | Connected Services.

    The Services Manager dialog box appears.

  2. Select AdDuplex. Click Configure.

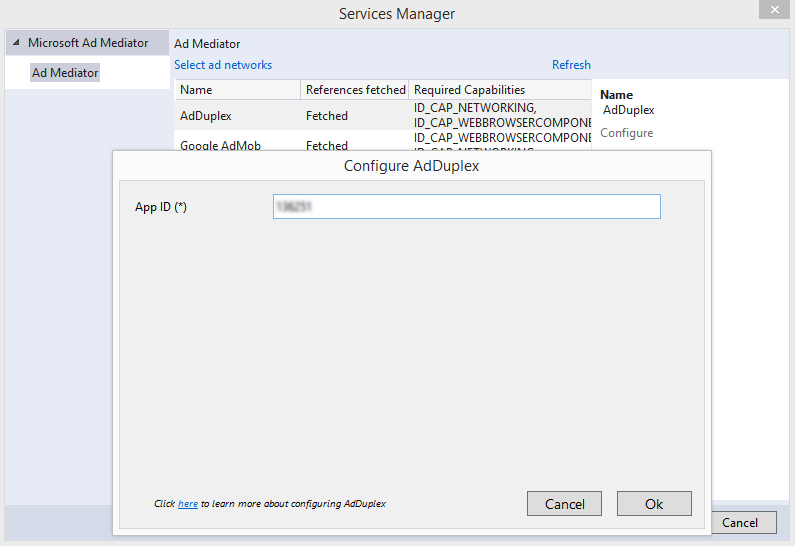
    The Configure AdDuplex dialog box appears.
  3. Note that the dialog is asking for App ID.
  4. In a web browser, open up the AdDuplex app detail page that you want to show ads for https://manage.adduplex.com/#/apps.

  5. Important: Instead of using the App key as it says on the page, copy the Ad unit ID value at the bottom of the page, e.g. 123456.
  6. Now back to the desktop's Configure AdDuplex dialog box. In the App ID field, type in the value from the web page Ad unit ID, e.g. 123456. Click OK.
  7. In the Service Manager dialog box, click OK.
  8. Build and run the app.

    AdDuplex ads will start appearing correctly in the AdMediator control.

Monday, September 22, 2014

Example Windows Phone 8 C# code to show AdMob interstitial ad on start up

I did not find examples on the net illustrating how to show an AdMob interstitial advertisement when a Windows Phone 8 app is started. So here is an example I wrote using C#, basing it on an Android example. In a nutshell, the following need to be done:

  1. Create a splash screen XAML file
  2. Edit the splash screen code behind file
  3. Set the splash screen XAML as the start up object
  4. Override the Windows Phone 8 app main page XAML's OnNavigatedTo method to prevent the back key from bringing up the splash screen
Create a splash screen XAML
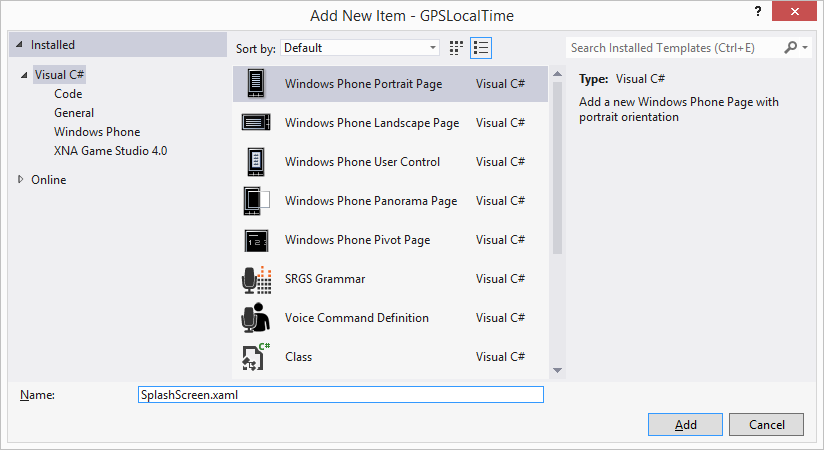
  1. In Visual Studio, add a New Item to the Windows Phone 8 project. Give it a name e.g. SplashScreen.xaml.


  2. Edit the newly created splash screen XAML file to your liking. In this example, we want to display only a progress bar without any text, as shown in the code below.

<phone:PhoneApplicationPage
x:Class="dominoc925.GPSLocalTime.SplashScreen"
xmlns="http://schemas.microsoft.com/winfx/2006/xaml/presentation"
xmlns:x="http://schemas.microsoft.com/winfx/2006/xaml"
xmlns:phone="clr-namespace:Microsoft.Phone.Controls;assembly=Microsoft.Phone"
xmlns:shell="clr-namespace:Microsoft.Phone.Shell;assembly=Microsoft.Phone"
xmlns:d="http://schemas.microsoft.com/expression/blend/2008"
xmlns:mc="http://schemas.openxmlformats.org/markup-compatibility/2006"
FontFamily="{StaticResource PhoneFontFamilyNormal}"
FontSize="{StaticResource PhoneFontSizeNormal}"
Foreground="{StaticResource PhoneForegroundBrush}"
SupportedOrientations="PortraitOrLandscape" Orientation="Portrait"
mc:Ignorable="d"
shell:SystemTray.IsVisible="True">
 
<!--LayoutRoot is the root grid where all page content is placed-->
<Grid x:Name="LayoutRoot" Background="Transparent">
<Grid.RowDefinitions>
<RowDefinition Height="Auto"/>
<RowDefinition Height="*"/>
</Grid.RowDefinitions>
 
<!--TitlePanel contains the name of the application and page title-->
<StackPanel Grid.Row="0" Margin="12,17,0,28">
</StackPanel>
 
<!--ContentPanel - place additional content here-->
<Grid x:Name="ContentPanel" Grid.Row="1" Margin="12,0,12,0">
<ProgressBar Margin="10" IsIndeterminate="True" />
</Grid>
</Grid>
 
</phone:PhoneApplicationPage>

Edit the splash screen code behind file

  1. In Visual Studio, open the splash screen code behind file e.g. splashscreen.xaml.cs.
  2. Code in the following:


using System;
using System.Collections.Generic;
using System.Linq;
using System.Net;
using System.Windows;
using System.Windows.Controls;
using System.Windows.Navigation;
using Microsoft.Phone.Controls;
using Microsoft.Phone.Shell;
using GoogleAds;
using System.Threading;
 
namespace dominoc925.GPSLocalTime
{
public partial class SplashScreen : PhoneApplicationPage
{
//The time to wait for the ad to load in milliseconds
private static int WAIT_TIME = 5000;
private static string INTERSTITIAL_AD_UNIT_ID = "ca-app-pub-xxxxxxxxxxxxxxxxxx";
#if DEBUG
private static bool ADMOB_FORCE_TESTING = true;
#else
private static bool ADMOB_FORCE_TESTING = false;
#endif
private static Timer _waitTimer;
private static bool _interstitialCanceled = false;
 
private InterstitialAd _interstitialAd;
 
public SplashScreen()
{
InitializeComponent();

_interstitialAd = new InterstitialAd(INTERSTITIAL_AD_UNIT_ID);

//Set up the Ad event listeners
_interstitialAd.ReceivedAd += OnAdReceived;
_interstitialAd.FailedToReceiveAd += OnAdFailedToLoad;
_interstitialAd.DismissingOverlay += OnAdDismissed;
 
AdRequest adRequest = new AdRequest();
adRequest.ForceTesting = ADMOB_FORCE_TESTING;
_interstitialAd.LoadAd(adRequest);
 
TimerCallback callback = new TimerCallback(ProcessTimerEvent);
_waitTimer = new Timer(callback, this, WAIT_TIME, Timeout.Infinite);
}
//Cancel the timer when the waiting time has been reached and show the App's main page.
private void ProcessTimerEvent(object obj)
{
_interstitialCanceled = true;
_waitTimer.Dispose();
 
Dispatcher.BeginInvoke(() =>
{
NavigationService.Navigate(new Uri("/MainPage.xaml", UriKind.Relative));
});
}
//Display the App's main page when the user dismisses the ad 
private void OnAdDismissed(object sender, AdEventArgs e)
{
NavigationService.Navigate(new Uri("/MainPage.xaml", UriKind.Relative));
}
//Display the App's main page when the ad fails to load
private void OnAdFailedToLoad(object sender, AdErrorEventArgs e)
{
_waitTimer.Dispose();
NavigationService.Navigate(new Uri("/MainPage.xaml", UriKind.Relative));
}
//Show the ad only when the ad has been received and within the waiting time 
private void OnAdReceived(object sender, AdEventArgs e)
{
if (!_interstitialCanceled)
{
_waitTimer.Dispose();
_interstitialAd.ShowAd();
}
}
}
}
Set the splash screen XAML file as the start up object

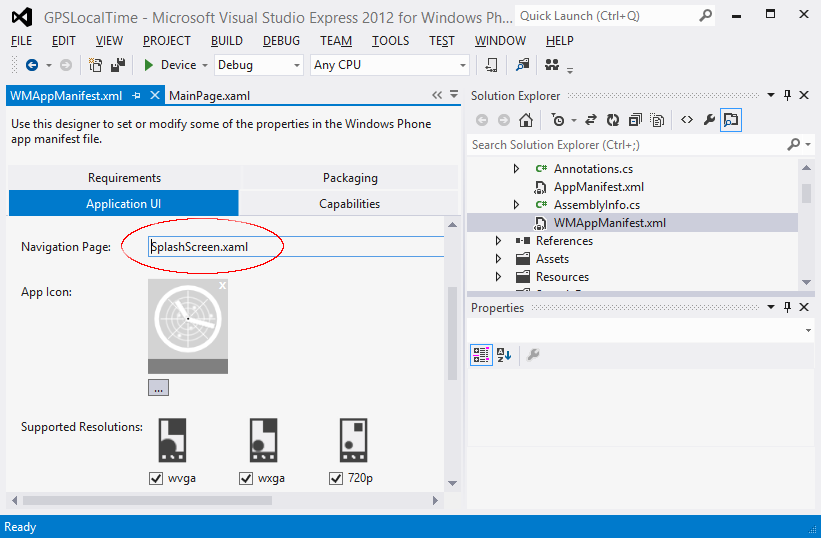
  1. In Visual Studio, open up the file WMAppManifest.xml file in the designer.

  2. In the Navigation Page field, type in the name of the splash screen XAML file e.g. SplashScreen.xaml.

Override the main page's OnNavigatedTo method
  1. In Visual Studio, open up the main page's code behind file e.g. MainPage.xaml.cs.

  2. In the code editor, change the OnNavigatedTo method to the following:
protected override void OnNavigatedTo(NavigationEventArgs e)
{
base.OnNavigatedTo(e);
if (NavigationService.BackStack.Count() == 1)
{
NavigationService.RemoveBackEntry();
}
}

Note: This will remove the splash screen XAML from the back stack i.e. when the user press the back button, the splash screen will not be loaded again.

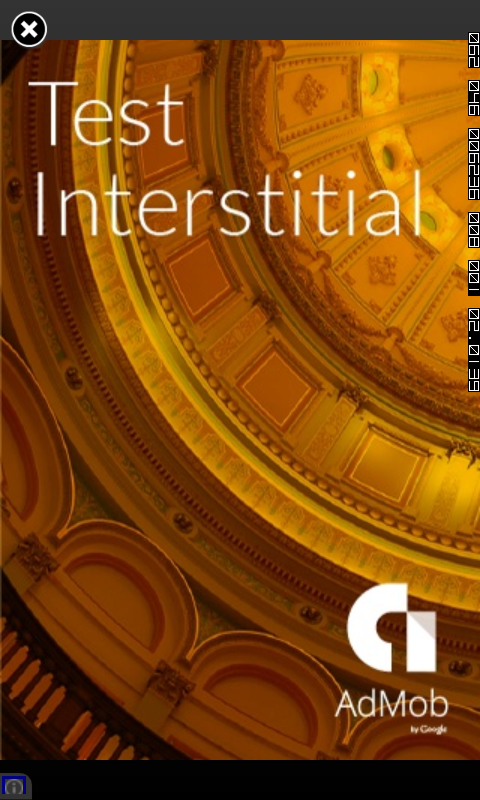
Now when the Windows app is run, the splash screen will load and may display an interstitial ad as shown below.

Monday, August 4, 2014

Extend and style a Button to display two labels in Windows Phone 8 with a Tilt animation effect

While developing a Windows Phone 8 app, I wanted to create a button that can display two lines of  text and has a tilt animation effect when pressed, similar to the standard Windows Phone UTC time zone list screen, as shown below. 
After some research, I found out how to do it by doing the following:
  • Extending the Button class to add in an additional property for the second text label
  • Create and use a new Button style resource for the extended Button class
  • Download and include the Control Tilt Effect example TiltEffect.cs file
Extend the Button class
In the Windows Phone solution, create a new class that extends the Button class, and expose a new property; I named the property as 'Content2'. 

namespace Example
{
public class TwoLabelButton : Button
{
public static readonly DependencyProperty Content2Property =
DependencyProperty.Register("Content2", typeof(string), typeof(TwoLabelButton), new PropertyMetadata(default(string)));
 
public string Content2
{
get { return (string)GetValue(Content2Property); }
set { SetValue(Content2Property, value); }
}
}
}
Define a new Button style resource
In the XAML file that I want to use the new two label extended button, create a new style resource. I name this as the TimeZoneButtonStyle. In the code snippet below, the style resource is placed in a Grid.Resources block, as I wanted to use the style in a grid layout. In the style I wanted the two labels (to be bounded to the Content and Content2 properties) to be in two TextBlocks, oriented vertically in a StackPanel. The upper TextBlock will be styled with the standard PhoneTextTitle2Style while the lower TextBlock will be styled with the standard PhoneTextSubtleStyle.


<Grid.Resources>
<Style x:Key="TimeZoneButtonStyle" TargetType="local:TwoLabelButton">
<Setter Property="Template">
<Setter.Value>
<ControlTemplate TargetType="local:TwoLabelButton">
<StackPanel Orientation="Vertical">
<TextBlock
Style="{StaticResource PhoneTextTitle2Style}"
TextWrapping="Wrap"
Text="{TemplateBinding Content}"></TextBlock>
<TextBlock
Style="{StaticResource PhoneTextSubtleStyle}"
Text="{TemplateBinding Content2}"></TextBlock>                                
</StackPanel>
</ControlTemplate>
</Setter.Value>
</Setter>
</Style>
</Grid.Resources>
Download and include the example TiltEffect.cs file
Follow the instructions on the MSDN web site http://msdn.microsoft.com/en-us/library/ff941094 to download and include the TiltEffect.cs file in your solution.
In my case, I edited the TiltEffect.cs file and changed the namespace to be consistent with my solution. Then in the XAML file where I wanted to use the effect, I added in the page level property to enable the tilt effect for the whole page as shown in the snippet below.

<phone:PhoneApplicationPage
    x:Class="Example"
    xmlns="http://schemas.microsoft.com/winfx/2006/xaml/presentation"
    xmlns:x="http://schemas.microsoft.com/winfx/2006/xaml"
    xmlns:phone="clr-namespace:Microsoft.Phone.Controls;assembly=Microsoft.Phone"
    xmlns:shell="clr-namespace:Microsoft.Phone.Shell;assembly=Microsoft.Phone"
    xmlns:d="http://schemas.microsoft.com/expression/blend/2008"
    xmlns:mc="http://schemas.openxmlformats.org/markup-compatibility/2006"
    xmlns:local="clr-namespace:Example"
    local:TiltEffect.IsTiltEnabled="True"
    FontFamily="{StaticResource PhoneFontFamilyNormal}"
    FontSize="{StaticResource PhoneFontSizeNormal}"
    Foreground="{StaticResource PhoneForegroundBrush}"
    SupportedOrientations="PortraitOrLandscape" Orientation="Portrait"
    mc:Ignorable="d"
    Loaded="PhoneApplicationPage_Loaded"
    shell:SystemTray.IsVisible="True">

The complete example XAML file is shown below. To display the list of time zones, I bounded a DataTemplate to a collection of my custom TimeZone class.

<phone:PhoneApplicationPage
x:Class="Example"
xmlns="http://schemas.microsoft.com/winfx/2006/xaml/presentation"
xmlns:x="http://schemas.microsoft.com/winfx/2006/xaml"
xmlns:phone="clr-namespace:Microsoft.Phone.Controls;assembly=Microsoft.Phone"
xmlns:shell="clr-namespace:Microsoft.Phone.Shell;assembly=Microsoft.Phone"
xmlns:d="http://schemas.microsoft.com/expression/blend/2008"
xmlns:mc="http://schemas.openxmlformats.org/markup-compatibility/2006"
xmlns:local="clr-namespace:Example"
local:TiltEffect.IsTiltEnabled="True"
FontFamily="{StaticResource PhoneFontFamilyNormal}"
FontSize="{StaticResource PhoneFontSizeNormal}"
Foreground="{StaticResource PhoneForegroundBrush}"
SupportedOrientations="PortraitOrLandscape" Orientation="Portrait"
mc:Ignorable="d"
Loaded="PhoneApplicationPage_Loaded"
shell:SystemTray.IsVisible="True">
 
<phone:PhoneApplicationPage.Resources>
<local:TimeZones x:Key="TimeZones" />
</phone:PhoneApplicationPage.Resources>
<!--LayoutRoot is the root grid where all page content is placed-->
<Grid x:Name="LayoutRoot" Background="{StaticResource PhoneChromeBrush}">
<Grid.RowDefinitions>
<RowDefinition Height="Auto"/>
<RowDefinition Height="*"/>
</Grid.RowDefinitions>
 
<Grid.Resources>
<Style x:Key="TimeZoneButtonStyle" TargetType="local:TwoLabelButton">
<Setter Property="Template">
<Setter.Value>
<ControlTemplate TargetType="local:TwoLabelButton">
<StackPanel Orientation="Vertical">
<TextBlock
Style="{StaticResource PhoneTextTitle2Style}"
TextWrapping="Wrap"
Text="{TemplateBinding Content}"></TextBlock>
<TextBlock
Style="{StaticResource PhoneTextSubtleStyle}"
Text="{TemplateBinding Content2}"></TextBlock>                                
</StackPanel>
</ControlTemplate>
</Setter.Value>
</Setter>
</Style>
</Grid.Resources>
 
<!--TitlePanel contains the name of the application and page title-->
<StackPanel Grid.Row="0" Margin="12,17,0,28">
<TextBlock Text="SELECT A TIME ZONE" Style="{StaticResource PhoneTextNormalStyle}"/>
</StackPanel>
 
<!--ContentPanel - place additional content here-->
<Grid x:Name="ContentPanel" Grid.Row="1" Margin="12,0,12,0">
<phone:LongListSelector
ItemsSource="{StaticResource TimeZones}"
HorizontalAlignment="Stretch"
VerticalAlignment="Stretch"
>
<phone:LongListSelector.ItemTemplate>
<DataTemplate>
<!--<TextBlock Text="{Binding Path=DisplayName}" />-->
<local:TwoLabelButton
Tap="TimeZoneButton_Tap"
Style="{StaticResource TimeZoneButtonStyle}"
Content="{Binding Path=DisplayName}"
Content2="{Binding Path=ZoneOffset}"
HorizontalContentAlignment="Left" BorderThickness="0" RenderTransformOrigin="0.5,0.5">                                
</local:TwoLabelButton>
<!--<TextBlock Text="{Binding Path=ZoneOffset}" />-->
</DataTemplate>
</phone:LongListSelector.ItemTemplate>
</phone:LongListSelector>
</Grid>
</Grid>
 
</phone:PhoneApplicationPage>

The code listing for the TimeZone class is shown below.

namespace Example
{
public class TimeZone
{
private string _displayName = string.Empty;
private string _zoneOffset = string.Empty;
public string DisplayName
{
get { return _displayName; }
set { _displayName = value; }
}
public string ZoneOffset
{
get { return _zoneOffset; }
set { _zoneOffset = value; }
}
public TimeZone(string zoneOffset, string displayName)
{
_displayName = displayName;
_zoneOffset = zoneOffset;
}
}
public class TimeZones : List<TimeZone>
{
public TimeZones()
{
Add(new TimeZone("UTC-12:00", "International Date Line West"));
Add(new TimeZone("UTC-11:00", "Samoa"));
Add(new TimeZone("UTC-10:00", "Hawaii"));
Add(new TimeZone("UTC-09:00", "Alaska"));
Add(new TimeZone("UTC-08:00", "Pacific Time (US & Canada)"));
//...etc...
}
}
}
The following screenshot shows how the example XAML file looks rendered on a Windows Phone.


Monday, July 14, 2014

Resolving the error "The name xxx does not exist in the namespace "clr-namespace:XXX" in Visual Studio 2012 for Windows Phone

In Windows Phone 8 development, it is possible to use the local project's public classes in a XAML file. But the local project's namespace has to be included in the XAML file by typing in the following:
xmlns:local="clr-namespace:Binding".
Here Binding refers to the namespace used by the class in the local project I want to use.

Then to use the local namespace in the XAML file to declare a class, I should do the following:
<local:MyData x:Key="MyData"
AppTitle="Real Estate Explorer" />

Everything looks fine, but the Visual Studio Intellisense underlines the local:MyData reference with the following error message:
The name "MyData" does not exist in the namespace "clr-namespace:Binding"

An example is shown below:

I could not figure out how to resolve the error; I did everything as described in the documentation. Eventually, I did a Build Solution (F7) on the project. After that, Visual Studio did not complain about the namespace anymore, as shown in the screenshot below.