Showing posts with label Java. Show all posts

Monday, November 27, 2023

How I fixed the Android Studio current target and jvm target compatibility error

I encountered the following compilation error in Android Studio of one of my Android project about current target JVM compatibility (or incompatibility), as shown in the screenshot message listing below:


Execution failed for task ':app:compileDebugKotlin'.
> 'compileDebugJavaWithJavac' task (current target is 1.8) and 'compileDebugKotlin' task (current target is 17) jvm target compatibility should be set to the same Java version.
  Consider using JVM toolchain: https://kotl.in/gradle/jvm/toolchain

* Try:
> Run with --stacktrace option to get the stack trace.
> Run with --info or --debug option to get more log output.
> Run with --scan to get full insights.

I managed to fix the problem by ensuring the source and target are compatible, i.e. having the same Java version.

To fix the issue:

  1. In Android Studio, select File | Project Structure.

    The Project Structure dialog box appears.


  2. Click Gradle Settings.

    The Gradle dialog box appears.


  3. In the Use Gradle from combo box, choose 'gradle-wrapper.properties' file.

  4. In the Gradle JDK combo box, choose jbr-17 JetBrains Runtime version 17.

  5. Click OK to close all dialog boxes.

  6. In Android Studio, open the app's build.gradle file in the editor.


  7. Within the android construct, add in the compileOptions as shown in the listing below.

android {
    compileSdk 33

// ...etc...

    compileOptions {
        sourceCompatibility JavaVersion.VERSION_17
        targetCompatibility JavaVersion.VERSION_17
    }
}

From this point on, compiling the app should not throw upany  JVM target compatibility errors.

Monday, June 17, 2019

Android Studio: Resolving PreferenceFragment is deprecated warning

I encountered the following warning message in Android Studio while converting some Android Java code to Kotlin:
'PreferenceFragment' is deprecated. Deprecated in Java

Some digging through the Android documentation resulted in a solution; the android.preference.PreferenceFragment class is being deprecated and can be replaced with the new Jetpack androidx preference classes. So I needed to do the following:
  1. Add a new dependency to the new Androidx preference library in the app's build.gradle file

    implementation "androidx.preference:preference:1.0.0"
  2. In the Kotlin source code, remove the following namespace import statement:

    import android.preference.PreferenceFragment
  3. Insert the following namespace import statement:

    import androidx.preference.PreferenceFragmentCompat
  4. Then override the abstract onCreatePreferences method.

override fun onCreatePreferences(savedInstanceState: Bundle?, rootKey: String?) {
//        TODO("not implemented") //To change body of created functions use File | Settings | File Templates.
    }

Monday, October 29, 2018

Setup CMakeLists.txt for Android Studio and OpenCV C++ coding

If you want to develop C++ code making use of Android and OpenCV classes, then you have to configure Android Studio's CMakeLists.txt build file accordingly.

Please follow the previous post https://dominoc925.blogspot.com/2018/10/how-i-setup-opencv4android-java-sdk.html to download and setup the OpenCV4Android Java SDK with and Android project before doing the following steps.
  1. In Android Studio, open up the app's build.gradle file.

    Note: the OpenCV native libraries are under the jniLibs directory relative to the app's build.gradle file according to the source set jniLibs srcDirs parameter.
     

  2. Enter the cmake cpp flags and platform abi filters  in the android defaultConfig externalNativeBuild section, as shown below.

    externalNativeBuild {
        cmake {
          cppFlags "-frtti -fexceptions"        
    
    abiFilters 'x86', 'x86_64', 'armeabi-v7a', 'arm64-v8a'
    }
    }

  3. Next, open up the CMakeLists.txt file in the editor.

     
  4. Add in the cmake macros to add in the path to the OpenCV C++ include files e.g. /path/to/OpenCV-android-sdk/sdk/native/jni/include/

     
  5.  Then, use the macro add_library to add the OpenCV library.

  6. Next, use the macro set_target_properties to tell CMake the location of the OpenCV library.

    set_target_properties(
         lib_opencv        
    
    PROPERTIES
    IMPORTED_LOCATION
    ${CMAKE_CURRENT_SOURCE_DIR}/jniLibs/${ANDROID_ABI}/libopencv_java3.so
    )


  7. Finally, link the OpenCV library with your code with the target_link_libraries macro.

The full sample of the CMakeLists.txt file is shown below.

# For more information about using CMake with Android Studio, read the
# documentation: https://d.android.com/studio/projects/add-native-code.html

# Sets the minimum version of CMake required to build the native library.

cmake_minimum_required(VERSION 3.4.1)

set (OPENCV4ANDSDK_INCLUDE
        /path/to/OpenCV-android-sdk/sdk/native/jni/include)
include_directories(
    ${OPENCV4ANDSDK_INCLUDE}
)
# Creates and names a library, sets it as either STATIC
# or SHARED, and provides the relative paths to its source code.
# You can define multiple libraries, and CMake builds them for you.
# Gradle automatically packages shared libraries with your APK.

add_library( # Sets the name of the library.
        native-lib

        # Sets the library as a shared library.
        SHARED

        # Provides a relative path to your source file(s).
        src/main/cpp/native-lib.cpp)
add_library(
        lib_opencv
        SHARED
        IMPORTED
)
set_target_properties(
        lib_opencv
        PROPERTIES
        IMPORTED_LOCATION
        ${CMAKE_CURRENT_SOURCE_DIR}/jniLibs/${ANDROID_ABI}/libopencv_java3.so
)

# Searches for a specified prebuilt library and stores the path as a
# variable. Because CMake includes system libraries in the search path by
# default, you only need to specify the name of the public NDK library
# you want to add. CMake verifies that the library exists before
# completing its build.

find_library( # Sets the name of the path variable.
        log-lib

        # Specifies the name of the NDK library that
        # you want CMake to locate.
        log)


# Specifies libraries CMake should link to your target library. You
# can link multiple libraries, such as libraries you define in this
# build script, prebuilt third-party libraries, or system libraries.

target_link_libraries( # Specifies the target library.
        native-lib

        # Links the target library to the log library
        # included in the NDK.
        ${log-lib}
        lib_opencv
        )


Monday, March 26, 2018

Resolving Maven "trustAnchors parameter must be non-empty" error

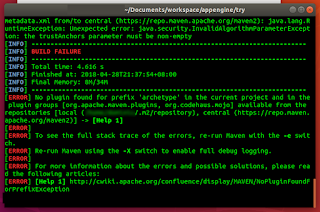
I encountered this Maven error on a new Ubuntu 18.04 system while trying to perform a mvn build on a Google AppEngine project. A screenshot of the error message is shown below.


It seems to be complaining about some "java.security.InvalidAlgorithmParameterException: the trustAnchors parameter must be non-empty" error.

After trying out some suggestions about regenerating Java security certificates, which didn't work, I managed to resolve the problem by creating a Maven  settings.xml file under a hidden folder .m2 underneath the user's home directory.

An example settings.xml file is shown below.

<?xml version="1.0" encoding="UTF-8"?>
<settings xmlns="http://maven.apache.org/SETTINGS/1.0.0" xmlns:xsi="http://www.w3.org/2001/XMLSchema-instance" xsi:schemaLocation="http://maven.apache.org/SETTINGS/1.0.0                            http://maven.apache.org/xsd/settings-1.0.0.xsd">
   <localRepository>/home/yourname/.m2/repository</localRepository>
   <interactiveMode />
   <usePluginRegistry />
   <offline />
   <pluginGroups />
   <servers />
   <mirrors />
   <proxies>
      <!-- 
               <proxy>
      <id>default</id>
      <active>true</active>
      <protocol>http</protocol>
      <host>proxy-host</host>
      <port>8080</port>
      <username>user</username>
      <password>password123</password>
      <nonProxyHosts>localhost,127.0.0.1</nonProxyHosts>
    </proxy> -->
   </proxies>
   <activeProfiles>
      <!--make the profile active all the time -->
      <activeProfile>securecentral</activeProfile>
   </activeProfiles>
   <profiles>
      <profile>
         <id>securecentral</id>
         <!--Override the repository (and pluginRepository) "central" from the
                     Maven Super POM -->
         <repositories>
            <repository>
               <id>central</id>
               <url>http://repo1.maven.apache.org/maven2/</url>
               <releases>
                  <enabled>true</enabled>
               </releases>
            </repository>
         </repositories>
         <pluginRepositories>
            <pluginRepository>
               <id>central</id>
               <url>http://repo1.maven.apache.org/maven2/</url>
               <releases>
                  <enabled>true</enabled>
               </releases>
            </pluginRepository>
         </pluginRepositories>
      </profile>
   </profiles>
</settings>
Change the localRepository tag from /home/yourname/.m2/repository to correct location of your Maven repository.

Then place this the settings.xml file in the following location /home/your_user_id/.m2/

Now when running Maven build commands, the error messages no longer appear.


Tuesday, August 30, 2016

Identifying deprecated classes and methods in Android Studio with "Recompile with -Xlink:deprecation"

When upgrading an Android project to a newer Android version, Google may deprecate some of the previously used Android classes and methods. By default, the gradle compilation process will only print out a summary message "Some input files use or override a deprecated API", as shown in the Android Studio screenshot below:

To enable the compilation process to print out a verbose message of the deprecated API, one or more of the build.gradle file may need to be edited to add in the -Xlint:deprecation option. In the example, the top most or project level build.gradle file was edited.


  1. In Android Studio, open up the project build.gradle file. Scroll to the allprojects section.


  2. Add in the gradle.projectsEvaluated sub section with the -Xlint:deprecation option as shown below.

  3. Save. Now when building the Android project, the deprecated API will be printed in the console.


Monday, May 30, 2016

Using Android XML layout tabs without ViewPager and Fragments

In Android, the TabLayout widget is typically used together with a ViewPager and fragments; when a user touch a tab, a fragment associated with the tab is displayed in the activity. But sometimes, I do not want or need fragments for each tab; I just want to execute some code. This post illustrates an example of using the TabLayout without a ViewPager and Fragments and setting a tab selected listener to the TabLayout.


First, create an XML layout and add in the TabLayout code. Add in the TabItem widgets underneath the parent TabLayout node. You can simple use text or icons (in this example) for the TabItem labels.

<?xml version="1.0" encoding="utf-8"?>
<LinearLayout xmlns:android="http://schemas.android.com/apk/res/android"
    xmlns:app="http://schemas.android.com/apk/res-auto"
    xmlns:tools="http://schemas.android.com/tools"
    android:layout_width="match_parent"
    android:layout_height="match_parent"
    android:orientation="vertical"
    tools:context="com.skyglob.insight.view.MainActivity">

    <android.support.design.widget.CoordinatorLayout
        android:id="@+id/coordinatorLayout"
        android:layout_width="match_parent"
        android:layout_height="match_parent"
        android:fitsSystemWindows="true">

        <android.support.design.widget.AppBarLayout
            android:layout_width="match_parent"
            android:layout_height="wrap_content"
            android:theme="@style/AppTheme.AppBarOverlay">

            <android.support.v7.widget.Toolbar
                android:id="@+id/toolbar"
                android:layout_width="match_parent"
                android:layout_height="?attr/actionBarSize"
                android:background="?attr/colorPrimary"
                app:popupTheme="@style/AppTheme.PopupOverlay" />

            <android.support.design.widget.TabLayout
                android:id="@+id/tabs"
                android:layout_width="match_parent"
                android:layout_height="wrap_content"
                app:tabGravity="fill"
                app:tabMode="fixed">

                <android.support.design.widget.TabItem
                    android:layout_width="wrap_content"
                    android:layout_height="wrap_content"
                    android:icon="@drawable/ic_action_call" />

                <android.support.design.widget.TabItem
                    android:layout_width="wrap_content"
                    android:layout_height="wrap_content"
                    android:icon="@drawable/ic_action_checkin" />

                <android.support.design.widget.TabItem
                    android:layout_width="wrap_content"
                    android:layout_height="wrap_content"
                    android:icon="@drawable/ic_action_contacts" />

                <android.support.design.widget.TabItem
                    android:layout_width="wrap_content"
                    android:layout_height="wrap_content"
                    android:icon="@drawable/ic_action_schedule" />

                <android.support.design.widget.TabItem
                    android:layout_width="wrap_content"
                    android:layout_height="wrap_content"
                    android:icon="@drawable/ic_action_logout" />

            </android.support.design.widget.TabLayout>

        </android.support.design.widget.AppBarLayout>

        <include layout="@layout/content_main" />

    </android.support.design.widget.CoordinatorLayout>

</LinearLayout>

In the activity Java code, add in the tab selected listener. The following is an example showing how to assign a tab selected listener to the TabLayout widget.


private void setupTabLayout() {
    TabLayout mTabLayout = (TabLayout) findViewById(R.id.tabs);
    mTabLayout.setOnTabSelectedListener(new TabLayout.OnTabSelectedListener() {
        @Override
        public void onTabSelected(TabLayout.Tab tab) {
            onTabTapped(tab.getPosition());
        }
        @Override
        public void onTabUnselected(TabLayout.Tab tab) {

        }
        @Override
        public void onTabReselected(TabLayout.Tab tab) {
            onTabTapped(tab.getPosition());
        }
    });
}

private void onTabTapped(int position) {
    switch (position) {
        case 0:
            // Do something when first tab is tapped here
            break;
        default:
            Toast.makeText(this, "Tapped " + position, Toast.LENGTH_SHORT);
    }
}

Monday, December 14, 2015

Android code snippet to create transparent bitmaps

To reduce the storage needed on a phone for images, I wanted to use a single image file and programmatically set the transparency based on some attribute, e.g. age. The Android BitmapDrawable class has a setAlpha method but it does not work as expected and the resultant icons displayed in views remain as opaque as the original because of how Android handles image resources to minimise resource usage. Eventually, I found a workaround by drawing the icon onto a canvas with the desired transparency, then creating a new icon from the canvas. The following code snippet shows how.


private static Bitmap makeTransparentBitmap(Bitmap bmp, int alpha) {
        Bitmap transBmp = Bitmap.createBitmap(bmp.getWidth(),
                bmp.getHeight(), Bitmap.Config.ARGB_8888);
        Canvas canvas = new Canvas(transBmp);
        final Paint paint = new Paint();
        paint.setAlpha(alpha);
        canvas.drawBitmap(bmp, 0, 0, paint);
        return transBmp;
    }

By using this code snippet, I was able to change the transparency of an icon image as shown in the screenshot below.


Monday, November 30, 2015

An example of using an SQLite database in a Spring Hibernate application project

I wanted to use SQLite as an object relational model (ORM) database for a Spring Hibernate Java application. It turned out to be relatively simple to achieve. This post shows a simple example illustrating the project configuration, SQLite table creation, Java object definition, saving and retrieving a Java object into/from the database. The example project structure is shown in the screenshot below.
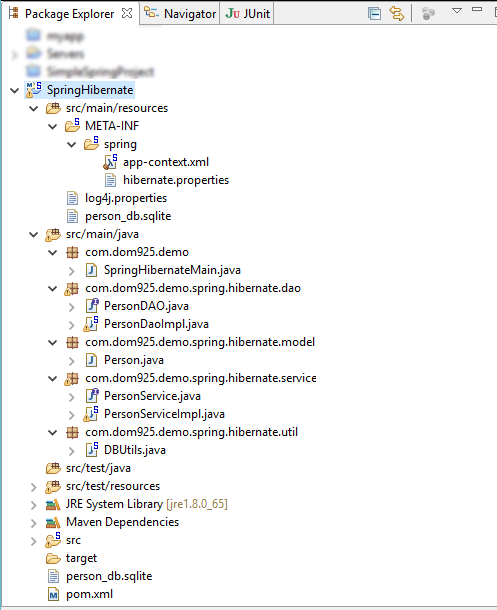

In order to prepare a Java application to work with SQLite as an ORM database, the following steps can be done:
  1. Add in the software dependencies to the project's Maven pom.xml
  2. Define Hibernate beans in the application context configuration file
Add in software dependencies to pom.xml
The following listing is an example pom.xml file.
Note that Hibernate, SQLite and Spring ORM dependencies have been appended to the dependencies element.

<?xml version="1.0" encoding="UTF-8"?>
<project xmlns="http://maven.apache.org/POM/4.0.0"
 xsi:schemaLocation="http://maven.apache.org/POM/4.0.0 http://maven.apache.org/maven-v4_0_0.xsd"
 xmlns:xsi="http://www.w3.org/2001/XMLSchema-instance">
 <modelVersion>4.0.0</modelVersion>
 <groupId>org.springframework.samples.spring</groupId>
 <artifactId>spring-hibernate-utility</artifactId>
 <version>1.0.0.CI-SNAPSHOT</version>
 <packaging>jar</packaging>
 <name>Spring Hibernate Utility</name>
 <url>http://www.springframework.org</url>
 <description>
  <![CDATA[This project is a minimal jar utility with Spring configuration for Hibernate.]]>
 </description>
 <properties>
  <maven.test.failure.ignore>true</maven.test.failure.ignore>
  <spring.framework.version>3.0.6.RELEASE</spring.framework.version>
 </properties>

 <dependencies>

  <dependency>
   <groupId>junit</groupId>
   <artifactId>junit</artifactId>
   <version>4.7</version>
   <scope>test</scope>
  </dependency>
  <dependency>
   <groupId>org.springframework</groupId>
   <artifactId>spring-test</artifactId>
   <version>${spring.framework.version}</version>
   <scope>test</scope>
  </dependency>
  <dependency>
   <groupId>org.springframework</groupId>
   <artifactId>spring-context-support</artifactId>
   <version>${spring.framework.version}</version>
  </dependency>
  <dependency>
   <groupId>org.springframework</groupId>
   <artifactId>spring-aop</artifactId>
   <version>${spring.framework.version}</version>
  </dependency>
  
  <!-- Dependencies for Hibernate and ORM  -->  
  <dependency>
   <groupId>com.h2database</groupId>
   <artifactId>h2</artifactId>
      <version>1.3.156</version>
  </dependency>
  <dependency>
   <groupId>org.springframework</groupId>
   <artifactId>spring-orm</artifactId>
   <version>${spring.framework.version}</version>
  </dependency>
  <dependency>
   <groupId>org.hibernate</groupId>
   <artifactId>hibernate-entitymanager</artifactId>
   <version>3.6.0.Final</version>
  </dependency>

  <!-- Dependencies for SQLite -->
  <dependency>
   <groupId>org.xerial</groupId>
   <artifactId>sqlite-jdbc</artifactId>
   <version>3.8.11.2</version>
  </dependency>
  <dependency>
   <groupId>net.kemitix</groupId>
   <artifactId>sqlite-dialect</artifactId>
   <version>0.1.0</version>
  </dependency>  
  
  <!--  
  <dependency>
   <groupId>hsqldb</groupId>
   <artifactId>hsqldb</artifactId>
   <version>1.8.0.10</version>
  </dependency>
   -->
  <dependency>
   <groupId>log4j</groupId>
   <artifactId>log4j</artifactId>
   <version>1.2.16</version>
  </dependency>
 </dependencies>

 <build>
  <plugins>
   <plugin>
    <groupId>org.apache.maven.plugins</groupId>
    <artifactId>maven-compiler-plugin</artifactId>
    <version>2.3.2</version>
    <configuration>
     <source>1.5</source>
     <target>1.5</target>
    </configuration>
   </plugin>
  </plugins>
 </build>

 <repositories>
  <repository>
   <id>org.jboss.repository.releases</id>
   <name>JBoss Maven Release Repository</name>
   <url>https://repository.jboss.org/nexus/content/repositories/releases</url>
   <snapshots>
    <enabled>false</enabled>
   </snapshots>
  </repository>

 </repositories>

</project>

Define Hibernate beans in the application context configuration file
The Spring Java application's context configuration file is located in the /path/to/project/src/main/resources/META-INF/spring/app-context.xml file. The beans SessionFactory, TransactionManager and the DataSource should at least be defined in the file as shown in the listing below.

Note: In this example listing, we configure Spring to scan for additional components under the package namespace com.dom925.demo.spring.


<?xml version="1.0" encoding="UTF-8"?>
<beans xmlns="http://www.springframework.org/schema/beans"
 xmlns:xsi="http://www.w3.org/2001/XMLSchema-instance" xmlns:context="http://www.springframework.org/schema/context"
 xmlns:tx="http://www.springframework.org/schema/tx" xmlns:jdbc="http://www.springframework.org/schema/jdbc"
 xsi:schemaLocation="
  http://www.springframework.org/schema/jdbc http://www.springframework.org/schema/jdbc/spring-jdbc-3.0.xsd
  http://www.springframework.org/schema/beans http://www.springframework.org/schema/beans/spring-beans-3.0.xsd
  http://www.springframework.org/schema/tx http://www.springframework.org/schema/tx/spring-tx-3.0.xsd
  http://www.springframework.org/schema/context http://www.springframework.org/schema/context/spring-context-3.0.xsd">

 <tx:annotation-driven transaction-manager="transactionManager" />

 <context:annotation-config/>
 
 <!-- Tell Spring where to scan for components -->
 <context:component-scan base-package="com.dom925.demo.spring" />
 
 <!-- Specify the Hibernate properties setting file -->
 <context:property-placeholder 
  location="classpath:META-INF/spring/hibernate.properties"/>

 <bean id="dataSource" 
  class="org.springframework.jdbc.datasource.DriverManagerDataSource">
  <property name="driverClassName" value="${jdbc.driverClassName}" />
  <property name="url" value="${jdbc.url}" />
  <property name="username" value="${jdbc.username}" />
  <property name="password" value="${jdbc.password}" />
 </bean>
 
 <bean id="sessionFactory" 
  class="org.springframework.orm.hibernate3.annotation.AnnotationSessionFactoryBean">
  <property name="dataSource" ref="dataSource" />
  <property name="annotatedClasses" value="com.dom925.demo.spring.hibernate.model.Person" />
  <property name="hibernateProperties">
   <props>
    <prop key="hibernate.dialect">${hibernate.dialect}</prop>
    <prop key="hibernate.show_sql">${hibernate.show_sql}</prop>
   </props>
  </property>
 </bean>
 
 <bean id="transactionManager" 
  class="org.springframework.orm.hibernate3.HibernateTransactionManager">
  <property name="sessionFactory" ref="sessionFactory" />
 </bean>
 
 <tx:annotation-driven transaction-manager="transactionManager"/>
</beans>

In this example, some of the Hibernate data source's JDBC properties are defined in a separate file /path/to/project/src/main/resources/META-INF/hibernate.properties file, as shown below.

Note: this example configures Spring to use a SQLite database named person_db.sqlite. Since the path is not defined, it will be created in /path/to/project/ directory.

jdbc.driverClassName=org.sqlite.JDBC
jdbc.url=jdbc:sqlite:person_db.sqlite
jdbc.username=
jdbc.password=

hibernate.dialect=org.hibernate.dialect.SQLiteDialect
hibernate.show_sql=true

At this point, the project configuration should be done. The next steps would be to write the Java classes and interfaces. In this example, the following classes are created.
  1. DBUtils.java
  2. Person.java
  3. PersonDaoImpl.java which implements the interface PersonDAO.java
  4. PersonServiceImpl.java which implements the interface PersonServiceImpl.java
DBUtils.java
When Spring initializes the Java application, the @PostConstruct annotation in this file will cause the initialize method to be executed. This method will recreate the SQLite database and table each time you run the application. 


package com.dom925.demo.spring.hibernate.util;

import java.sql.Connection;
import java.sql.SQLException;
import java.sql.Statement;

import javax.annotation.PostConstruct;
import javax.sql.DataSource;

import org.springframework.beans.factory.annotation.Autowired;
import org.springframework.stereotype.Component;

@Component
public class DBUtils {

 @Autowired
 private DataSource dataSource;
 
 @PostConstruct
 public void initialize(){
  try {
   Connection connection = dataSource.getConnection();
   Statement statement = connection.createStatement();
   statement.execute("DROP TABLE IF EXISTS PERSON_INFO");
   statement.executeUpdate(
     "CREATE TABLE PERSON_INFO(" +
     "ID INTEGER Primary key, " +
     "FIRST_NAME varchar(30) not null, " +
     "LAST_NAME varchar(30) not null)"
     );
   statement.executeUpdate(
     "INSERT INTO PERSON_INFO " +
     "(FIRST_NAME, LAST_NAME) " +
     "VALUES " + "('DONALD', 'TRUMP')"
     );
   statement.close();
   connection.close();
  }
  catch (SQLException e) {
   e.printStackTrace();
  }
 }
}

Person.java
Now we define the plain old Java object POJO class that we want to associate to a SQLite database table.

Note I: the Spring annotations @Entity and @Table specify the database table
Note II: the annotations @Column specify the database column name, and @Id define the primary key.


package com.dom925.demo.spring.hibernate.model;

import javax.persistence.Column;
import javax.persistence.Entity;
import javax.persistence.GeneratedValue;
import javax.persistence.GenerationType;
import javax.persistence.Id;
import javax.persistence.Table;

@Entity
@Table(name = "PERSON_INFO")
public class Person {

 @Id
 @Column(name = "ID")
 @GeneratedValue(strategy = GenerationType.IDENTITY)
 private Integer id;
 
 @Column(name = "FIRST_NAME")
 private String firstName;
 
 @Column(name = "LAST_NAME")
 private String lastName;
  
 public Integer getId() {
  return id;
 }
 public void setId(Integer id) {
  this.id = id;
 }
 public String getFirstName() {
  return firstName;
 }
 public void setFirstName(String firstName) {
  this.firstName = firstName;
 }
 public String getLastName() {
  return lastName;
 }
 public void setLastName(String lastName) {
  this.lastName = lastName;
 }
 @Override
 public boolean equals(Object obj){
  if (this == obj){
   return true;
  }
  Person person = (Person) obj;
  if (firstName != null ?
    !firstName.equals(person.firstName)
    :person.firstName != null){
   return false;
  }
  else {
   return true;
  } 
 }
 @Override
 public String toString() {
  return "Person [id=" 
    + id 
    + ", name=" 
    + firstName 
    + " " 
    + lastName 
    + "]";
 }
}

PersonDAO.java
This interface defines the interface for accessing the Person data.


package com.dom925.demo.spring.hibernate.dao;

import java.util.List;

import com.dom925.demo.spring.hibernate.model.Person;

public interface PersonDAO {

 public List<Person> getAllPersons();
 
 public void insertPerson (Person person);
}

PersonDaoImpl.java
This implements the interface defined by the PersonDAO.java file. Note the use of the Spring @Repository and @Transactional annotations for database related activities.


package com.dom925.demo.spring.hibernate.dao;

import java.util.List;

import org.hibernate.Query;
import org.hibernate.Session;
import org.hibernate.SessionFactory;
import org.springframework.beans.factory.annotation.Autowired;
import org.springframework.stereotype.Repository;
import org.springframework.transaction.annotation.Transactional;

import com.dom925.demo.spring.hibernate.model.Person;

@Repository
@Transactional(readOnly = true)
public class PersonDaoImpl implements PersonDAO {

 @Autowired
 private SessionFactory sessionFactory;

 
 public List<Person> getAllPersons() {
  Session session = sessionFactory.openSession();
  String hql = "FROM Person";
  Query query = session.createQuery(hql);
  List<Person> persons = query.list();
  return persons;
 }

 @Transactional(readOnly = false)
 public void insertPerson(Person employee) {
  Session session = sessionFactory.openSession();
  session.save(employee);
 }

}

PersonService.java
This file defines the interface for a service to access the Person data.


package com.dom925.demo.spring.hibernate.service;

import java.util.List;

import com.dom925.demo.spring.hibernate.model.Person;

public interface PersonService {

 public List<Person> getAllPersons();
 
 public void insertPerson(Person person);
}

PersonServiceImpl.java
This is an implementation of the interface defined in the PersonService.java file. Note the Spring @Service annotation.


package com.dom925.demo.spring.hibernate.service;

import java.util.List;

import org.springframework.beans.factory.annotation.Autowired;
import org.springframework.stereotype.Component;
import org.springframework.stereotype.Service;

import com.dom925.demo.spring.hibernate.dao.PersonDAO;
import com.dom925.demo.spring.hibernate.model.Person;


@Service
public class PersonServiceImpl implements PersonService {

 @Autowired
 private PersonDAO personDao;
 
 public List<Person> getAllPersons() {
  List<Person> persons = personDao.getAllPersons();
  return persons;
 }

 public void insertPerson(Person person) {
  personDao.insertPerson(person);
 }

}

SpringHibernateMain.java
Finally, the Java application's main method, which loads the application context, get a PersonService bean to add a new Person object to the database. Then print out the database contents to the screen.


package com.dom925.demo;

import org.springframework.context.ApplicationContext;
import org.springframework.context.support.ClassPathXmlApplicationContext;

import com.dom925.demo.spring.hibernate.model.Person;
import com.dom925.demo.spring.hibernate.service.PersonService;

public class SpringHibernateMain {

 public static void main(String[] args) {
  ApplicationContext context = 
    new ClassPathXmlApplicationContext(
      "/META-INF/spring/app-context.xml");
  PersonService personService = 
    context.getBean("personServiceImpl", PersonService.class);
  
  Person person = new Person();
  person.setFirstName("HILLARY");
  person.setLastName("CLINTON");
  personService.insertPerson(person);
  
  for (Person p : personService.getAllPersons()){
   System.out.println(p);
  }
 }
}
Example print out from the Spring application

A zip file containing the example project can be downloaded here.