Showing posts with label Android Studio. Show all posts

Monday, November 27, 2023

How I fixed the Android Studio current target and jvm target compatibility error

I encountered the following compilation error in Android Studio of one of my Android project about current target JVM compatibility (or incompatibility), as shown in the screenshot message listing below:


Execution failed for task ':app:compileDebugKotlin'.
> 'compileDebugJavaWithJavac' task (current target is 1.8) and 'compileDebugKotlin' task (current target is 17) jvm target compatibility should be set to the same Java version.
  Consider using JVM toolchain: https://kotl.in/gradle/jvm/toolchain

* Try:
> Run with --stacktrace option to get the stack trace.
> Run with --info or --debug option to get more log output.
> Run with --scan to get full insights.

I managed to fix the problem by ensuring the source and target are compatible, i.e. having the same Java version.

To fix the issue:

  1. In Android Studio, select File | Project Structure.

    The Project Structure dialog box appears.


  2. Click Gradle Settings.

    The Gradle dialog box appears.


  3. In the Use Gradle from combo box, choose 'gradle-wrapper.properties' file.

  4. In the Gradle JDK combo box, choose jbr-17 JetBrains Runtime version 17.

  5. Click OK to close all dialog boxes.

  6. In Android Studio, open the app's build.gradle file in the editor.


  7. Within the android construct, add in the compileOptions as shown in the listing below.

android {
    compileSdk 33

// ...etc...

    compileOptions {
        sourceCompatibility JavaVersion.VERSION_17
        targetCompatibility JavaVersion.VERSION_17
    }
}

From this point on, compiling the app should not throw upany  JVM target compatibility errors.

Monday, November 15, 2021

Android Studio: Fixing the warning "flatDir should be avoided"

After upgrading my gradle plugin to version 7, I encountered this warning message "Using flatDir should be avoided because it doesn't support any meta-data format".

As shown in the screenshot below, I have the word flatDir under the repositories keyword inside my Android app's build.gradle file.


This flatDir is used to point to the location of my local Android library file(s), named inside the build.gradle's dependencies section - shown below.

To fix the warning, all I needed to do was to do the following:

  1. Remove the flatDir part from the build.gradle file's repositories section. 
  2. Inside the build.gradle's dependencies section, replace the local Android library name implementation with the following relative path to the local library file name with extension :

    implementation files ( 'libs/my-local-library.aar')

    An example is shown below.


Monday, August 17, 2020

Android Studio: Fix for Default Activity not found warning

Recently after upgrading Android Studio to version 4.x, I found some of my old Android projects showing a warning message: "Warning: Default Activity not found" when I tried to run the project in the emulator; and Android Studio would not be able to launch the app. 

I tried the following:

  • Build | Clean project in Android Studio
    • Invalidate Caches / Restart in Android Studio
  • Verified AndroidManifest.xml is declaring the main activity correctly
  • Deleted the Android Studio caches - .idea/, .gradle/, *.iml

None worked.

When I tried to edit the run configuration, no matter what launch options I chose, the warning message still persisted, as shown in the screenshot below and I could not run the application. 

Finally, systematically I discovered the problem to be related to the Google Play Services AdMob dependency. The app's build.gradle snippet below shows the dependency.

dependencies { 
 
 implementation 'com.google.android.gms:play-services-ads:19.3.0'

}

Note: When using the newer Google Play Services Ads, the minimum SDK must now be set to at least 16. 

The screenshot below shows the Android Studio project when using 14 as the minimum SDK level. Notice the large red cross.

The screenshot shows the state of the Android Studio project after changing the minimum SDK level to 16 and selecting File | Sync Project with Gradle Files. Notice the large red cross is no longer displayed. Android Studio should be able to launch the app from this point on.
 

Monday, November 11, 2019

Android Studio: Automatically replace the Google Maps V2 API Key for debug and release mode

The Android Google Maps API requires a separate debug and release keys in the Android Studio project's AndroidManifest.xml file, as shown in the listing below.

<meta-data
android:name="com.google.android.maps.v2.API_KEY"
android:value="your_google_maps_v2_api_debug_or_release_key_here" />
It can get tedious having to replace the key every time you want to debug or to generate a release build APK.

It is possible to use Gradle to automate the replacement of the Google Maps V2 API key value by using constants defined in the Gradle build types. To automate the replacement, you can do the following:
  1. In the Android app's build.gradle file, add in the following line under the debug component of buildTypes:

    resValue "string", "google_maps_v2_api_key", "your_google_maps_v2_debug_api_key_here"

    Note: replace the api key accordingly; and the constant name is google_maps_v2_api_key.
  2. Similarly, add in the following line under the release component of buildTypes:

    resValue "string", "google_maps_v2_api_key", "your_google_maps_v2_release_api_key_here"
  3. The Android app's build.gradle should look like this screenshot below:


  4. Now, in the app's AndroidManifest.xml file, replace the Google Maps V2 API key metadata value to the string constant name google_maps_v2_api_key.

    <meta-data
    android:name="com.google.android.maps.v2.API_KEY"
    android:value="@string/google_maps_v2_api_key" />
    

Now you can debug or build the Android app as per normal without manually replacing the Google Maps V2 API key.

Monday, October 28, 2019

Android Studio: resolving duplicate AndroidX and support classes errors

While migrating an Android project from the support libraries to use the AndroidX libraries, I encountered the following errors regarding "duplicate class android.support.v4.app xxxx found in modules classes.jar (androidx.core:core:1.0.0) and classes.jar (com.android.support:support-compat:26.1.0)"; even though all the Java/Kotlin/XML source code files have been replaced with the AndroidX versions and the old support libraries have been removed from the app's build.gradle file.

The screenshot below illustrates the error.


The solution I found was to set project wide gradle properties.
  1. In Android Studio, open up the project's gradle.properties file.
  2. Insert the following two lines:

    android.enableJetifier=true
    android.useAndroidX=true


  3. Save the file, select Build | Clean Project. Then select recompile again.

    The duplicate classes error messages no longer appear.|

Monday, August 26, 2019

Creating faux square Android Navigation Drawer icons

The Navigation drawer widget in Android can display vector SVG icons, but if the vector icons are non-rectangular, Android will distort the dimensions to force them into squares. This can be seen in the screenshot of the Hawaii flag icon below.


It is possible to extend the drawer by code to display non-rectangular icons but I prefer to adjust the SVG icon instead. The way I did it was to change the page size to a square and then placing a transparent square box around the page. The following steps illustrate:

Change the page to a square
  1. Open up the SVG icon in Inkscape.


  2. Select File | Document Properties.


    1. Under the Page tab, change the Width and Height to be equal e.g. 1200 x 1200 px. Close the dialog box.

      The page display changes to a square.

  3. Using the Align and Distribute tools, align the graphics to the middle of the page.


Create a transparent square
  1.  Next, click the Create rectangles and squares (F4) icon. Place a stroke only, no-fill rectangle on the page.


  2. Change the width and height of the rectangle to match the page dimensions e.g. 1200 by 1200 px.


  3. Change the origin to the upper left corner of the page, e.g. X=0, Y=0.

  4. Open the Fill and stroke pane. Change the stroke opacity to low or zero opacity, e.g. 0.


  5. Save the file.
Import the SVG vector icon into an Android drawable icon
  1.  In Android Studio, right click on the /path/to/app/res/drawables folder and choose New | Vector Asset.


  2. Toggle on Local File (PNG, SVG). Choose the new SVG icon file from the previous section.
  3. Click Next. Click OK.

    The drawable is created.
Using this new icon, the Navigation drawer can now display the icon seemingly with the correct proportions, as shown below.

Monday, August 19, 2019

Set Android system bar to be transparent when Navigation drawer is opened

While developing Android apps, a lot of times I broke the code and made the Android system bar opaque when the Navigation drawer is opened, as shown in the screenshot below.

Then I had to waste precious time hunting down the cause. So I am putting down the requirements to enable the Android system bar to be transparent over the Navigation drawer.
  1. In Android Studio, open up the XML layout file e.g. activity_main.xml for the activity with the Navigation Drawer. In the AndroidX DrawerLayout widget, make sure the property fitsSystemWindows is set to true.


  2. Next, create a "no action bar" style e.g. AppThem.NoActionBar in styles.xml to be used by the activity with the Navigation Drawer. In the example below, the style inherits the theme Theme.AppCompat.DayNight.DarkActionBar style for day and night mode styling.


  3. Set the properties windowActionBar to false and windowNoTitle to true.
  4. Then create the same "no action bar" style for Android API 21 and above e.g. /path/to/res/values-v21/styles.xml. Set the properties windowDrawsSystemBarBackgrounds to true and statusBarColor to "@android:color/transparent" as shown below.


  5. Compile and run the application. The system bar should be transparent over the Navigation Drawer now.

Monday, August 12, 2019

Resolving Android Studio "Cannot fit requested classes in a single dex file" error

After I added an additional library to an Android app, this error "null, Cannot fit requested classes in a single dex file (# methods: 66445 > 65536)" occurred while trying to build the application in Android Studio, as shown in the screenshot below.
 
The solution to this is to enable multi dex support in the Android app. The following steps show how to do this:
  1. In Android Studio, add in a new dependency to the androidx.multidex:multidex library to the app's build.gradle file.

    dependencies {
    ...etc...
    implementation 'androidx.multidex:multidex:2.0.1
    ...etc...
    }

  2. Then in the same app build.gradle file, toggle true the multiDexEnabled property.

    android {
      defaultConfig {
        ...etc...
        multiDexEnabled true
        ...etc...
      }
    }

Now, compiling the Android application should no longer result in the dex error.

Monday, July 22, 2019

Convert multiple images to WebP format using Android Studio

WebP (https://en.wikipedia.org/wiki/WebP) is a lossy and lossless compressed image format with a resultant file size smaller than JPEG. Using Android Studio, you can easily convert one or more images intoWebP format.
  1. Run Android Studio and open a project.
  2. In the Project pane on the left, select one or more images.


  3. Press the mouse right button. In the pop up menu, choose Convert to WebP....

    The Converting Images to WebP dialog box appears.

  4. Optional. If necessary, change the parameters e.g. encoding. Click OK.

    The Preview and Adjust Converted Images dialog box appears.

  5. Optional. If necessary, adjust the quality parameter. Click Next to preview the next conversion, or click Accept All to convert all images.

    The images are converted to WebP.

Monday, June 17, 2019

Android Studio: Resolving PreferenceFragment is deprecated warning

I encountered the following warning message in Android Studio while converting some Android Java code to Kotlin:
'PreferenceFragment' is deprecated. Deprecated in Java

Some digging through the Android documentation resulted in a solution; the android.preference.PreferenceFragment class is being deprecated and can be replaced with the new Jetpack androidx preference classes. So I needed to do the following:
  1. Add a new dependency to the new Androidx preference library in the app's build.gradle file

    implementation "androidx.preference:preference:1.0.0"
  2. In the Kotlin source code, remove the following namespace import statement:

    import android.preference.PreferenceFragment
  3. Insert the following namespace import statement:

    import androidx.preference.PreferenceFragmentCompat
  4. Then override the abstract onCreatePreferences method.

override fun onCreatePreferences(savedInstanceState: Bundle?, rootKey: String?) {
//        TODO("not implemented") //To change body of created functions use File | Settings | File Templates.
    }

Monday, June 10, 2019

Android Studio shortcut to insert a Kotlin logging code using Live Template


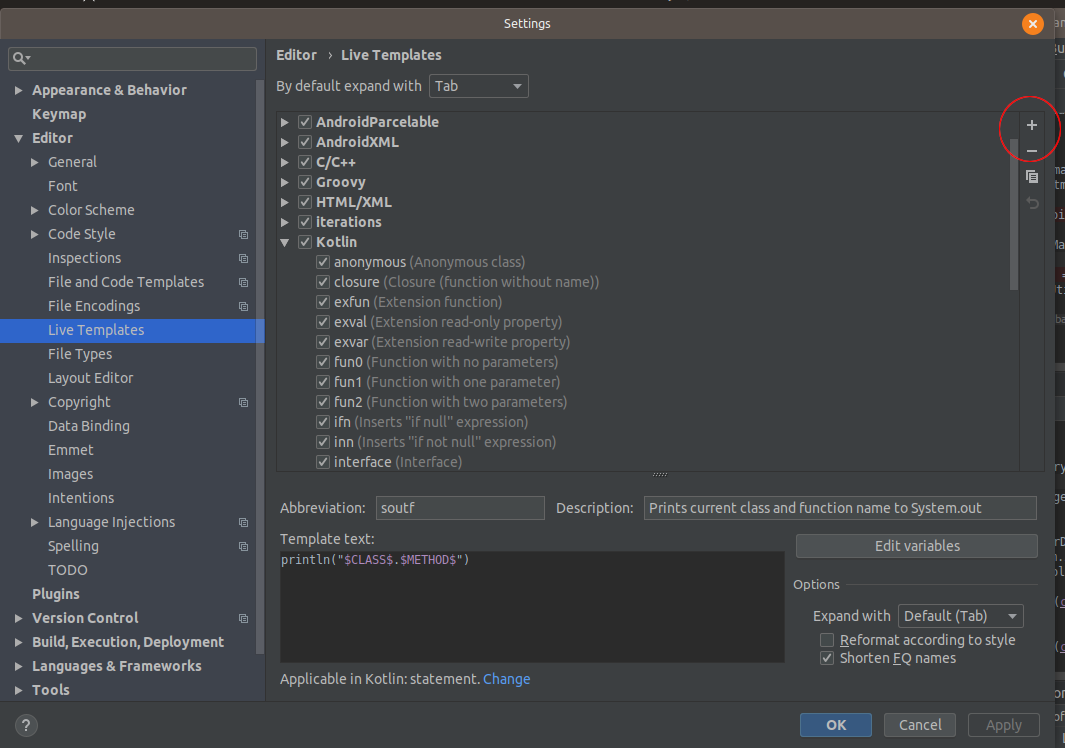
Android Studio has a Live Template system for storing predefined code templates which can be recalled via an abbreviation keyword and automatically inserted at the cursor location in the source code editor. This can ease the task of typing in frequently used code syntax.

In this example, a template with the abbreviation logd shall be created which will insert the following code at the cursor location when activated only within a Kotlin language file. Once the code is inserted, the cursor will be placed inside the quotation marks.

Log.d(TAG, "")

Do the following:
  1. In Android Studio, select File | Settings.

    The Settings dialog box appears.
     
  2.  Select Editor | Live Templates.

  3. Then click the + button on the right. Choose Live Template. In the Abbreviation field, type in the keyword, e.g. logd that will activate this template. In the Description field, type in a accurate value e.g. Log debug message.

  4. In the Template text field, type in the code syntax and/or any macro, e.g. Log.d(TAG, "$END$")

    Note: $END$ is a macro which will position the cursor after the template has been inserted.
  5. Next, click Define to choose the environment in which this template can be activated.

  6. In the popup, choose a language or group construct e.g. Kotlin. Click OK

    The template is created.
Now, to use the newly created template, open a Kotlin file in the code editor. Place the cursor on the location in the code and press CTRL-j on the keyboard. A pop up menu with a list of template keywords will appear.


Type in the keyword logd or choose the logd keyword with the mouse and press Enter. The template is inserted and the cursor placed between the quote marks as shown below.

Monday, April 22, 2019

Migrating Android support library Renderscript code to AndroidX

Android is deprecating the Support compatibility libraries  and replacing them with the new AndroidX libraries. To aid in the migration of Android projects using the deprecated support libraries, Android Studio has a Refactor to AndroidX tool. I used that to migrate an old Android project and while it works for the most part, it did not manage to migrate the files using the support renderscript classes; I presume that is because the AndroidX namespace does not have the equivalent renderscript classes.

To complete the migration to AndroidX, I had to do the following by hand:

  1. In all the code files using the android.support.v8.renderscript.* classes, replace them to android.renderscript.* as shown below.

  2. In the app's build.gradle file, upgrade the renderscriptTargetApi level to 17 and turn off the renderscript support mode (renderscriptSupportModeEnabled to false) as shown below.


  3. Save all the files and rebuild the project.

    The project should manage to sync and build successfully.
Note: At the time of writing, Android can only compile android.renderscript.* classes into 32 bit *.bc files. This may be a problem in future as Google Play is moving to apks that support 64 bit files. 

Monday, April 15, 2019

Speed up Android Studio startup by disabling unnecessary plugins

Android Studio loads a relatively large number of plugins on start up. Depending on your workflow, some of them may not be needed. For instance, if you don't use Subversion as your source code repository, then the Subversion plugin may not need to be loaded especially if your machine is slow or RAM is limited.

To disable plugins, do the following:

  1. Start Android Studio.


  2. In the Configure drop down menu at the bottom right, choose Plugins.

    The Plugins dialog box appears.

  3. Scroll down the list and toggle off the unneeded plugins e.g. CVS Integration. Click OK.

    The Prompt appears.

  4. Click Restart.

    Android Studio is restarted without the disabled plugins.

Monday, October 29, 2018

Setup CMakeLists.txt for Android Studio and OpenCV C++ coding

If you want to develop C++ code making use of Android and OpenCV classes, then you have to configure Android Studio's CMakeLists.txt build file accordingly.

Please follow the previous post https://dominoc925.blogspot.com/2018/10/how-i-setup-opencv4android-java-sdk.html to download and setup the OpenCV4Android Java SDK with and Android project before doing the following steps.
  1. In Android Studio, open up the app's build.gradle file.

    Note: the OpenCV native libraries are under the jniLibs directory relative to the app's build.gradle file according to the source set jniLibs srcDirs parameter.
     

  2. Enter the cmake cpp flags and platform abi filters  in the android defaultConfig externalNativeBuild section, as shown below.

    externalNativeBuild {
        cmake {
          cppFlags "-frtti -fexceptions"        
    
    abiFilters 'x86', 'x86_64', 'armeabi-v7a', 'arm64-v8a'
    }
    }

  3. Next, open up the CMakeLists.txt file in the editor.

     
  4. Add in the cmake macros to add in the path to the OpenCV C++ include files e.g. /path/to/OpenCV-android-sdk/sdk/native/jni/include/

     
  5.  Then, use the macro add_library to add the OpenCV library.

  6. Next, use the macro set_target_properties to tell CMake the location of the OpenCV library.

    set_target_properties(
         lib_opencv        
    
    PROPERTIES
    IMPORTED_LOCATION
    ${CMAKE_CURRENT_SOURCE_DIR}/jniLibs/${ANDROID_ABI}/libopencv_java3.so
    )


  7. Finally, link the OpenCV library with your code with the target_link_libraries macro.

The full sample of the CMakeLists.txt file is shown below.

# For more information about using CMake with Android Studio, read the
# documentation: https://d.android.com/studio/projects/add-native-code.html

# Sets the minimum version of CMake required to build the native library.

cmake_minimum_required(VERSION 3.4.1)

set (OPENCV4ANDSDK_INCLUDE
        /path/to/OpenCV-android-sdk/sdk/native/jni/include)
include_directories(
    ${OPENCV4ANDSDK_INCLUDE}
)
# Creates and names a library, sets it as either STATIC
# or SHARED, and provides the relative paths to its source code.
# You can define multiple libraries, and CMake builds them for you.
# Gradle automatically packages shared libraries with your APK.

add_library( # Sets the name of the library.
        native-lib

        # Sets the library as a shared library.
        SHARED

        # Provides a relative path to your source file(s).
        src/main/cpp/native-lib.cpp)
add_library(
        lib_opencv
        SHARED
        IMPORTED
)
set_target_properties(
        lib_opencv
        PROPERTIES
        IMPORTED_LOCATION
        ${CMAKE_CURRENT_SOURCE_DIR}/jniLibs/${ANDROID_ABI}/libopencv_java3.so
)

# Searches for a specified prebuilt library and stores the path as a
# variable. Because CMake includes system libraries in the search path by
# default, you only need to specify the name of the public NDK library
# you want to add. CMake verifies that the library exists before
# completing its build.

find_library( # Sets the name of the path variable.
        log-lib

        # Specifies the name of the NDK library that
        # you want CMake to locate.
        log)


# Specifies libraries CMake should link to your target library. You
# can link multiple libraries, such as libraries you define in this
# build script, prebuilt third-party libraries, or system libraries.

target_link_libraries( # Specifies the target library.
        native-lib

        # Links the target library to the log library
        # included in the NDK.
        ${log-lib}
        lib_opencv
        )


Monday, October 22, 2018

How I setup OpenCV4Android Java SDK with a blank Android project

Setting up an Android Studio project with OpenCV3 can be a little tricky. The official documentation is still using Eclipse and has not been updated with Android Studio. So setting up OpenCV with Android Studio required some trial and error experimentation. I managed to get a template Android Studio project to load the native OpenCV library with the following steps.

Download OpenCV4AndroidSdk
  1. If you have not done so, download OpenCV4Android from this website https://sourceforge.net/projects/opencvlibrary/files/opencv-android/
  2. Extract the files into a folder e.g. /path/to/Open-CV-android-sdk/
Create an Android Project with C++ Support
  1.  Run Android Studio. Choose Create a New Project.

  2. In the Create New Project dialog box, toggle on Include C++ support.
  3. Choose appropriate options and click Next in the following screens.
  4. Click Finish.

    The new project is created.
Import the OpenCV module into Gradle
  1. In the Android Studio File menu, select File | New | Import Module.

    The Import Module from Source dialog box appears.
  2. In the Source directory field, click the ... button and browse to the downloaded OpenCV4Android files and select the java folder e.g. /path/to/OpenCV-android-sdk/sdk/java/.
  3. Optional. In the Module name field, type in a name e.g. :opencv.
  4. Click Next and Finish.

    The module is imported (with most likely error messages)
  5. Options. You can download the missing dependencies by clicking the Install missing platforms and sync project link. Or you can edit the OpenCV4Android's build.gradle file to enter the installed dependencies.
Fix OpenCV4Android configuration files
  1. In Android Studio, open up the file build.gradle from the imported module opencv module e.g. /path/to/opencv/build.gradle. It may be necessary to change the Project pane to display as project view.

  2. In the editor, changed the compiledSdkVersion to 27 (or any installed version), the targetSdkVersion to 27 (or any installed version).
  3. Then sync the gradle project.

    The project is synced but now there is an error about the manifest file.
  4. Open up the manifest file /path/to/opencv/src/main/AndroidManifest.xml in the editor.

  5. Now, comment out the uses-sdk line as shown in the screenshot above.
  6. Sync the project again.

    The OpenCV module is successfully configured.
Add the OpenCV module as a dependency to the Android App project
  1. In Android Studio, select App in the Project pane.
  2. Select File | Project Structure.

    The Project Structure dialog box appears.
  3. Select app. Then click the Dependencies tab. Click +. Choose module dependency.
  4. Choose the imported Opencv module.

    OpenCV is appended to the list.
  5. Click OK.

    The module is added the Android App project.
Copy over the OpenCV native platform binaries to the Android App project
  1.  Open up a File Explorer. Select all the native platform folders under the /path/to/OpenCV-android-sdk/sdk/native/libs/*.

  2. Right click and select Copy.
  3. In Android Studio, right click on the app folder (in project view). Choose Paste.

    The Copy dialog box appears.
  4. In the To directory field, change the text to /path/to/myandroid/app/jniLibs/.
  5. Click OK.

    The native binaries are copied to the project.
  6. To enable the Android project to know where the native binaries are, open up the app's build.gradle file in the editor.

  7. Add in the android class, add in the following sourceSets lines:

    Note: 'jniLibs' means the jniLibs directory relative to this build.gradle file location.
    sourceSets {
        main {
            jniLibs.srcDirs = ['jniLibs']
        }
    }
  8. Sync the project.
Load the native library
  1.  In the MainActivity Kotlin class, type in the following to load in the OpenCV library.

    System.loadLibrary("opencv_java3")
  2. If everything is configured properly, then the Android app can be launched successfully.

    Now you can make any java/Kotlin calls to the built in OpenCV interfaces.