Showing posts with label Spring. Show all posts

Monday, November 30, 2015

An example of using an SQLite database in a Spring Hibernate application project

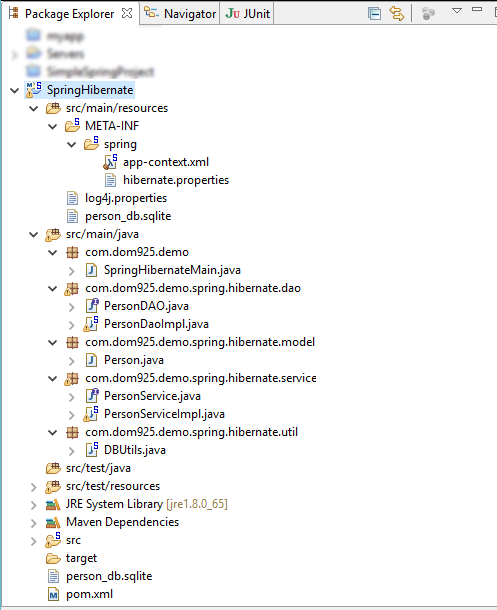
I wanted to use SQLite as an object relational model (ORM) database for a Spring Hibernate Java application. It turned out to be relatively simple to achieve. This post shows a simple example illustrating the project configuration, SQLite table creation, Java object definition, saving and retrieving a Java object into/from the database. The example project structure is shown in the screenshot below.


In order to prepare a Java application to work with SQLite as an ORM database, the following steps can be done:
  1. Add in the software dependencies to the project's Maven pom.xml
  2. Define Hibernate beans in the application context configuration file
Add in software dependencies to pom.xml
The following listing is an example pom.xml file.
Note that Hibernate, SQLite and Spring ORM dependencies have been appended to the dependencies element.

<?xml version="1.0" encoding="UTF-8"?>
<project xmlns="http://maven.apache.org/POM/4.0.0"
 xsi:schemaLocation="http://maven.apache.org/POM/4.0.0 http://maven.apache.org/maven-v4_0_0.xsd"
 xmlns:xsi="http://www.w3.org/2001/XMLSchema-instance">
 <modelVersion>4.0.0</modelVersion>
 <groupId>org.springframework.samples.spring</groupId>
 <artifactId>spring-hibernate-utility</artifactId>
 <version>1.0.0.CI-SNAPSHOT</version>
 <packaging>jar</packaging>
 <name>Spring Hibernate Utility</name>
 <url>http://www.springframework.org</url>
 <description>
  <![CDATA[This project is a minimal jar utility with Spring configuration for Hibernate.]]>
 </description>
 <properties>
  <maven.test.failure.ignore>true</maven.test.failure.ignore>
  <spring.framework.version>3.0.6.RELEASE</spring.framework.version>
 </properties>

 <dependencies>

  <dependency>
   <groupId>junit</groupId>
   <artifactId>junit</artifactId>
   <version>4.7</version>
   <scope>test</scope>
  </dependency>
  <dependency>
   <groupId>org.springframework</groupId>
   <artifactId>spring-test</artifactId>
   <version>${spring.framework.version}</version>
   <scope>test</scope>
  </dependency>
  <dependency>
   <groupId>org.springframework</groupId>
   <artifactId>spring-context-support</artifactId>
   <version>${spring.framework.version}</version>
  </dependency>
  <dependency>
   <groupId>org.springframework</groupId>
   <artifactId>spring-aop</artifactId>
   <version>${spring.framework.version}</version>
  </dependency>
  
  <!-- Dependencies for Hibernate and ORM  -->  
  <dependency>
   <groupId>com.h2database</groupId>
   <artifactId>h2</artifactId>
      <version>1.3.156</version>
  </dependency>
  <dependency>
   <groupId>org.springframework</groupId>
   <artifactId>spring-orm</artifactId>
   <version>${spring.framework.version}</version>
  </dependency>
  <dependency>
   <groupId>org.hibernate</groupId>
   <artifactId>hibernate-entitymanager</artifactId>
   <version>3.6.0.Final</version>
  </dependency>

  <!-- Dependencies for SQLite -->
  <dependency>
   <groupId>org.xerial</groupId>
   <artifactId>sqlite-jdbc</artifactId>
   <version>3.8.11.2</version>
  </dependency>
  <dependency>
   <groupId>net.kemitix</groupId>
   <artifactId>sqlite-dialect</artifactId>
   <version>0.1.0</version>
  </dependency>  
  
  <!--  
  <dependency>
   <groupId>hsqldb</groupId>
   <artifactId>hsqldb</artifactId>
   <version>1.8.0.10</version>
  </dependency>
   -->
  <dependency>
   <groupId>log4j</groupId>
   <artifactId>log4j</artifactId>
   <version>1.2.16</version>
  </dependency>
 </dependencies>

 <build>
  <plugins>
   <plugin>
    <groupId>org.apache.maven.plugins</groupId>
    <artifactId>maven-compiler-plugin</artifactId>
    <version>2.3.2</version>
    <configuration>
     <source>1.5</source>
     <target>1.5</target>
    </configuration>
   </plugin>
  </plugins>
 </build>

 <repositories>
  <repository>
   <id>org.jboss.repository.releases</id>
   <name>JBoss Maven Release Repository</name>
   <url>https://repository.jboss.org/nexus/content/repositories/releases</url>
   <snapshots>
    <enabled>false</enabled>
   </snapshots>
  </repository>

 </repositories>

</project>

Define Hibernate beans in the application context configuration file
The Spring Java application's context configuration file is located in the /path/to/project/src/main/resources/META-INF/spring/app-context.xml file. The beans SessionFactory, TransactionManager and the DataSource should at least be defined in the file as shown in the listing below.

Note: In this example listing, we configure Spring to scan for additional components under the package namespace com.dom925.demo.spring.


<?xml version="1.0" encoding="UTF-8"?>
<beans xmlns="http://www.springframework.org/schema/beans"
 xmlns:xsi="http://www.w3.org/2001/XMLSchema-instance" xmlns:context="http://www.springframework.org/schema/context"
 xmlns:tx="http://www.springframework.org/schema/tx" xmlns:jdbc="http://www.springframework.org/schema/jdbc"
 xsi:schemaLocation="
  http://www.springframework.org/schema/jdbc http://www.springframework.org/schema/jdbc/spring-jdbc-3.0.xsd
  http://www.springframework.org/schema/beans http://www.springframework.org/schema/beans/spring-beans-3.0.xsd
  http://www.springframework.org/schema/tx http://www.springframework.org/schema/tx/spring-tx-3.0.xsd
  http://www.springframework.org/schema/context http://www.springframework.org/schema/context/spring-context-3.0.xsd">

 <tx:annotation-driven transaction-manager="transactionManager" />

 <context:annotation-config/>
 
 <!-- Tell Spring where to scan for components -->
 <context:component-scan base-package="com.dom925.demo.spring" />
 
 <!-- Specify the Hibernate properties setting file -->
 <context:property-placeholder 
  location="classpath:META-INF/spring/hibernate.properties"/>

 <bean id="dataSource" 
  class="org.springframework.jdbc.datasource.DriverManagerDataSource">
  <property name="driverClassName" value="${jdbc.driverClassName}" />
  <property name="url" value="${jdbc.url}" />
  <property name="username" value="${jdbc.username}" />
  <property name="password" value="${jdbc.password}" />
 </bean>
 
 <bean id="sessionFactory" 
  class="org.springframework.orm.hibernate3.annotation.AnnotationSessionFactoryBean">
  <property name="dataSource" ref="dataSource" />
  <property name="annotatedClasses" value="com.dom925.demo.spring.hibernate.model.Person" />
  <property name="hibernateProperties">
   <props>
    <prop key="hibernate.dialect">${hibernate.dialect}</prop>
    <prop key="hibernate.show_sql">${hibernate.show_sql}</prop>
   </props>
  </property>
 </bean>
 
 <bean id="transactionManager" 
  class="org.springframework.orm.hibernate3.HibernateTransactionManager">
  <property name="sessionFactory" ref="sessionFactory" />
 </bean>
 
 <tx:annotation-driven transaction-manager="transactionManager"/>
</beans>

In this example, some of the Hibernate data source's JDBC properties are defined in a separate file /path/to/project/src/main/resources/META-INF/hibernate.properties file, as shown below.

Note: this example configures Spring to use a SQLite database named person_db.sqlite. Since the path is not defined, it will be created in /path/to/project/ directory.

jdbc.driverClassName=org.sqlite.JDBC
jdbc.url=jdbc:sqlite:person_db.sqlite
jdbc.username=
jdbc.password=

hibernate.dialect=org.hibernate.dialect.SQLiteDialect
hibernate.show_sql=true

At this point, the project configuration should be done. The next steps would be to write the Java classes and interfaces. In this example, the following classes are created.
  1. DBUtils.java
  2. Person.java
  3. PersonDaoImpl.java which implements the interface PersonDAO.java
  4. PersonServiceImpl.java which implements the interface PersonServiceImpl.java
DBUtils.java
When Spring initializes the Java application, the @PostConstruct annotation in this file will cause the initialize method to be executed. This method will recreate the SQLite database and table each time you run the application. 


package com.dom925.demo.spring.hibernate.util;

import java.sql.Connection;
import java.sql.SQLException;
import java.sql.Statement;

import javax.annotation.PostConstruct;
import javax.sql.DataSource;

import org.springframework.beans.factory.annotation.Autowired;
import org.springframework.stereotype.Component;

@Component
public class DBUtils {

 @Autowired
 private DataSource dataSource;
 
 @PostConstruct
 public void initialize(){
  try {
   Connection connection = dataSource.getConnection();
   Statement statement = connection.createStatement();
   statement.execute("DROP TABLE IF EXISTS PERSON_INFO");
   statement.executeUpdate(
     "CREATE TABLE PERSON_INFO(" +
     "ID INTEGER Primary key, " +
     "FIRST_NAME varchar(30) not null, " +
     "LAST_NAME varchar(30) not null)"
     );
   statement.executeUpdate(
     "INSERT INTO PERSON_INFO " +
     "(FIRST_NAME, LAST_NAME) " +
     "VALUES " + "('DONALD', 'TRUMP')"
     );
   statement.close();
   connection.close();
  }
  catch (SQLException e) {
   e.printStackTrace();
  }
 }
}

Person.java
Now we define the plain old Java object POJO class that we want to associate to a SQLite database table.

Note I: the Spring annotations @Entity and @Table specify the database table
Note II: the annotations @Column specify the database column name, and @Id define the primary key.


package com.dom925.demo.spring.hibernate.model;

import javax.persistence.Column;
import javax.persistence.Entity;
import javax.persistence.GeneratedValue;
import javax.persistence.GenerationType;
import javax.persistence.Id;
import javax.persistence.Table;

@Entity
@Table(name = "PERSON_INFO")
public class Person {

 @Id
 @Column(name = "ID")
 @GeneratedValue(strategy = GenerationType.IDENTITY)
 private Integer id;
 
 @Column(name = "FIRST_NAME")
 private String firstName;
 
 @Column(name = "LAST_NAME")
 private String lastName;
  
 public Integer getId() {
  return id;
 }
 public void setId(Integer id) {
  this.id = id;
 }
 public String getFirstName() {
  return firstName;
 }
 public void setFirstName(String firstName) {
  this.firstName = firstName;
 }
 public String getLastName() {
  return lastName;
 }
 public void setLastName(String lastName) {
  this.lastName = lastName;
 }
 @Override
 public boolean equals(Object obj){
  if (this == obj){
   return true;
  }
  Person person = (Person) obj;
  if (firstName != null ?
    !firstName.equals(person.firstName)
    :person.firstName != null){
   return false;
  }
  else {
   return true;
  } 
 }
 @Override
 public String toString() {
  return "Person [id=" 
    + id 
    + ", name=" 
    + firstName 
    + " " 
    + lastName 
    + "]";
 }
}

PersonDAO.java
This interface defines the interface for accessing the Person data.


package com.dom925.demo.spring.hibernate.dao;

import java.util.List;

import com.dom925.demo.spring.hibernate.model.Person;

public interface PersonDAO {

 public List<Person> getAllPersons();
 
 public void insertPerson (Person person);
}

PersonDaoImpl.java
This implements the interface defined by the PersonDAO.java file. Note the use of the Spring @Repository and @Transactional annotations for database related activities.


package com.dom925.demo.spring.hibernate.dao;

import java.util.List;

import org.hibernate.Query;
import org.hibernate.Session;
import org.hibernate.SessionFactory;
import org.springframework.beans.factory.annotation.Autowired;
import org.springframework.stereotype.Repository;
import org.springframework.transaction.annotation.Transactional;

import com.dom925.demo.spring.hibernate.model.Person;

@Repository
@Transactional(readOnly = true)
public class PersonDaoImpl implements PersonDAO {

 @Autowired
 private SessionFactory sessionFactory;

 
 public List<Person> getAllPersons() {
  Session session = sessionFactory.openSession();
  String hql = "FROM Person";
  Query query = session.createQuery(hql);
  List<Person> persons = query.list();
  return persons;
 }

 @Transactional(readOnly = false)
 public void insertPerson(Person employee) {
  Session session = sessionFactory.openSession();
  session.save(employee);
 }

}

PersonService.java
This file defines the interface for a service to access the Person data.


package com.dom925.demo.spring.hibernate.service;

import java.util.List;

import com.dom925.demo.spring.hibernate.model.Person;

public interface PersonService {

 public List<Person> getAllPersons();
 
 public void insertPerson(Person person);
}

PersonServiceImpl.java
This is an implementation of the interface defined in the PersonService.java file. Note the Spring @Service annotation.


package com.dom925.demo.spring.hibernate.service;

import java.util.List;

import org.springframework.beans.factory.annotation.Autowired;
import org.springframework.stereotype.Component;
import org.springframework.stereotype.Service;

import com.dom925.demo.spring.hibernate.dao.PersonDAO;
import com.dom925.demo.spring.hibernate.model.Person;


@Service
public class PersonServiceImpl implements PersonService {

 @Autowired
 private PersonDAO personDao;
 
 public List<Person> getAllPersons() {
  List<Person> persons = personDao.getAllPersons();
  return persons;
 }

 public void insertPerson(Person person) {
  personDao.insertPerson(person);
 }

}

SpringHibernateMain.java
Finally, the Java application's main method, which loads the application context, get a PersonService bean to add a new Person object to the database. Then print out the database contents to the screen.


package com.dom925.demo;

import org.springframework.context.ApplicationContext;
import org.springframework.context.support.ClassPathXmlApplicationContext;

import com.dom925.demo.spring.hibernate.model.Person;
import com.dom925.demo.spring.hibernate.service.PersonService;

public class SpringHibernateMain {

 public static void main(String[] args) {
  ApplicationContext context = 
    new ClassPathXmlApplicationContext(
      "/META-INF/spring/app-context.xml");
  PersonService personService = 
    context.getBean("personServiceImpl", PersonService.class);
  
  Person person = new Person();
  person.setFirstName("HILLARY");
  person.setLastName("CLINTON");
  personService.insertPerson(person);
  
  for (Person p : personService.getAllPersons()){
   System.out.println(p);
  }
 }
}
Example print out from the Spring application

A zip file containing the example project can be downloaded here.

Monday, November 9, 2015

Enable basic Spring Security authentication and authorization in a Google App Engine site

After some effort, I managed to get a Google App Engine project to work with a simple Spring Security authentication and authorization over a secure HTTPS protocol. In addition to Spring Core and Spring MVC, Spring Security needs to be installed and configured for the App Engine project.

Add Spring Security to the project's pom.xml file
  1. Open up the pom.xml in a text editor, e.g. C:\MyProject\myapp\pom.xml. Add in a convenience property for the Spring Security version.


  2. Add in the dependencies for Spring Security.
<!-- Spring security dependencies -->
<dependency>
	<groupId>org.springframework.security</groupId>
	<artifactId>spring-security-core</artifactId>
	<version>${spring.security.version}</version>
</dependency>    

<dependency>
	<groupId>org.springframework.security</groupId>
	<artifactId>spring-security-web</artifactId>
	<version>${spring.security.version}</version>
</dependency>    

<dependency>
	<groupId>org.springframework.security</groupId>
	<artifactId>spring-security-config</artifactId>
	<version>${spring.security.version}</version>
</dependency>

Add in the Spring Security filters and the security configuration file to web.xml
  1. Open up the configuration web.xml file e.g. C:\MyProject\myapp\src\main\webapp\WEB-INF\web.xml in a text editor.
  2. Add in the filter and filter mapping sections for Spring Security.


  3. Add in the name and location of the Spring Security configuration file e.g. C:\MyProject\myapp\src\main\webapp\WEB-INF\spring-security.xml in the context-param section as shown below.


An example of the resultant web.xml file

<?xml version="1.0" encoding="UTF-8"?>
<web-app version="2.5" xmlns="http://java.sun.com/xml/ns/javaee" xmlns:xsi="http://www.w3.org/2001/XMLSchema-instance" xsi:schemaLocation="http://java.sun.com/xml/ns/javaee http://java.sun.com/xml/ns/javaee/web-app_2_5.xsd">

	<context-param>
		<param-name>contextConfigLocation</param-name>
		<param-value>
		/WEB-INF/dispatcher-servlet.xml,
		/WEB-INF/spring-security.xml
      	</param-value>
	</context-param>

	<context-param>
		<param-name>log4jConfigLocation</param-name>
		<param-value>/WEB-INF/classes/log4j.properties</param-value>
	</context-param>

	<!-- Bootstrap the root application context as usual using ContextLoaderListener -->
	<listener>
		<listener-class>org.springframework.web.context.ContextLoaderListener</listener-class>
	</listener>

    <servlet>
        <servlet-name>dispatcher</servlet-name>
        <servlet-class>org.springframework.web.servlet.DispatcherServlet</servlet-class>
        <load-on-startup>1</load-on-startup>      
    </servlet>

    <servlet-mapping>
        <servlet-name>dispatcher</servlet-name>
        <url-pattern>/</url-pattern>
    </servlet-mapping>

	<!-- Add support for HTTPS -->
    <security-constraint>
        <web-resource-collection>
            <web-resource-name>MySecureSite</web-resource-name>
            <url-pattern>/*</url-pattern>
        </web-resource-collection>
        <user-data-constraint>
            <transport-guarantee>CONFIDENTIAL</transport-guarantee>
        </user-data-constraint>
    </security-constraint>

	<!-- For Spring Security -->
	<context-param>
		<param-name>contextConfigLocation</param-name>
		<param-value>/WEB-INF/spring-security.xml</param-value>
	</context-param>

	<filter>
		<filter-name>springSecurityFilterChain</filter-name>
		<filter-class>org.springframework.web.filter.DelegatingFilterProxy</filter-class>
	</filter>
	
	<filter-mapping>
		<filter-name>springSecurityFilterChain</filter-name>
		<url-pattern>/*</url-pattern>
	</filter-mapping>
	
</web-app>

Create the Spring Security configuration file spring-security.xml
  1. Use a text editor and create the Spring Security configuration file e.g. C:\MyProject\myapp\src\main\webapp\WEB-INF\spring-security.xml.

  2. Create an http element and add in one or more intercept-url elements to define which URLs you want to enable Spring Security, e.g. "/*" for all.


An example listing is shown below. This example enables security for all mappings from the root for any user with the role ROLE_ADMIN. There is only one user admin with the password admin authorized with the role ROLE_ADMIN. Add in more roles and users as required.

<beans:beans xmlns:beans="http://www.springframework.org/schema/beans"
	xmlns:xsi="http://www.w3.org/2001/XMLSchema-instance" xmlns="http://www.springframework.org/schema/security"
	xsi:schemaLocation="http://www.springframework.org/schema/beans 
	http://www.springframework.org/schema/beans/spring-beans.xsd
		http://www.springframework.org/schema/security 
		http://www.springframework.org/schema/security/spring-security-4.0.xsd">

	<http auto-config="true">
		<intercept-url pattern="/*" access="hasRole('ROLE_ADMIN')" />
	</http>
	
	<authentication-manager>
		<authentication-provider>
			<user-service>
				<user name="admin" password="admin" authorities="ROLE_ADMIN" />
			</user-service>
		</authentication-provider>
	</authentication-manager>
	
</beans:beans>

Code the Spring controller
  1. Develop the Java application logic for the Spring Controller. Add in the Spring annotations @Controller and map one or more methods to URLs using the @RequestMapping annotations as shown below.


package com.mycompany.myapp;

import org.springframework.stereotype.Controller;
import org.springframework.web.bind.annotation.RequestMapping;
import org.springframework.web.bind.annotation.RequestMethod;
import org.springframework.web.bind.annotation.ResponseBody;

@Controller
public class MySvc {
	@RequestMapping("/hello")
	public @ResponseBody String index(){
		return "Greetings from Spring Boot!";
	}	
}


Compile and deploy the application to Google App Engine. Now when the site URL e.g. https://myapp.appspot.com/hello is first accessed, a default Spring login prompt will appear.

If an incorrect user name or password is submitted, the authentication will fail.

If the correct user name and password is submitted, Spring Security will check the user's authorization for the requested URL. If it's in the user's role, then the URL will return the requested resource to the user as shown below.
 

Monday, October 12, 2015

Enabling HTTPS for a Spring Google App Engine deployment

Following the previous post on adding Spring to a Google App Engine application, I wanted to add support for the secure HTTPS protocol to the application. It is quite straightforward to do so by simply adding the security-constraint element to the application's web.xml file as shown below/

  1. Open up the web.xml file in a text editor e.g. c:\MyProject\myapp\src\main\webapp\WEB-INF\web.xml. Add in the following security-constraint elements.

    Note: the example below encrypts the application from the top parent url using the "/*" url pattern.

The development server can only use HTTP, so in order to check the results, the application must be deployed to Google App Engine. As shown below, the Chrome browser shows the HTTPS "padlock" while accessing a URL of the application.
 

Monday, October 5, 2015

Add Spring to a Google App Engine application

Spring is a Java based framework that takes a lot of work out from developing web applications that you can "just run". I tried to install Spring on Google's App Engine platform as a service (PAAS) but there are a few "gotchas".

Google App Engine runs the older Java 1.7 SDK and hence you must adjust the development environment accordingly. Java 1.8 cannot be used otherwise you will encounter no class found when trying to deploy your Spring application. The Servlet API should be version 2.5 only. Once you keep to the above versions, you only need to follow the steps below to add Spring to a skeleton Google App Engine template. For more information on creating the skeleton with Maven, see Google's documentation at https://cloud.google.com/appengine/docs/java/tools/maven.

Creating the skeleton

  1. Open up a Command Prompt. Change to a parent folder where you want to build the project, e.g. C:\MyProjects\.

    C:\> cd \MyProjects
  2. Type in the Maven command to create a skeleton.

    C:\> mvn archetype:generate -Dappengine-version=1.9.27 -Dapplication-id=your-app-id -Dfilter=com.google.appengine.archetypes:appengine-skeleton-archetype

  3. When prompted for the groupId, type in a name space, e.g. com.mycompany.myapp.
  4. When prompted for the artifactId, type in e.g. myapp.
  5. When prompted for the version, type in a value or accept the default.
  6. When prompted for the package, type in a value or accept the default.
  7. When prompted to confirm, type in Y.

    The skeleton is created.
Add the application's Java code and logic
  1. Using your favorite text editor or IDE, create the Java source code in the skeleton project's src\main folder , e.g. Application.java and MySvc.java.
    Application.java with Spring configuration annotations

    MySvc.java with Spring controller annotations. This just prints out a message "Greetings from Spring Boot" when invoked. 


Add in Spring configurations in the pom.xml file
  1. Open up the skeleton's pom.xml file in a text editor.
  2. In the properties section of the pom.xml file, add in a property for defining the Spring version for convenience.

    <spring.version>4.2.1.RELEASE</spring.version>
  3. In the dependencies section of the pom.xml file, add in the all the Spring dependencies you want to use in the application, making use of the Spring version property defined earlier.

    An example listing for the edited pom.xml file.
<?xml version="1.0" encoding="UTF-8"?>
<project xmlns="http://maven.apache.org/POM/4.0.0" xmlns:xsi="http://www.w3.org/2001/XMLSchema-instance" xsi:schemaLocation="http://maven.apache.org/POM/4.0.0 http://maven.apache.org/xsd/maven-4.0.0.xsd">
 
<modelVersion>4.0.0</modelVersion>
<packaging>war</packaging>
<version>1.0-SNAPSHOT</version>
 
<groupId>com.mycompany.myapp</groupId>
<artifactId>myapp</artifactId>
 
<properties>
<app.id>com.mycompany.myapp</app.id>
<app.version>1</app.version>
<appengine.version>1.9.27</appengine.version>
<gcloud.plugin.version>2.0.9.74.v20150814</gcloud.plugin.version>
<project.build.sourceEncoding>UTF-8</project.build.sourceEncoding>
<maven.compiler.showDeprecation>true</maven.compiler.showDeprecation>

<!-- Add a property for Spring -->
<spring.version>4.2.1.RELEASE</spring.version>
</properties>
 
<prerequisites>
<maven>3.1.0</maven>
</prerequisites>
 
<dependencies>
<!-- Compile/runtime dependencies -->
<dependency>
<groupId>com.google.appengine</groupId>
<artifactId>appengine-api-1.0-sdk</artifactId>
<version>${appengine.version}</version>
</dependency>
<dependency>
<groupId>javax.servlet</groupId>
<artifactId>servlet-api</artifactId>
<version>2.5</version>
<scope>provided</scope>
</dependency>
<dependency>
<groupId>jstl</groupId>
<artifactId>jstl</artifactId>
<version>1.2</version>
</dependency>
 
<!-- Test Dependencies -->
<dependency>
<groupId>com.google.appengine</groupId>
<artifactId>appengine-testing</artifactId>
<version>${appengine.version}</version>
<scope>test</scope>
</dependency>
<dependency>
<groupId>com.google.appengine</groupId>
<artifactId>appengine-api-stubs</artifactId>
<version>${appengine.version}</version>
<scope>test</scope>
</dependency>

<!-- Spring Dependencies -->
 
<dependency>
<groupId>org.springframework</groupId>
<artifactId>spring-aop</artifactId>
<version>${spring.version}</version>
</dependency>
 
<dependency>
<groupId>org.springframework</groupId>
<artifactId>spring-context</artifactId>
<version>${spring.version}</version>
</dependency>
 
<dependency>
<groupId>org.springframework</groupId>
<artifactId>spring-beans</artifactId>
<version>${spring.version}</version>
</dependency>
 
<dependency>
<groupId>org.springframework</groupId>
<artifactId>spring-context-support</artifactId>
<version>${spring.version}</version>
</dependency>
 
<dependency>
<groupId>org.springframework</groupId>
<artifactId>spring-core</artifactId>
<version>${spring.version}</version>
</dependency>
 
<dependency>
<groupId>org.springframework</groupId>
<artifactId>spring-expression</artifactId>
<version>${spring.version}</version>
</dependency>
 
<dependency>
<groupId>org.springframework</groupId>
<artifactId>spring-web</artifactId>
<version>${spring.version}</version>
</dependency>
 
<dependency>
<groupId>org.springframework</groupId>
<artifactId>spring-webmvc</artifactId>
<version>${spring.version}</version>
</dependency>


</dependencies>
 
<build>
<!-- for hot reload of the web application-->
<outputDirectory>${project.build.directory}/${project.build.finalName}/WEB-INF/classes</outputDirectory>
<plugins>
<plugin>
<groupId>org.codehaus.mojo</groupId>
<artifactId>versions-maven-plugin</artifactId>
<version>2.1</version>
<executions>
<execution>
<phase>compile</phase>
<goals>
<goal>display-dependency-updates</goal>
<goal>display-plugin-updates</goal>
</goals>
</execution>
</executions>
</plugin>
<plugin>
<groupId>org.apache.maven.plugins</groupId>
<version>3.1</version>
<artifactId>maven-compiler-plugin</artifactId>
<configuration>
<source>1.7</source>
<target>1.7</target>
</configuration>
</plugin>
<plugin>
<groupId>org.apache.maven.plugins</groupId>
<artifactId>maven-war-plugin</artifactId>
<version>2.4</version>
<configuration>
<archiveClasses>true</archiveClasses>
<webResources>
<!-- in order to interpolate version from pom into appengine-web.xml -->
<resource>
<directory>${basedir}/src/main/webapp/WEB-INF</directory>
<filtering>true</filtering>
<targetPath>WEB-INF</targetPath>
</resource>
</webResources>
</configuration>
</plugin>
 
<plugin>
<groupId>com.google.appengine</groupId>
<artifactId>appengine-maven-plugin</artifactId>
<version>${appengine.version}</version>
<configuration>
<enableJarClasses>false</enableJarClasses>
<version>${app.version}</version>
<!-- Comment in the below snippet to bind to all IPs instead of just localhost -->
<!-- address>0.0.0.0</address>
                    <port>8080</port -->
<!-- Comment in the below snippet to enable local debugging with a remote debugger
                         like those included with Eclipse or IntelliJ -->
<!-- jvmFlags>
                      <jvmFlag>-agentlib:jdwp=transport=dt_socket,address=8000,server=y,suspend=n</jvmFlag>
                    </jvmFlags -->
</configuration>
</plugin>
<plugin>
<groupId>com.google.appengine</groupId>
<artifactId>gcloud-maven-plugin</artifactId>
<version>${gcloud.plugin.version}</version>
<configuration>
<set_default>true</set_default>
</configuration>
</plugin>
</plugins>
<pluginManagement>
<plugins>
<!--This plugin's configuration is used to store Eclipse m2e settings only. It has no influence on the Maven build itself.-->
<plugin>
<groupId>org.eclipse.m2e</groupId>
<artifactId>lifecycle-mapping</artifactId>
<version>1.0.0</version>
<configuration>
<lifecycleMappingMetadata>
<pluginExecutions>
<pluginExecution>
<pluginExecutionFilter>
<groupId>
org.codehaus.mojo
</groupId>
<artifactId>
versions-maven-plugin
</artifactId>
<versionRange>
[2.1,)
</versionRange>
<goals>
<goal>
display-plugin-updates
</goal>
<goal>
display-dependency-updates
</goal>
</goals>
</pluginExecutionFilter>
<action>
<ignore></ignore>
</action>
</pluginExecution>
</pluginExecutions>
</lifecycleMappingMetadata>
</configuration>
</plugin>
</plugins>
</pluginManagement>
</build>
</project>

Modify the Servlet's web.xml  file to add in Spring configurations

  1. Open up the skeleton project's web.xml file in [project]\src\main\webapp\WEB-INF\ folder in a text editor.
  2. Add in sections for defining the Spring configuration context, listener, dispatcher sections.
  3. In the context-param section's contextConfigLocation param-name, define your controller's class name e.g. com.mycompany.myapp.Application.
  4. In the servlet section's contextConfigLocation init-param, define your controller's class name e.g. com.mycompany.myapp.Application.

    An example web.xml file is shown below
    .
<?xml version="1.0" encoding="UTF-8"?>
<web-app version="2.5" xmlns="http://java.sun.com/xml/ns/javaee" xmlns:xsi="http://www.w3.org/2001/XMLSchema-instance" xsi:schemaLocation="http://java.sun.com/xml/ns/javaee http://java.sun.com/xml/ns/javaee/web-app_2_5.xsd">
 
<context-param>
<param-name>contextClass</param-name>
<param-value>
org.springframework.web.context.support.AnnotationConfigWebApplicationContext
</param-value>
</context-param>
 
<context-param>
<param-name>log4jConfigLocation</param-name>
<param-value>/WEB-INF/classes/log4j.properties</param-value>
</context-param>
 
<!-- Configuration locations must consist of one or more comma- or space-delimited 
        fully-qualified @Configuration classes. Fully-qualified packages may also 
        be specified for component-scanning -->
<context-param>
<param-name>contextConfigLocation</param-name>
<param-value>com.mycompany.myapp.Application</param-value>
</context-param>
 
<!-- Bootstrap the root application context as usual using ContextLoaderListener -->
<listener>
<listener-class>org.springframework.web.context.ContextLoaderListener</listener-class>
</listener>
 
<servlet>
<servlet-name>dispatcher</servlet-name>
<servlet-class>org.springframework.web.servlet.DispatcherServlet</servlet-class>
<init-param>
<param-name>contextClass</param-name>
<param-value>org.springframework.web.context.support.AnnotationConfigWebApplicationContext</param-value>
</init-param>
<init-param>
<param-name>contextConfigLocation</param-name>
<param-value>com.mycompany.myapp.Application</param-value>
</init-param>        
</servlet>
 
<servlet-mapping>
<servlet-name>dispatcher</servlet-name>
<url-pattern>/*</url-pattern>
</servlet-mapping>
 
 
</web-app>


Building and deploying to the development server

  1. Open a Command Prompt. Change directory to the root of the skeleton project e.g. C:\MyProjects\myapp\.

    C:\> cd \MyProjects\myapp
  2. Type in the Maven build command.

    C;\gt; mvn clean install
  3. To run the Spring application in the Google App Engine development server, type in the command:

    C:\> mvn appengine:devserver


    The Spring example can be accessed from a browser as shown below.