Tuesday, June 30, 2009

Append Path variable during installation with Visual Studio

In my previous post, I mentioned that using the Microsoft Visual Studio Setup and Deployment Wizard's Registry Editor to add in your custom application's path to the system path environment variable has an unfortunate side effect - the uninstaller will delete the system path variable.

A better but longer way is to write your own custom action program to add in your custom application's path to the system path environment variable during installation. In the custom action program (I call it AddPath and I use C# in my example code), I call a SetPathVariable function from main as shown below to do the job.

class Program
{
static void Main(string[] args)
{
try
{
//Call this function to add in my custom application's location to the system path variable
SetPathVariable();
}
catch
{
}
finally
{
}
}

The SetPathVariable will read in the AddPath program's command line arguments to find the custom application's location.

#region public methods
public static void SetPathVariable()
{
//Read and place the command line arguments into a string array.
//The custom application path is the first argument.
string[] cmd_args = System.Environment.GetCommandLineArgs();

//Now call this function to append the custom application's folder
//to the system Path environment variable
AppendPathVariable(cmd_args[0]);
}


public static void AppendPathVariable(string appPath)
{
try
{
//Filter custom application's path
string loc = GetPathOnly(appPath);
//Get the current value of the Path environment variable
string Value = System.Environment.GetEnvironmentVariable("Path", EnvironmentVariableTarget.Machine);

//Only append the custom application's path if it is not already in
//the system Path environment variable.
if (Value.ToUpper().Contains(loc.ToUpper()) == false)
{
Value = Value + ";" + loc;
System.Environment.SetEnvironmentVariable("Path", Value, EnvironmentVariableTarget.Machine);
}
}
catch (Exception ex)
{
Console.WriteLine(ex.Message);
Console.WriteLine(ex.StackTrace);
}
}

//This function simply ensures that the input string is a valid
//path string
public static string GetPathOnly(string url)
{
string outputStr = string.Empty;
string ipurl = url;
char[] delimiter = { '\\'};
string[] values = ipurl.Split(delimiter);
for (int i = 0; i <values.Length - 1; i++)
{
if (i == 0)
{
outputStr = values[i];
}
else
{
outputStr = outputStr + @"\" + values[i];
}
}
return outputStr;
}
#endregion
}

In the Setup and Deployment project, you need to add in this AddPath executable in the Custom Actions Commit phase as shown in the figure below.
In addition, you have to set the Arguments property for AppPath to “[OriginalDatabase]<>[TARGETDIR]<>[ComputerName]", as shown below.
Now your installer will be able to add in your custom application's path to the System Path environment variable correctly without having it deleted by the uninstaller.

Monday, June 22, 2009

Update the Windows Path with Visual Studio Setup and Deployment Wizard (with caveats)

Microsoft Visual Studio.NET 2003/2008 has a setup and deployment wizard which you can use to create installers for your custom applications. During the installation of your application, you might want your installer to automatically add in the path to your custom application executable to the Windows system path.

The Visual Studio setup and deployment project has a Registry Editor which you can use to get your installer to add in your application registry keys and values. For instance, by using the Registry Editor, you can add in the registry keys under HKEY_LOCAL_MACHINE to set the Windows Path.

Underneath \\HKEY_LOCAL_MACHINE\System\CurrentControlSet\Control\Session Manager\Environment keys, you can add in a Environment String Path value with the string "[%Path];[TARGETDIR]", as shown below.
Once that is done, your installer will automatically set the Windows environment Path variable to include the path to your custom application's executable.

But there is a problem with this method: when you uninstall your custom application, the uninstaller will remove the Path string from the Registry. A better approach would be to create a small Custom Action program to add modify the Registry instead. I will post details about that method later here.

Wednesday, June 3, 2009

How to wait for a VB6-like executable

If you have written any VB6 and earlier programs for running in the Windows Command prompt as batch programs, you would have noticed that control is returned back to you or your calling script almost immediately after execution. There is no convenient way to know when the program execution has completed before executing the next line in your calling script. Global Mapper is an example executable that exhibits the same behavior but it has its batch execution engine that lets you get around this issue.

I have written a C# wrapper program that will wrap around executables that behave like VB6 executables. The wrapper program essentially works like this:
  1. Before starting up an instance of the executable, get a list of all running processes that have the same executable name.
  2. Start up an instance of the executable.
  3. Get a second list of all running processes that has the same executable name.
  4. If the second list has a process id that is not in the first list, then that is my executable instance.
  5. In a while loop, periodically check to see whether my executable instance is still running in the process list. If it is not in the running list, then exit from the loop and return to the calling method.
Example c# code snippets are shown below. The example requires the System.Collections, System.Threading, System.Runtime.InteropServices name spaces.

using System;
using System.Collections.Generic;
using System.Linq;
using System.Text;
using System.IO;
using System.Diagnostics;
using System.Collections;
using System.Threading;
using System.Runtime.InteropServices;

class VB6ExeWrapper
{
//This array list will store the list of running vb6exe processes before
//we run our own instance of vb6exe executable
private ArrayList _vb6exeProcesses = null;

//Declare the name of the vb6exe executable we want to run
private string _VB6ExeProcessName = "vb6exe";

#region public properties
public string Vb6ExeProcessName
{
get { return this._VB6ExeProcessName; }
set { this._VB6ExeProcessName = value; }
}
#endregion

#region public methods
public void Execute()
{
ProcessStartInfo Vb6ExeStartInfo = null;
Process theProc = null;
int myProcId = 0;
try
{
//Before invoking our vb6exe executable, get a list of vb6exe processes currently running
_vb6exeProcesses = new ArrayList();
foreach (Process proc in Process.GetProcessesByName(_VB6ExeProcessName))
_vb6exeProcesses.Add(proc.Id);

//Now we can startup our own instance of vb6exe
Vb6ExeStartInfo = new ProcessStartInfo(_VB6ExeProcessName);
Vb6ExeStartInfo.UseShellExecute = false;
theProc = Process.Start(Vb6ExeStartInfo);

//The vb6exe process has started. Now get a new list of vb6exe processes running.
//Compare that with the first list to determine the process id of our own
//vb6exe instance.
foreach (Process proc in Process.GetProcessesByName(_VB6ExeProcessName))
if (!_vb6exeProcesses.Contains(proc.Id))
{
//this is my vb6exe process!
myProcId = proc.Id;
}

//Use a threaded endless loop to periodically check whether our vbexe instance
//is still running. If it is no longer in the process list, then
//exit the loop
while (isProcessRunning(myProcId) == true)
{
//pause this program thread for 1500 milliseconds
Thread.Sleep(1500);
}
}
catch (Exception ex)
{
throw ex;
}
}
#endregion
#region private methods
private bool isProcessRunning(int procId)
{
bool status = true;
Process proc = null;
try
{
proc = Process.GetProcessById(procId);
if (proc == null)
status = false;
}
catch (Exception ex)
{
status = false;
}
return status;
}
#endregion
}

To use the wrapper, in the calling program code, the following lines of code are sufficient.

wrapper = new VB6ExeWrapper();
wrapper.Execute();
//The next line in the code will be executed only when the wrapper.Execute() method has finished.

Thursday, May 21, 2009

Close "unclosed" polygons with FME

Sometimes I get ASCII text files of polygons but with unclosed vertices. What I mean is that the first point and last point of the polygon in the ASCII file are not the same. An example is shown in the figure below.
When I load this polygon ASCII file into Global Mapper or GeoMedia, the polygon is displayed as an unclosed line string. An example is shown in the figure below.
To close such cases of unclosed polygons, I decided to use FME 2009. Here are the steps I took to form a close polygon from the unclosed polygon ASCII file. There is a LineCloser Transformer in FME that will do the job.
  1. Start up the FME Workbench by selecting Start > All Programs > FME > FME Workbench. Choose to work with the Translation Workspace Wizard.

    The Create Translation Workspace Wizard dialog box appears.


  2. In the text box, choose Comma Separated Value (CSV) as the source data format. Click Next.

    The Locate Source Data page appears.
  3. Browse or type in the location and name of the source ASCII file e.g. C:\Temp\polygon.csv. Click Settings.

    The Input Settings for Comma Separated Value dialog box appears.


  4. In the Separator character drop down list, choose space. Click OK. Click Next.

    The Select Destination Format page appears.


  5. Choose ESRI Shape. Click Next until the Wizard is completed.

    The Workbench is filled in with the source and destination datasets.

  6. In the FME Workbench, add in the 2DPointAdder, PointConnector, LineCloser Transformers. Connect them to the source and destination datasets as shown in the figure below.

  7. Open up the 2DPointAdder Parameters.

  8. In the X Value drop down list, choose col0. In the Y Value drop down list, choose col1. Click OK.

  9. Open up the destination dataset Feature Type Properties.

  10. In the Allowed Geometries drop down list, choose shape_polygon. Click OK.
  11. Run the translation.

    The unclosed polygon ASCII file is transformed to a closed polygon in Shapefile format.

Import Text File as area polygons in Global Mapper

Sometimes I have ASCII text files that contain XY coordinates defining the outline of polygons. An example is my polygoncoords.txt file shown in the figure below. Typically it has the polygon vertices listed from the first point to the last point, with the last point having the same XY coordinates as the first point. 
It is not clear how you can load this kind of polygon ASCII text file in Global Mapper as area geometry features. If you use the Global Mapper's Open Generic ASCII Text File command, it will be loaded as a line vector feature. I had to dig around before I found out how to load it as a polygon vector feature. Here is how I did it.
  1. Open up the polygon ASCII text file in your favorite text editor and add in the following line at the top:

    CLOSED = YES


    Note: I also added NAME=My Polygon in the example above. This line simply tells Global Mapper to create and display the label "My Polygon".

  2. Close and save the text file.

  3. In Global Mapper, select File > Open Generic ASCII Text File(s).

    The Open dialog box appears.


  4. In the Open dialog box, browse or type in the polygon ASCII text file in the File name field. Click Open.

    The Generic ASCII Text File Import Options dialog box appears.


  5. In the Generic ASCII Text File Import Options dialog box, ensure that the Point, Line, and Area Features option is on. Click OK

    The Select Projection for dialog box appears.


  6. Define an appropriate coordinate system. Click OK.

    The area vector feature is created and displayed in Global Mapper.


  7. If you use the Tools > Feature Info tool and click on the polygon, the polygon is highlighted as shown in the figure below. Note that the Feature Information dialog is showing that the Feature Type is an area type. 

Friday, May 15, 2009

Create labels in Global Mapper 10

I wanted to display the shape file's attribute values as labels in the Global Mapper's map display and I had some difficulty in figuring out how to do it. For instance, I have these grid shapes that I wanted to label with the grid shape's attribute field GRIDAB value on the screen as shown in the figure below. 
These steps are how I got Global Mapper to display the attributes as labels.
  1. In Global Mapper 10, select Tools > Control Center.

    The Overlay Control Center dialog box appears.


  2. In the Overlay Control Center dialog box, select the overlay feature you want to label, e.g. grid.shp.

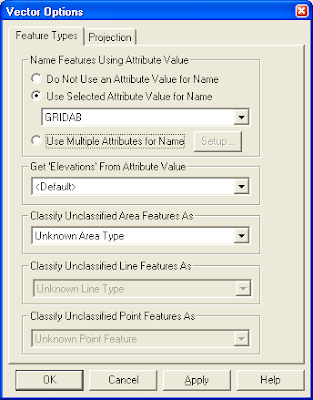
  3. Click Options.

    The Vector Options dialog box appears.


  4. Toggle on Use Selected Attribute Value for Name. In the drop down list, choose the attribute field for labelling e.g. GRIDAB.

  5. Click OK.

    The vector overlay is labeled with the attribute values.

Note that you can also string more than one attribute fields to form the labels.  In the Vector Options dialog box, toggle on Use Multiple Attributes for Name


This will bring up the Attribute Naming Setup dialog box. Simply select the attributes you want under Available Attributes then click Add to form the Attributes in Name on the right side. You can choose the separator between the attribute values in the box as shown below. 

Click OK. This will create the labels as defined in the map display as shown below. 

Thursday, May 7, 2009

Connecting and display a text file in GeoMedia

It is easy for GeoMedia to connect and display the contents of text files. The hard part is defining the format of the text file and I have covered that in my previous post. To connect to a CSV text file as shown in the screen shot below, simply do the following steps:
  1. In GeoMedia, select Warehouse > New Connection.

    The New Connection dialog box appears.


  2. Under Connection type, choose Text File.

  3. In the Connection name field, type in a connection name (optional) or use the default. 

  4. In the Input text file field, click Browse. 

    The Select an Input Text file dialog box appears.

  5. In the File name field, select or key in the text file name. Click Open.

  6. In the Text format definition field, click Browse.

    The Select a Text format definition file dialog box appears.


  7. Select or key in the name of the text file server format definition file you have defined earlier ( as created in my previous post). Click Open.

    The New Connection dialog box should look similar to this.


  8. Click OK.

    The text file connection is created and opened.
To display the text file contents, you can use the standard GeoMedia commands such as New Data Window as shown below.
  1. Select Window > New Data Window.


  2. Expand the text file connection and select a text feature. Click OK.

    The text file contents is displayed in the Data Window.